- Buffalo Plaid embossing folder
- Merry Mice stamp set & coordinating dies
- Season's Greetings stamp set & coordinating dies (pine needles)
- Snowflake Circle Frame die
- Christmas Garland Frame die (merry)
- Rainbow Pearls
I wanted a subtle embossed
background to create a very soft card. I achieved this effect by using
embossing pads (both of them) on top of the buffalo plaid embossing folder and using Tab 1 on
my Big Shot.
I first die cut multiples of the circle and merry and layered them for a thick dimensional effect. Next, I stamped the mice, colored with Copic markers, cut out with the coordinating dies, gluing under the glitter circle and trimmed off the bottoms.
I first die cut multiples of the circle and merry and layered them for a thick dimensional effect. Next, I stamped the mice, colored with Copic markers, cut out with the coordinating dies, gluing under the glitter circle and trimmed off the bottoms.
I then heat embossed
the pine needles in green and cut out using the coordinating dies placing them under the circle frame
with glue dots.
To finish the card, I created a banner by heat embossing the sentiment in white, inking with shabby shutters and placing the merry above. I added a few pink pearls for a pop of color.
To finish the card, I created a banner by heat embossing the sentiment in white, inking with shabby shutters and placing the merry above. I added a few pink pearls for a pop of color.
Thank you for visiting
with me and just a heads up, Sunny Studio Stamps is participating in the 25 Days of
Christmas Tags and you can visit Tracey McNeely's blog to see the amazing tags created by the
talented Sunny Studio Design Team on Sunday, November
10th!
----------------------------------------------
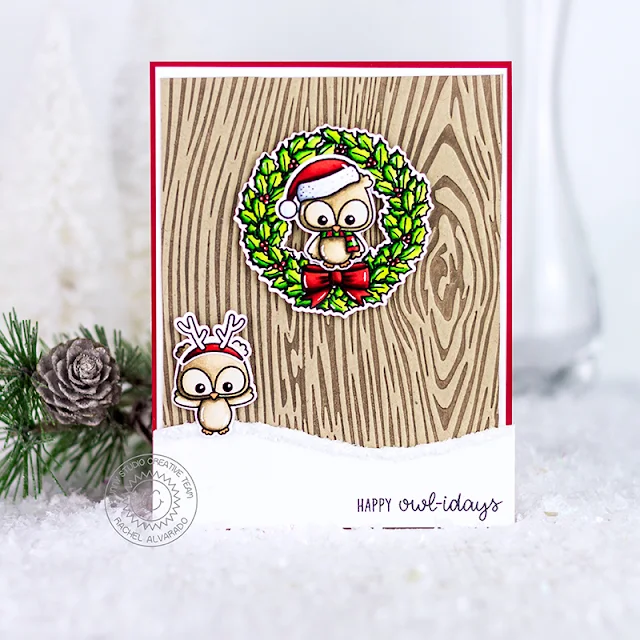
Hello friends! It's Rachel here and I have a Christmas card to share with you today that features the new Woodgrain Embossing Folder. This embossing folder is amazing! I love the texture that it provides.
----------------------------------------------
Hello friends! It's Rachel here and I have a Christmas card to share with you today that features the new Woodgrain Embossing Folder. This embossing folder is amazing! I love the texture that it provides.
To get the two-toned look that I
have on my card today, I stamped some brown ink onto the inside (smooth side)
of my embossing folder. I then ran it through my machine once using a 4" x
5.25" of Kraft Card Stock. I then stamped my images from the Happy Owlidays Set with Memento Tuxedo
Black Ink onto a sheet of Neenah Solar White 110lb Card Stock. I used the
coordinating Happy Owlidays Die Set to cut them out.
I die cut a piece of white card stock using one of the Woodland Border Dies to create a snow
border. Prior to attaching it to my card, I stamped my sentiment in the lower
right corner and then added some sparkly white glitter to the top of this snow
drift with some liquid adhesive. Although it doesn't photograph well, it gives
the snow some gorgeous texture. Lastly, I adhered my images to the front of my
card using some 3D Foam Adhesive Squares.
I hope you enjoyed my card today! Thanks so much for stopping by!
I hope you enjoyed my card today! Thanks so much for stopping by!
Sunny Studio Supplies Used:
 Woodland Borders Dies Shop at: Sunny Studio |
 Happy Owlidays Stamps Shop at: Sunny Studio |
 Happy Owlidays Dies Shop at: Sunny Studio |
 Buffalo Plaid Embossing Shop at: Sunny Studio |
 Woodgrain Embossing Shop at: Sunny Studio |
 Season's Greetings Stamps Shop at: Sunny Studio |
 Season's Greetings Dies Shop at: Sunny Studio |
 Merry Mice Stamps Shop at: Sunny Studio |
 Merry Mice Dies Shop at: Sunny Studio | |
 Snowflake Circle Frame Shop at: Sunny Studio |
 Christmas Garland Frame Shop at: Sunny Studio |


Cute cards!
ReplyDeleteRosalie
Thank you Rosalie!
ReplyDelete