Showing posts with label Everything's Rosy. Show all posts

Thursday, May 29, 2025

Everything's Rosy Card with Marine

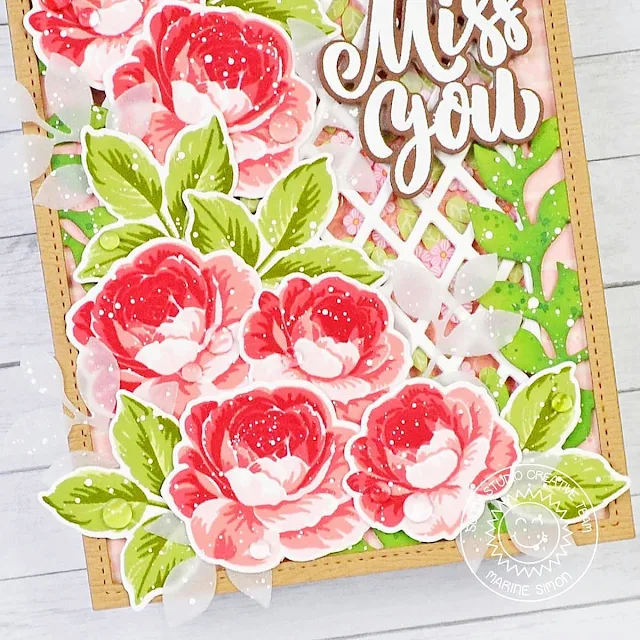
Hello crafty friends, Marine here, I'm very happy to be back with something different than I usually do. I mean, you know that I'm a "the busier the merrier" type of girl with lots and lots of critters. Well, today I'm sharing this floral shaker card showcasing the gorgeous Everything's Rosy stamp set, and I had a blast creating all those beautiful roses and foliage with this layering stamp set!

Sunny Studio Stamps: Everything's Rosy Miss You card by Marine Simon (featuring Big Bold Greetings, Frilly Frame Dies, Stitched Rectangle Dies, Spring Greenery Dies)

And speaking of which, I started off by stamping the roses and leaves, using all the layers, along with Lawn Fawn premium dye inks and Altenew crisp dye inks. For the roses, light to dark I used frosty pink (Alt.) + peachy keen (LF) + guava (LF) + lobster (LF) + raspberry (LF). And for the leaves, light to dark I used frayed leaf (Alt.) + forest glades (Alt.) + moss (Alt.)

I cut all the images using the matching dies, mixed some copic opaque white ink with water and used a slim brush to add splatters to each rose and piece of greenery, and set them aside to dry. I also cut additional pieces of greenery out of vellum using Spring Greenery dies, added white ink splatters to each piece and set them aside as well for later.

Next I cut a 5,5 x 4,25 inches Strathmore bristol smooth panel, and started by covering it with tattered rose oxide ink. I added a brick pattern to my panel using a brick stencil from stash along with saltwater taffy oxide ink, splattered water all over the panel and dried it with a paper towel, mixed some worn lipstick oxide ink with water and added more splatters to the panel, and then did the same with copic opaque white ink.

Sunny Studio Stamps: Everything's Rosy Miss You card by Marine Simon (featuring Big Bold Greetings, Frilly Frame Dies, Stitched Rectangle Dies, Spring Greenery Dies)

Once my panel was dry, I cut an opening out of it right in the center using the second largest Stitched Rectangle die, kept the frame piece only, and added a piece of acetate at the back of my brick frame using liquid glue. And I wanted my roses to be climbing up on a lattice, so I cut three white panels using the same die I used to create the opening, and cut a lattice design out of each white panel using the Frilly Frame Lattice die set. I layered the three lattice panels on top of each other using liquid glue to create a little bit of dimension, and then attached my lattice panel in the middle of my brick panel, right on the acetate using liquid glue again.

I flipped my brick panel over, added foam strips along the opening, close to the edges, and on the edges of the panel as well. I poured a lot of Pink Blossoms confetti inside the acetate opening, peeled all the foam strips backing papers off, and then closed my shaker panel with a Flirty Flowers pink panel.

Next, back to the front of the brick panel. Along with my climbing roses, I wanted to add some extra foliage, so I cut a Botanical Backdrop panel out of green cardstock, added some rustic wilderness oxide ink to darken some spots, mixed that same ink with water and added splatters to the leaves, did the same with copic opaque white ink, and attached this leafy panel to my brick panel using 1mm foam squares.

Sunny Studio Stamps: Everything's Rosy Miss You card by Marine Simon (featuring Big Bold Greetings, Frilly Frame Dies, Stitched Rectangle Dies, Spring Greenery Dies)

Before attaching the roses and leaves, I wanted to frame my panel with wood, so I used the Tropical Trees die set to cut my frame out of light brown woodgrain cardstock, attached it to my panel using liquid glue, and then finally stuck the roses and leaves using 1mm and 2mm foam squares, and the vellum greenery using liquid glue. For my greeting, I white heat embossed "Miss you" from Big Bold Greetings on dark brown cardstock, cut it using the matching die, and attached it to my panel using foam squares again. I attached my panel to a white card base, and to finish my card I added a scattering of clear droplets from my stash for shine and brightness.

And that's it! I hope that you like this card as much as I enjoyed creating it. It was pretty amazing to see those beautiful roses come to life layer after layer, and it was super easy to line everything up! Thanks so much for stopping by, and see you next week!

Sunny Studio Supplies Used:

Stitched Rectangle Dies
Shop at:
Sunny Studio
Flirty Flowers 6x6 Paper
Shop at:
Sunny Studio
Everything's Rosy Stamps
Shop at:
Sunny Studio
Everything's Rosy Dies
Shop at:
Sunny Studio
Frilly Frames Lattice Dies
Shop at:
Sunny Studio
Spring Greenery Dies
Shop at:
Sunny Studio
Tropical Trees Backdrop
Shop at:
Sunny Studio
Big Bold Greetings Stamps
Shop at:
Sunny Studio
Big Bold Greetings Dies
Shop at:
Sunny Studio
Botanical Backdrop Die
Shop at:
Sunny Studio

Monday, May 19, 2025

Everything's Rosy & Potted Rose Floral Cards with Mendi

Hello and welcome! This is Mendi here today, popping in to share some floral rose-themed cards using our Everything's Rosy Stamps and Potted Rose Stamps.

Sunny Studio Floral Birthday Card Set using Everything Rosy, Potted Rose, & Lovey Dovey Stamps and Blooming Frame Dies

For my first card, I paired the layered stamp images from our Everything's Rosy Stamps with the smaller blossom and leaf from the Potted Rose Stamps to adorn the bottom-left and top-right corners. For my card background, I turned to our Blooming Frame Dies. I used the die without a shim, which helped keep the pieces in place. I also quickly adhered them all to a piece of printer paper with liquid adhesive to help keep the pieces intact. After I had done this, I inked up my background using the same dye inks I had used to ink my leaves, fading it towards the center. Finally, I die-cut the "Happy Birthday" phrase from white cardstock using the same die set to place in the center.

Sunny Studio Floral Rose Birthday Card using Everything Rosy & Potted Rose Clear Stamps and Blooming Frame Metal Craft Dies

For my next card, I used the same small blossom and leaf from the Potted Rose Stamps to completely cover a 1.5" strip of green cardstock. The green base meant that even if small sections peeked through, it would blend in with the leaves and contrast nicely with the white cardstock from my overlapping card panels. I then die-cut a stitched edge to frame each side of my strip (to give the appearance that it's cut away to reveal the bottom floral layer) using our Ribbon & Lace Border Dies. Lastly, I stamped the sentiment "You Are So Lovely" from our Lovey Dovey Stamps using VersaFine Onyx Black Ink, which I also heat embossed with clear embossing powder to give it a bit of shine and make it stand out crisply. I really love how this clean and simple design turned out!

Sunny Studio Floral "You Are So Lovely" Card using Potted Rose & Lovey Dovey Clear Stamps, Ribbon & Lace Border Craft Dies

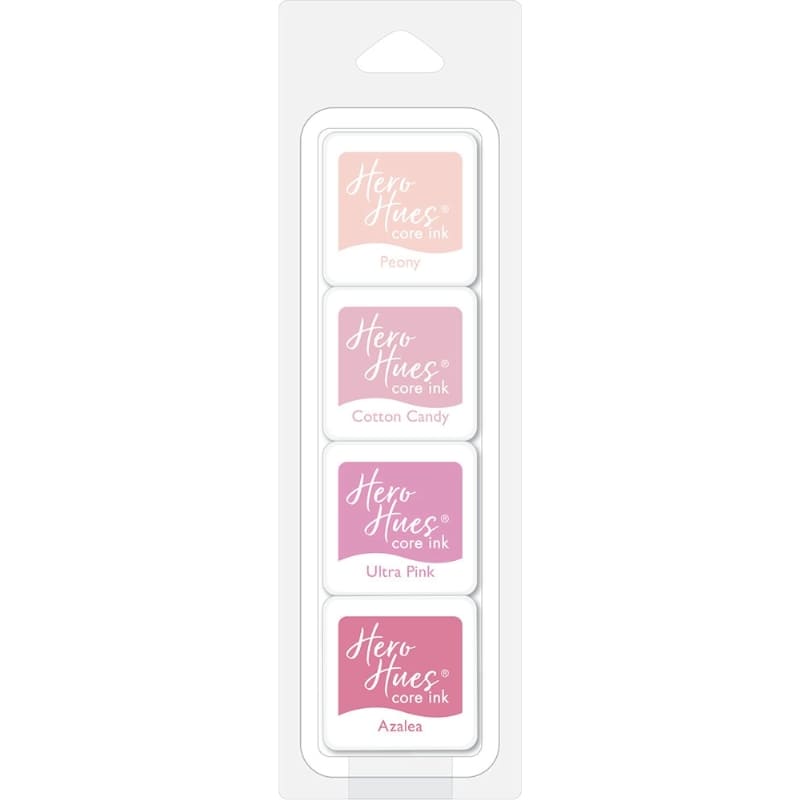
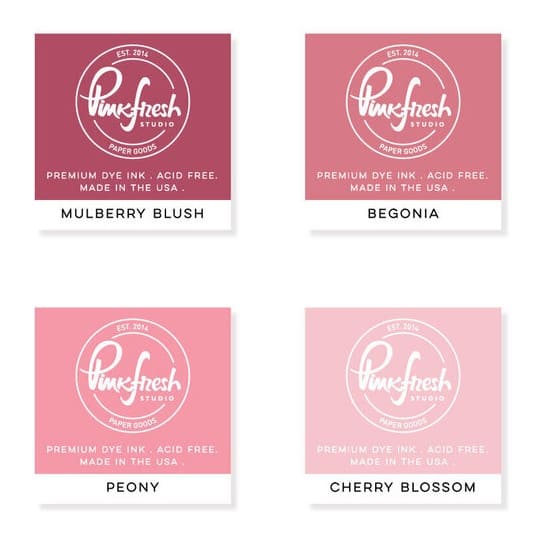
I am frequently asked which ink colors I used for my layered images. Some of these images were previously stamped using now-retired Colorbox inks; however, I spent considerable time trying to find the closest matches to share them here with you (from lightest to darkest).

Pink Roses
Gina K Bubblegum Pink
Hero Arts Ultra Pink
Versafine Charming Pink
Gina K Passionate Pink

Peach Roses
Hero Arts Peony
PinkFresh Cherry Blossoms
PinkFresh Coral Reef
PinkFresh Peony

Pinkish-Red Roses
Gina K. Dusty Rose
Versafine Glamorous
PinkFresh Candy Apple
PinkFresh Mulberry Blush

Olive Green Leaves (Card no. 1)
Gina K. Key Lime
Gina K. Jelly Bean Green

Stampin' Up Old Olive

Medium Green Leaves  (Card no. 2)
Hero Arts Green Hills
PinkFresh Key Lime
PinkFresh Olive


Dark Green Leaves  (Card no. 2)
Gina K. Lucky Clover
PinkFresh Olive
PinkFresh Evergreen

That wraps up my projects for this morning. I hope I've inspired you in your own cardmaking and that you spread a little happiness by sending out a card to a loved one today.💛

Don't forget to check out our Potted Rose Stamps and Blooming Frame Dies in our online shop, which are currently on sale Also, please check out all the card ideas using these sets on each of their product pages. I always make sure to upload tons of card ideas following the product image so there are lots of ideas to scroll through there organized by set.

Supplies Used:

Versafine Onyx Black Ink
Shop at:
Sunny Studio
Everything's Rosy Stamps
Shop at:
Sunny Studio
Everything's Rosy Dies
Shop at:
Sunny Studio
Blooming Frame Die
Blooming Frame Die
Shop at:
Sunny Studio
Potted Rose Stamps
Potted Rose Stamps
Shop at:
Sunny Studio
Potted Rose Dies
Potted Rose Dies
Shop at:
Sunny Studio
Lovey Dovey Stamps
Lovey Dovey Stamps
Shop at:
Sunny Studio
Lovey Dovey Dies
Lovey Dovey Dies
Shop at:
Sunny Studio
Hero Arts Pinks Core Ink
Shop at:
Sunny Studio
PinkFresh Rose Garden Ink
Shop at:
Sunny Studio
PinkFresh Heartbeat Ink
Shop at:
Sunny Studio
PinkFresh Over The Hills Ink
Shop at:
Sunny Studio
Ribbon & Lace Dies
Ribbon & Lace Dies
Shop at:
Sunny Studio
Hero Arts Ultra Fine Clear
Shop at:
Sunny Studio
Tsukineko Jumbo Dauber
Shop at:
Sunny Studio

Sunday, July 9, 2023

Notebook Die Focused Card with Cathy

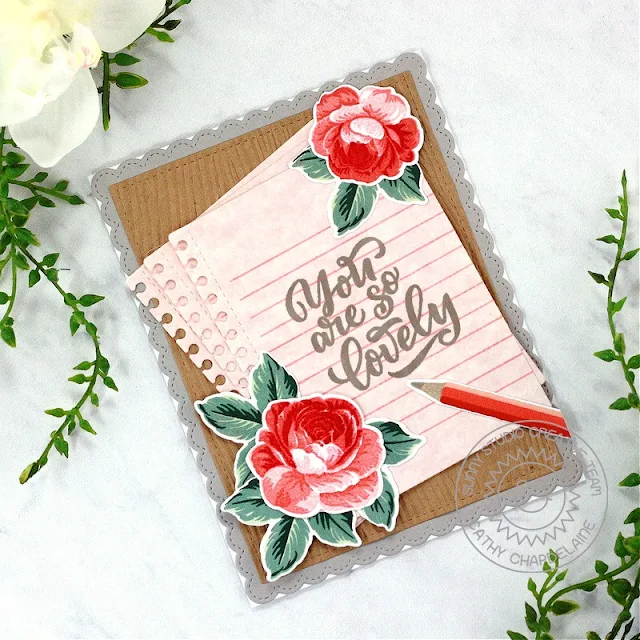
Hey friends! Cathy here today and I’m sharing a CAS card with a touch of elegance featuring the Notebook Tabs Dies. When I first saw this notebook paper die I immediately thought of a large handwritten message and Sunny Studio has the perfect sentiment stamps to give it that look! Paired with a pencil from the A Cut Above Stamps, I just love how this came together.

Sunny Studio Stamps: Notebook Die Focused Card by Cathy Chapdelaine (featuring Fancy Frame Dies, Everything's Rosy, Frilly Frame Dies, Lovey Dovey)

I started this A2 card by die-cutting a piece of gray cardstock using the Fancy Frames Rectangle Dies. I adhered this to a white card front. Next, I die-cut a piece of kraft cardstock using a Stitched Rectangles Die and embossed it using the Woodgrain Embossing Folder. I adhered this centered on the gray frame.

I die-cut a light pink parchment cardstock 3 times using the Notebook Tabs Die and stamped lines on one of them in a dark pink ink using the A Cut Above Stamps. I then stamped the sentiment from the Lovey Dovey Stamps in gray ink. I already loved these scripty stamps, but they work so perfect on the notebook paper die for that handwritten look! I adhered the 3 notebook papers layered over each other.

Sunny Studio Stamps: Notebook Die Focused Card by Cathy Chapdelaine (featuring Fancy Frame Dies, Everything's Rosy, Frilly Frame Dies, Lovey Dovey)

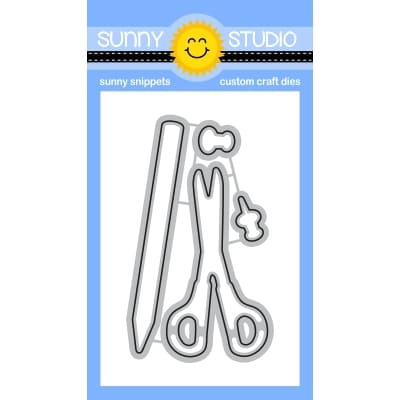
To finish, I stamped roses and leaves from the Everything’s Rosy Stamps and die-cut them using the coordinating dies. The pencil from the A Cut Above Stamps was a perfect finishing touch. I also die-cut this using the coordinating dies.

I hope you enjoyed and thanks for stopping by today! For more inspiration, please visit my blog www.inkredibleadventures.com and you can also find me on Instagram as @cathy.chapdelaine.

Sunny Studio Supplies Used:

Stitched Rectangle Dies
Shop at:
Sunny Studio
Fancy Frames- Rectangles
Shop at:
Sunny Studio
Everything's Rosy Stamps
Shop at:
Sunny Studio
Everything's Rosy Dies
Shop at:
Sunny Studio
Woodgrain Embossing
Woodgrain Embossing
Shop at:
Sunny Studio
Lovey Dovey Stamps
Lovey Dovey Stamps
Shop at:
Sunny Studio
Lovey Dovey Dies
Lovey Dovey Dies
Shop at:
Sunny Studio
A Cut Above Stamps
A Cut Above Stamps
Shop at:
Sunny Studio
A Cut Above Dies
A Cut Above Dies
Shop at:
Sunny Studio
Notebook Tabs Dies
Notebook Tabs Dies
Shop at:
Sunny Studio

Friday, June 23, 2023

Everything's Rosy Card with Tina

Hello crafty friends, it’s Tina and today we are talking about lots of layering! First up I am creating gorgeous flowers with the layering stamp and die set Everything’s Rosy! The detail in these stamps is just amazing and you end up with such great realistic roses.

Sunny Studio Stamps: Everything's Rosy Thank You Card by Tina Henkens (featuring Frilly Frame Dies, Big Bold Greetings, Spring Greenery Dies, Scalloped Circle Mat Dies)

As always with layering stamps I used a trick I learned from Jennifer McGuire using the dies and a stamping tool. You start by die cutting the basic shapes, in this case the two roses and the clustered leaves. I cut each shape several times. You put the negative pieces of cardstock inside the stamping tool, so you can just pop in the basic shapes.

Next, I removed all the stamps from the plastic sheet they come on. You place the first drawing (the 1a image) onto the cut basic shape for perfect placement. I secure the plastic in place with some low tack tape. Next, I place the coordinating stamp onto the drawing and line it up with the lines of the image. Then you just pick up the stamp with the door of your stamping tool and remove the plastic, you’ll get perfect stamping each time! Repeat the same process for each layer. I always stamp more images than I need, giving myself some room to play with the design.

Sunny Studio Stamps: Everything's Rosy Thank You Card by Tina Henkens (featuring Frilly Frame Dies, Big Bold Greetings, Spring Greenery Dies, Scalloped Circle Mat Dies)

I created a white A2 card base and covered it with a pretty teal paper from the Sweater Weather paper pad. This ties in nicely with the teal inks I used on the leaves. I cut a white panel with the Frilly Frames Stripes Die and layered it on top of the teal one. Next, I added a white circle using the largest of the Scalloped Circle Mats 3.

Now it was time to lay down my roses and leaves, so I could see how much room I had left for a sentiment. I fiddled a bit with the placement and once I was happy, I could adhere the arrangement with liquid glue and dimensional foam tapes. As a little bonus, I added some white and teal leaves cut with the Spring Greenery dies.

I stamped the beautiful scripty ‘Thank You’ from the Big Bold Greetings in Versafine Onyx Black ink and cut it with the matching die. A few Chrystal Clear Jewels were scattered around the sentiment.

I hope you will create beautiful bouquets with these gorgeous, layered roses! Thank you for joining me and happy crafting!

Sunny Studio Supplies Used:

Everything's Rosy Stamps
Shop at:
Sunny Studio
Everything's Rosy Dies
Shop at:
Sunny Studio
Frilly Frames Stripes Die
Shop at:
Sunny Studio
Scalloped Circle Mat 3 Dies
Shop at:
Sunny Studio
Sweater Weather Paper
Shop at:
Sunny Studio
Spring Greenery Dies
Shop at:
Sunny Studio
Big Bold Greetings Stamps
Shop at:
Sunny Studio
Big Bold Greetings Dies
Shop at:
Sunny Studio