Saturday, July 30, 2022

Guest Designer Spotlight: Summer Themed Cards with Rachel Alvarado

Hello friends! It's Rachel here from rachelalvaradodesigns.com and @theunpamperedstamper. I am so happy to be guest designing for Sunny Studio Stamps today! I have three summer-themed cards to share with you.

Sunny Studio Stamps: Fintastic Friends, Ocean View, and Kiddie Pool Summer Themed Cards by Rachel Alvarado

The first one is a bright, single layer card that I made by combining the Fintastic Friends, Ocean View, and Kiddie Pool Stamp Sets. To create my one-layered look, I used some Gina K Designs Masking Magic Sheets to mask my images (after stamping them) before ink blending my background. I also used masking while stamping to create the illusion of some of the objects appearing behind one another. Once all of my images were masked, I used a stencil along with some Pink Fresh Studios Sky Blue, Summer Shower, Seaside, and Storm Inks to create my ocean water background.

Sunny Studio Stamps: Fintastic Friends, Ocean View, and Kiddie Pool Summer Themed Cards by Rachel Alvarado

I used Copic Markers to color all of my images and added some white accents with a Sakura White Gelly Roll Pen. Lastly, I stamped my sentiment from the Fintastic Friends Stamp Set with Memento Tuxedo Black Ink.

Sunny Studio Stamps: Fintastic Friends, Ocean View, and Kiddie Pool Summer Themed Cards by Rachel Alvarado

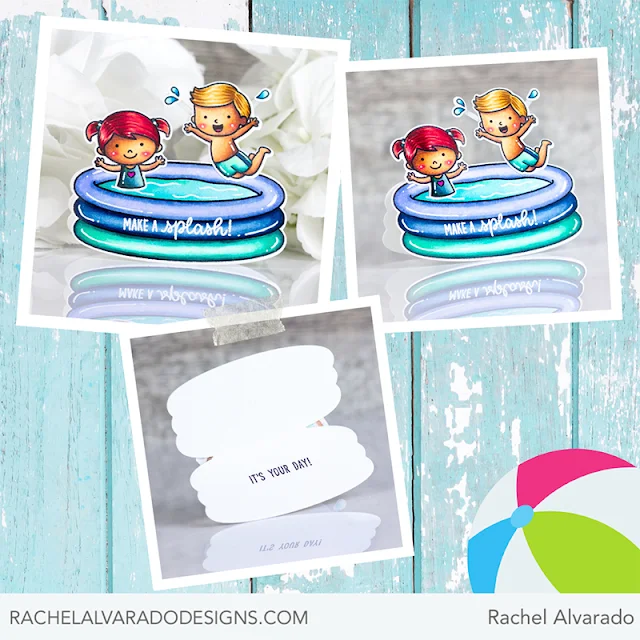
For my second project, I created a small and simple pool-themed card. This type of card would be perfect for that swimmer in your life or even to be used as really cute pool party invitations. To do this, I simply stamped my images, (I used Memento Tuxedo Black Ink and stamped them onto a piece of Neenah Solar White 110lb Card Stock), colored them with Copic Markers, and used the coordinating dies to cut them out.

Sunny Studio Stamps: Fintastic Friends, Ocean View, and Kiddie Pool Summer Themed Cards by Rachel Alvarado

Once I finished with the images, I assembled the kids in the pool and then folded a small piece of white card stock so that I could die cut it with the pool die. I made sure to leave the crease of my folded card stock outside of the die so that I could use this piece as my folding card base. Next, I attached my stamped pool directly on top of this folding piece. Lastly, I stamped a sentiment onto the inside center of my card. Super fun and easy to make!

Sunny Studio Stamps: Fintastic Friends, Ocean View, and Kiddie Pool Summer Themed Cards by Rachel Alvarado

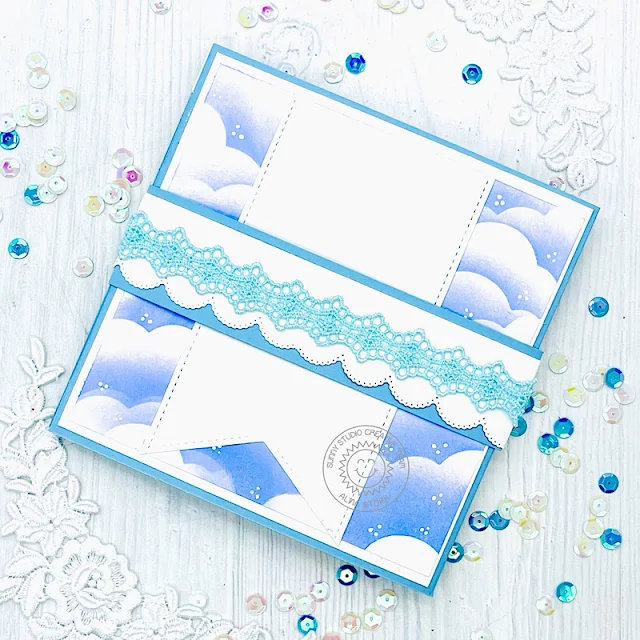
For my third and final project, I created a slimline pop-up box card from scratch. When propped up, this card measures at 6.5" long x 2" wide x 3.75" tall. I stamped images from both the Kiddie Pool and Ocean View Stamp Sets to create my scene. Once again, all of my images were colored with Copic Markers and cut out using both the Kiddie Pool and Ocean View Die Sets. I used the Slimline Nature Borders Die Set to die cut my sand dunes from white card stock. I added color to these dunes by blending them with some Antique Linen and Brushed Corduroy Distress Oxide Inks. I also added some sandy texture to these pieces by adding dots of color with Copic Markers.

Sunny Studio Stamps: Fintastic Friends, Ocean View, and Kiddie Pool Summer Themed Cards by Rachel Alvarado

The fun part about this card is that it fits perfectly into a business or #10 sized envelope. This makes it convenient for both mailing or hand delivering.

Here's a mini tutorial if you would like to make a low profile card like this one too:

Sunny Studio Stamps Summer Ocean Beach Themed Mini Slimline Low Profile Pop-up Box Card with Step-by-Step Tutorial

Thank you so much for stopping by today! I hope you have enjoyed these 3 projects!

Sunny Studio Supplies Used:

Slimline Nature Borders
Shop at:
Sunny Studio
Fintastic Friends Stamps
Shop at:
Sunny Studio
Fintastic Friends Dies
Shop at:
Sunny Studio
Ocean View Stamps
Ocean View Stamps
Shop at:
Sunny Studio
Ocean View Dies
Ocean View Dies
Shop at:
Sunny Studio
Kiddie Pool Stamps
Kiddie Pool Stamps
Shop at:
Sunny Studio
Kiddie Pool Dies
Kiddie Pool Dies
Shop at:
Sunny Studio

Friday, July 29, 2022

Country Carnival Cards with Audrey and Vanessa

Hello friends! Audrey here with a Country Carnival card to share with you! This card is a bit different for me as I normally love bright colors and lots of white space on my cards, but I decided to make a night scene card with this stamp set. 

Sunny Studio Stamps: Country Carnival Card by Audrey Tokach (featuring Basic Mini Shape Dies)

I started off with a piece of dark blue cardstock cut to 4" x 5.25". I used a cloud stencil from my stash and some Black Soot Distress Oxide to add some night clouds to the top 2/3 of the panel. I masked off the bottom and inked along the mask to create the ground. Then, I splattered on some gold metallic watercolor and watered down white acrylic paint to add stars to the sky. I stamped and colored the ferris wheel, some of the little bears and the ticket booth from the Country Carnival stamp set, and die cut them with the coordinating Country Carnival dies. The white background of the stamped images was too much contrast for me, so I used a dark blue Copic marker to trace around the edges of the images. 

Sunny Studio Stamps: Country Carnival Card by Audrey Tokach (featuring Basic Mini Shape Dies)

I arranged my scene, and adhered it to the panel. I didn't want sentiment to stand out too much, so I used white pigment ink on the dark cardstock for a more muted sentiment. Then, I used the Basic Mini Shapes Dies II to add some white stars to the sky. Finally, I mounted the panel to a dark blue card base.

---------------------------------------------

Hello to you! Vanessa here with a baby card using the sweet Country Carnival set.

Sunny Studio Stamps: Country Carnival Card by Vanessa Menhorn (featuring Chloe Alphabet Dies, Scalloped Tag Square Dies)

I started with a white card base and inked the background with Kitsch Flamingo Distress Oxide ink. After I had added ink droplets, I die-cut the scalloped tag from white cardstock and stamped the carousel. Now I stamped the image again onto a scrap of cardstock, colored both images with Copics, fussy-cut parts of the second image and adhered these to the tag with foam tape for more dimension. 

Today I used these sets:
Country Carnival stamps dies
Chloe Alphabet Dies
Scalloped Tag Square Dies

Sunny Studio Stamps: Country Carnival Card by Vanessa Menhorn (featuring Chloe Alphabet Dies, Scalloped Tag Square Dies)

I tied-on ribbon and twine and adhered the tag to the card. Now I die-cut the letters, colored them with Copics, added details with a white gel pen and spelled BABY. Finally, I added heart sequins to finish the card off.

Have a lovely weekend, everybody!

Sunny Studio Supplies Used:

Chloe Alphabet Dies
Chloe Alphabet Dies
Shop at:
Sunny Studio
Mini Basic Shape Dies 2
Shop at:
Sunny Studio
Scalloped Tags-Square
Shop at:
Sunny Studio
Country Carnival Stamps
Shop at:
Sunny Studio
Country Carnival Dies
Shop at:
Sunny Studio

Thursday, July 28, 2022

Fintastic Friends Cards with Marieke and Marine

Hello Sunny Studio friends, Marieke here. Today I hope to inspire you with an shaker card using the Fintastic Friends

Sunny Studio Stamps: Fintastic Friends Ocean Themed Card by Marieke Slaats (featuring Snail Mail, Tropical Scenes)

As always I started with the background. I ink blended the colors Tumbled Glass, Broken China, Blue Sapphire and Villainous Potion. Splattered water and some Villainous Potion and die cut the heart out of it.

Sunny Studio Stamps: Fintastic Friends Ocean Themed Card by Marieke Slaats (featuring Snail Mail, Tropical Scenes)

Heat set the sentiment out of the Sending Sunshine and die cut the word love out of white cardstock and glued it onto the die cut heart. Adhered a sheet of acetate behind the border. Added a layer of foam tape on to the basecard and filled up the shaker. Closed it using the border.

Used Copic Colors:
Purple - V06, V04, V01, V00
Red - R24, R22, R20
Green - G05, G02, G00
Yellow - Y17, Y15, Y13, Y11
White - W6, W4, W2, W00
Blueish purple - BV17, BV04, BV13, BV02
Sand - E55, E53, E51, E50
Envelop - E43, E41, E40

Sunny Studio Stamps: Fintastic Friends Ocean Themed Card by Marieke Slaats (featuring Snail Mail, Tropical Scenes)

Stamped all the images out of Fintastic FriendsSnail Mail and Tropical Scenes stamps. Colored them up using my Copic markers and die cut them using the coordinating dies. I added some die cuts in the animals so I could fit in the envelopes.

Adhered all the images on the card using glue or foam tape and added some white gel pen details to the octopus to give him something extra to stand out.

--------------------------------------------------

Hello crafty friends, Marine here, super happy to be back with one last Christmas in July card. I had a lot of fun making this series, and I hope you appreciated it as well! Today we're going under the ocean to celebrate Christmas with some adorable Fintastic Friends critters.

Sunny Studio Stamps: Fintastic Friends Ocean Themed Card by Marine Simon (featuring Ocean View, Penguin Pals)

I started off with the underwater background. I cut a 5,5 x 4,25" bristol panel, and worked on the bottom part first. I created a sand border using a hill stencil, along with antique linen and vintage photo oxide inks. And once the inking was done, I added texture on that sand border: white ink + water splatters, and vintage photo oxide ink + water splatters.

Next I covered the sand border using the hill stencil, and I created the ocean on the upper part of the panel using oxide inks again. From the sand border towards the top of the panel I applied chipped sapphire, blueprint sketch, peacock feathers and salvaged patina. I also added texture: water splatters, chipped sapphire oxide ink + water splatters, and white ink + water splatters.

Sunny Studio Stamps: Fintastic Friends Ocean Themed Card by Marine Simon (featuring Ocean View, Penguin Pals)

I set the paper aside to dry, and worked on the images. I stamped them all using an alcohol marker friendly black ink, cut them using the coordinating dies and colored everything using my alcohol markers with greys, pinks, aquas, blues and purples.

Fintastic Friends: sea critters
Ocean View: crab +reef
Penguin Pals: small fishes + hat
Christmas Critters: small hat
North Pole: nice list

After the coloring, I stamped my sentiment at the very top of the panel using clear embossing ink and silver embossing powder. I picked the words "Wishing you a" + "Christmas" from Santa Claus Lane, and "Fintastic" from Fintastic Friends to make the phrase "Wishing you a fintastic Christmas", and then I attached all the images on the panel using 1mm foam squares.

Sunny Studio Stamps: Fintastic Friends Ocean Themed Card by Marine Simon (featuring Ocean View, Penguin Pals)

Finally I glued a few clear droplets here and there, and added highlights and details to the images using a white gel. And done! Super bright and so cute, I hope you like it. As always you will find more details in the process video so feel welcome to check it out (click on the image above)! Thanks so much for stopping by, and see you next week!

Sunny Studio Supplies Used:

Christmas Critters Stamps
Shop at:
Sunny Studio
Christmas Critters DIes
Shop at:
Sunny Studio
Sending Sunshine Stamps
Shop at:
Sunny Studio
Santa Claus Lane Stamps
Shop at:
Sunny Studio
Tropical Scenes Stamps
Shop at:
Sunny Studio
Tropical Scenes Dies
Shop at:
Sunny Studio
North Pole Stamps
North Pole Stamps
Shop at:
Sunny Studio
North Pole Dies
North Pole Dies
Shop at:
Sunny Studio
Penguin Pals Stamps
Penguin Pals Stamps
Shop at:
Sunny Studio
Penguin Pals Dies
Penguin Pals Dies
Shop at:
Sunny Studio
Snail Mail Stamps
Snail Mail Stamps
Shop at:
Sunny Studio
Snail Mail Dies
Snail Mail Dies
Shop at:
Sunny Studio
Fintastic Friends Stamps
Shop at:
Sunny Studio
Fintastic Friends Dies
Shop at:
Sunny Studio
Ocean View Stamps
Ocean View Stamps
Shop at:
Sunny Studio
Ocean View Dies
Ocean View Dies
Shop at:
Sunny Studio

Wednesday, July 27, 2022

Baby Elephants Card by Alma and Gladys

Hi, this is Alma and today I want to show you a Baby Popup Card with the cute Baby Elephants Stamps. 

Sunny Studio Stamps: Baby Elephants Card by Alma Störk (featuring Slimline Dies, Scalloped Circle Mat Dies)

First I coloured the elephants in the Copic grey tones T6 T5 T4 T3 T2 T1 and T0 and then punched them out with the Baby Elephant Dies. Afterwards I cut out a square folding card. Next I die-cut a cloud stencil using the Slimline Nature Border Dies and smudged the clouds with Distress Oxide Inks Shaded Lilac.

Sunny Studio Stamps: Baby Elephants Card by Alma Störk (featuring Slimline Dies, Scalloped Circle Mat Dies)

Then it was time to make the baby bed: I used the tag from the Sliding Windows Dies Set for the edges of the bed. I punched out the base with the curved frame stencil from the same set. After that, I cut several bars from narrow strips of paper and glued everything together. I decorated the edges of the bed with the crown from the Baby Elephants Stamps set.

Sunny Studio Stamps: Baby Elephants Card by Alma Störk (featuring Slimline Dies, Scalloped Circle Mat Dies)

Then I punched clouds from the Tropical Trees Backdrop Dies Set and glued them to the background. The "sky" of the card is die-cut with the Cloud Die from the Slimline Nature Border Dies. To let the elephant hovering on the moon above the bed, I attached it with a piece of pinwheel foil.

Sunny Studio Stamps: Baby Elephants Card by Alma Störk (featuring Slimline Dies, Scalloped Circle Mat Dies)

After gluing everything together, I designed the outside of the card. Next to the cloud background I glued a banderole that can be slipped over the card so that the card doesn't open. For this I used the Scalloped Circle Mat 1 Dies and the border from the Slimline Pennant Dies Set. For the text box on the back side I used the pennant from the Slimline Pennant Dies Set.

--------------------------------------------------

Hello friends! Gladys here with a sweet and happy slimline card using the Baby Elephant stamps and dies. This stamp set is full of adorable elephant images and baby sentiments but it is also perfect for many occasions! Just check out all the design team inspirations, they will blow you away!

Sunny Studio Stamps: Baby Elephants Card by Gladys Marcelino

To start I use a scallop slimline die to cut from Bristol smooth cardstock. I masked off the edges to keep a nice border. I ink blended the background using distress oxide inks in the colors: prized ribbon, salvaged patina, wilted violet, kitsch flamingo, and abandoned coral. For interest I added some water droplets and diluted prized ribbon with a small paint brush.

Sunny Studio Stamps: Baby Elephants Card by Gladys Marcelino

I stamped and colored three elephants and three umbrellas using copic markers. I cut them out using their coordinating dies. I used a cloud border die to cut from white cardstock to ground one of the elephant. I also used the cloud dies from the set to fill in the scene. To adhere the images I used double sided foam tape because I love dimensions on my cards. For the sentiment, I white heat embossed the sentiment from Balloon Rides stamp set onto black cardstock. I completed the card using stardust stickles on the clouds and glossy accents for the umbrellas. That is all for me today.

Thanks for joining me and have a wonderful day!

Sunny Studio Supplies Used:

Sliding Window Dies
Sliding Window Dies
Shop at:
Sunny Studio
Slimline Nature Borders
Shop at:
Sunny Studio
Balloon Rides Stamps
Shop at:
Sunny Studio
Scalloped Circle Mat 1 Dies
Shop at:
Sunny Studio
Slimline Pennant Dies
Shop at:
Sunny Studio
Baby Elephants Stamps
Shop at:
Sunny Studio
Baby Elephants Dies
Baby Elephants Dies
Shop at:
Sunny Studio
Tropical Trees Backdrop
Shop at:
Sunny Studio

Tuesday, July 26, 2022

Summer Greenery Cards with Kavya and Isha

Hi folks, Kavya here. I am back on the blog with another fun card that combines a bunch of older releases with something new. This is also a fun way to stretch your existing supplies :)

Sunny Studio Stamps: Summer Greenery Card by Kavya (featuring Make A Wish, Savanna Safari, Silly Sloths, Fancy Frame Dies)

I first started off by creating my base by using a linen colored cardstock and splattering some white paint. Then, I created my square frame by using a Fancy Frames Square die cut and added an ink blended blue background. I also added a fun foliage around the frame using some ink blended Summer Greenery

Sunny Studio Stamps: Summer Greenery Card by Kavya (featuring Make A Wish, Savanna Safari, Silly Sloths, Fancy Frame Dies)

Later, I stamped and colored a bunch of images from Silly Sloths StampsSavanna Safari, Make A Wish Stamps and Party Pups Stamps (for the caps). I added a heat embossed sentiment and I was done! 

That’s it folks! I hope you liked this fun project :) Happy Crafting!

-------------------------------------------------

Hello everyone! Isha here and today I am featuring the new Summer Greenery dies. I am a huge fan of monstera plants, so I had to use those dies. I really like the details on these dies.

Sunny Studio Stamps: Summer Greenery Card by Isha Gupta (featuring Lovey Dovey, Stitched Rectangle Dies, Stitched Circle Dies)

I started by die-cutting a white panel using the Stitched Rectangle dies. Sponge some tumbled glass distress oxide inks. Flick black and gold watercolor and let dry. Die-cut a circle using the Stitched Circle small dies. Sponge a bit of ink towards the circle.

Next take Tim Holtz alcohol ink white cardstock. Use some alcohol inks in greens and teals along with alcohol blending solution. Let this dry and then apply some WOW! gold fab foil. The foil will stick to the sticky part of the ink.

Sunny Studio Stamps: Summer Greenery Card by Isha Gupta (featuring Lovey Dovey, Stitched Rectangle Dies, Stitched Circle Dies)

Die-cut some leaves using the Summer Greenery dies. Adhere the rectangle panel to the card base. Adhere the circle to it using foam tape and then create the wreath around the circle using the leaves.

Stamp the sentiment using the Lovey Dovey stamp, die-cut using the coordinating dies. Adhere to the card.

Thank you for dropping by and have a nice day!

Sunny Studio Supplies Used:

Stitched Rectangle Dies
Shop at:
Sunny Studio
Fancy Frames-Square Dies
Shop at:
Sunny Studio
Party Pups Stamps
Party Pups Stamps
Shop at:
Sunny Studio
Party Pups Dies
Party Pups Dies
Shop at:
Sunny Studio
Make A Wish Stamps
Make A Wish Stamps
Shop at:
Sunny Studio
Make A Wish Dies
Make A Wish Dies
Shop at:
Sunny Studio
Silly Sloths Stamps
Silly Sloths Stamps
Shop at:
Sunny Studio
Silly Sloths Dies
Silly Sloths Dies
Shop at:
Sunny Studio
Savanna Safari Stamps
Shop at:
Sunny Studio
Savanna Safari Dies
Savanna Safari Dies
Shop at:
Sunny Studio
Stitched Circle Small Dies
Shop at:
Sunny Studio
Lovey Dovey Stamps
Lovey Dovey Stamps
Shop at:
Sunny Studio
Lovey Dovey Dies
Lovey Dovey Dies
Shop at:
Sunny Studio
Summer Greenery Die
Summer Greenery Die
Shop at:
Sunny Studio