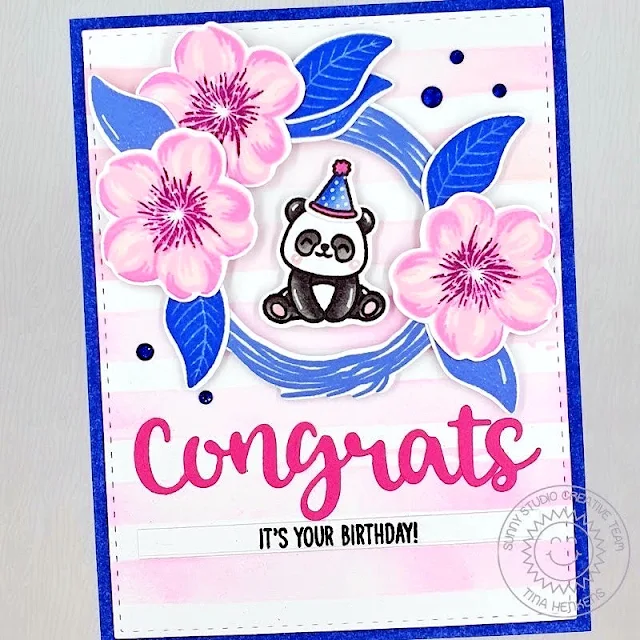
Hello crafty friends, Tina here with a card featuring a
custom sentiment made with the versatile Hayley
Alphabet Uppercase and Hayley
Alphabet Lowercase dies. I love the scripty font of these dies and
how easy they are to connect in creating words. The possibilities are endless
with these amazing products.
As I have mentioned before here on the blog, I am always in
need of fun birthday cards! So, what better word to spell than ‘Congrats’. I
die cut all the letters from pink card stock and adhered them together with
some drops of liquid glue. The letters all overlap to create that fluid scripty
font, having the word already created will give me the opportunity to play
around with the correct placement in a later phase.
The Cherry
Blossoms stamps were the perfect match for the cute bear from Panda
Party. First, I stamped the layering flowers in three shades of
pink inks from my stash. For the leaves, I kept with the cool tones and went
with a vibrant blue color. I used the same color for the Winter
Wreath. The panda was stamped, die cut and colored with Copic
markers. Of course, he needed a party hat too!
With so much going on in this design, I created a simple
striped background panel with a stencil from my stash. I placed all my
components on the background and decided I needed another small sentiment
(‘It’s your birthday’ from Little
Birdie). I didn’t have a card base in the same blue color as my
leaves and wreath, so I just inked up the sides of a white one for a perfect
match.
Next, I glued the background panel to that base and popped
up the wreath, flowers, leaves and bear with foam tape. Lastly, I added the
‘Congrats’ word and sentiment banner. A few blue jewels from the Bright
mix were scattered around the wreath.
I am sure you will love these amazing alphabet dies as much
as I do! Can’t wait to see all your creations! Thank you for visiting the blog
and happy crafting!
----------------------------------------------
Hello to
you! Vanessa here with a colorful birthday card featuring the Hayley Alphabet Dies.
I was
inspired by my former team mate Kavya and her colorful creations! First, I
trimmed a panel of white cardstock slightly smaller than my slimline card base
and inked the background with Broken Glass and Rusty Hinge Distress Oxide Inks.
Now I stamped all my images from Panda Party, Fast Food Fun, Looking Sharp and Lovable Llama. I colored the pieces with Copics, die-cut
them with the matching dies and adhered the elements to the card.
Then I
die-cut the letters, spelled "Spec-taco-lar" and adhered them.
Finally, I stamped and heat-embossed the rest of the sentiment onto a strip of
black cardstock and adhered it before adding highlights with a white gel pen.
I hope this
happy card will brighten someone's day! Enjoy your weekend and thanks for
visiting!
Sunny Studio Supplies Used:


