Showing posts with label Thank You Word Dies. Show all posts

Thursday, June 1, 2023

Notebook Die Focused Card with Marine

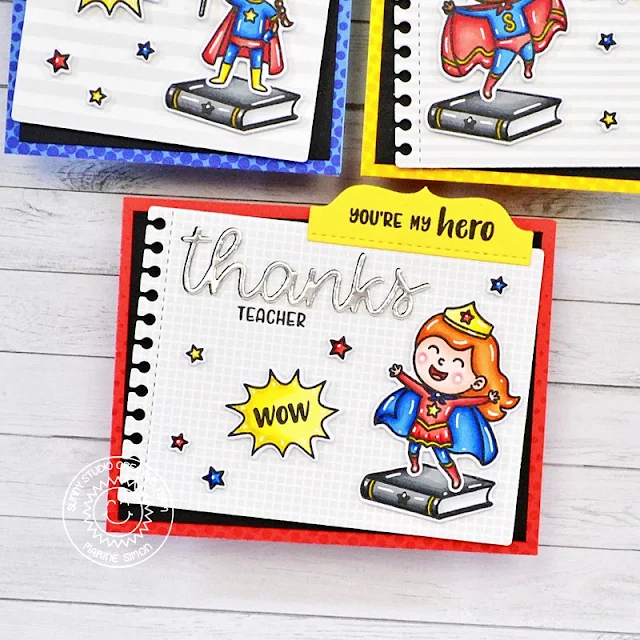
Hi crafty friends, Marine here, I'm thrilled to be back on the blog with those three mini cards showcasing the Notebook Photo Corners + Notebook Tabs die sets. Love those notebook designs, and with the end of the school year coming soon (in France it's early July) I think those sets are just perfect to make "Thank You" cards for our amazing teachers. And what a better set than Super Duper to celebrate them?

Sunny Studio Stamps: Notebook Die Focused Thank You Cards by Marine Simon (featuring Super Duper, Thank You Word Dies)

I started off by cutting the different pieces in three:
- three Notebook Photo Corners pages out of Subtle Grey Tones pattern papers
- three Notebook Tabs out of colored cardstock
- three simple black panels
- three colored panels out of Heroic Halftones pattern papers
- three Thank You Words out of silver mirror cardstock + three others out of black cardstock

Sunny Studio Stamps: Notebook Die Focused Thank You Cards by Marine Simon (featuring Super Duper, Thank You Word Dies)

I attached a black panel on each colored panel using double sided tape, and then stuck a notebook page in a crooked way using double sided foam tape. I layered the silver mirror "Thanks" on the black ones, stuck those words in the upper part of each panel, and stamped "Teacher" from Super Duper below each word.

Sunny Studio Stamps: Notebook Die Focused Thank You Cards by Marine Simon (featuring Super Duper, Thank You Word Dies)

Next I stamped three cute characters, stars and "Wow" signs from Super Duper, as well as three books from Grad Cat on white cardstock using an alcohol marker friendly black ink. I cut the images using the coordinating dies, and colored everything using my Spectrum Noir Illustrator markers and Graph'It Brush markers with blue, red and yellow to match the Heroic Halftones pattern papers.

Sunny Studio Stamps: Notebook Die Focused Thank You Cards by Marine Simon (featuring Super Duper, Thank You Word Dies)

Once the coloring was done, I attached the images on the cards using 1mm foam squares. Next I stamped a "You're my hero" greeting from Super Duper on each tab, and stuck a tab on each card. And as always I finished my cards by adding highlights and details to the images using a white gel pen.

And that's it! I really love all the cards I've made so far using the new release, but these are my favorite. Love how they turned out, and I hope that these will inspire you! Thanks so much for stopping by, and see you next week!

Sunny Studio Supplies Used:

Thank You Words Die
Thank You Words Die
Shop at:
Sunny Studio
Heroic Halftones 6x6 Paper
Shop at:
Sunny Studio
Super Duper Stamps
Super Duper Stamps
Shop at:
Sunny Studio
Super Duper Dies
Super Duper Dies
Shop at:
Sunny Studio
Subtle Grey Tones Paper
Shop at:
Sunny Studio
Grad Cat Stamps
Grad Cat Stamps
Shop at:
Sunny Studio
Grad Cat Dies
Grad Cat Dies
Shop at:
Sunny Studio
Notebook Photo Corners Dies
Shop at:
Sunny Studio
Notebook Tabs Dies
Notebook Tabs Dies
Shop at:
Sunny Studio

Saturday, April 29, 2023

Guest Designer Spotlight: A Cut Above Cards with Leanne West

Hello everyone! Leanne here and I'm excited to be here showcasing some the new stamps and dies from the summer release. I just love anything related to school and crafting supplies. So I was thrilled to see the new A Cut Above stamps, Notebook Photo Corners, and Notebook Tabs dies

Sunny Studio Stamps: A Cut Above & Notebook Die Focused Cards by Leanne West

I'm sharing three clean and fairly simple note cards which would be quick and easy to mass produce. With the end of the school year coming up, we will need lots of teacher thank you cards. These designs would also be great if you need thank you or birthday cards for any of your co-workers.  

First off, I'd like to talk about how I set up my Misti for mass producing layered stamped images. I die cut a bunch of blanks using the coordinating dies from A Cut Above. I then use a template overtop the black Misti pad. I find that I can position the stamps easily using the negative space of my die cut templates because I can clearly see the open area. I close the Misti door with the stamps perfectly placed. I then put the blank die cut pieces into the template and stamp the first layer. I repeat this process until all the layers have been stamped. I did this with different colors so I'd get many completed stamped images as you can see in my colorful scissors mini slimline card.  I love the little scissor image and could not resist stamping them in all the colors of the rainbow. 

Sunny Studio Stamps: A Cut Above & Notebook Die Focused Cards by Leanne West

I also really love the Notebook dies and line stamp to create realistic mini notebook pages. I simply used one notebook page on each of the A2 sized cards and a greeting plus a few stamped images. This design can be easily replicated and results in a very eye catching card especially with bright happy colors. 

Sunny Studio Stamps: A Cut Above & Notebook Die Focused Cards by Leanne West

On all my cards today, I have used the Lots of Dots Embossing Folder to create the textures backgrounds. I thought this was a great way to add interest to the cards without distracting from the focal images.  

Other Sunny Studio supplies used were the Thank You Word dies and Inside Greetings Birthday Stamps

Sunny Studio Supplies Used:

Thank You Words Die
Thank You Words Die
Shop at:
Sunny Studio
Lots of Dots Embossing
Shop at:
Sunny Studio
Inside Greetings Birthday
Shop at:
Sunny Studio
A Cut Above Stamps
A Cut Above Stamps
Shop at:
Sunny Studio
A Cut Above Dies
A Cut Above Dies
Shop at:
Sunny Studio
Notebook Photo Corners Dies
Shop at:
Sunny Studio
Notebook Tabs Dies
Notebook Tabs Dies
Shop at:
Sunny Studio

Thursday, March 2, 2023

Tranquil Tulips Cards with Waleska and Marine

Hello there friends, Waleska here! My card today features the beautiful Tranquil Tulips Stamps from the most recent release mixed with the Moroccan Circles Embossing folder and the Mini Mat and Tag Dies #3.

Sunny Studio Stamps: Tranquil Tulips Thank You Card by Waleska Galindo (featuring Mini Mat & Tag Dies, Moroccan Embossing Folder)

For this card I wanted the Tulips to be the focal point in my card, to do that I decided to leave the tulips very colorful and the background white so they can really stand out.  I started by stamping the different layers of the tulips with the following inks: Hero Arts Ombre Pink Ink, Lawn Fawn Plastic Flamingo Ink and Lawn Fawn Lobster Ink, for the leaves I used Lawn Fawn Jalapeno Ink and Lawn Fawn Noble Fir Ink. I hand cut the tulips and arrange them in the way I wanted.

Sunny Studio Stamps: Tranquil Tulips Thank You Card by Waleska Galindo (featuring Mini Mat & Tag Dies, Moroccan Embossing Folder)

I then embossed a white panel with the Moroccan Circles Embossing folder and cut 4 of the scalloped rectangle from the Mini Mat and Tag Dies #3, I wanted to have dimension to this piece so I adhere them together.  Finally I assemble my card by using the pattern paper as a base layer from the Dots and Stripes Jewel Tones, then the embossed panel and finally the small scalloped rectangle, my sentiment is from the Big Bold Greetings.

Thank you so much for stopping by today I hope you will be inspired to create today by my post!

------------------------------------------

Hello crafty friends! Marine here, so happy to be back on the blog today with a bright & beautiful bouquet showcasing Tranquil Tulips! It's no secret that I love to create little scenes with multiple images and details, but I also really love to play with the amazing layering stamp sets we have in the Sunny Studio catalogue.

Sunny Studio Stamps: Tranquil Tulips Thank You Card by Marine Simon (featuring Thank You Word Dies, Words of Gratitude)

I started off with the background. I knew that the flowers, watering can & shaker accessories would be very bright, and I didn't want all those elements to get lost on a too colorful background, so I picked a light pattern paper from the Subtle Grey Tones paper pack, and cut a 5,5 x 4,25 inches panel. Next I took a sheet of plastic from my stash a little bit bigger than my panel, added double sided tape along the four edges, placed my grey panel in the middle of it, and while keeping the panel in place with my left hand, I cut the four plastic corners off, and this way created four plastic tabs on each side of the grey panel. I folded and attached three of those tabs at the back of the grey panel, added a mix of sequins, jewels & confetti inside the plastic pocket, and then folded and attached the fourth tab to totally close the pocket. I attached my infinity shaker panel on a white card base using double sided tape, and then moved on to the images.

Sunny Studio Stamps: Tranquil Tulips Thank You Card by Marine Simon (featuring Thank You Word Dies, Words of Gratitude)

I stamped the tulips and leaves from Tranquil Tulips, as well as the watering can from Watering Can on Strathmore bristol smooth cardstock using distress oxide inks. For the tulips, I used spun sugar + kitsch flamingo + picked raspberry. For the leaves, I used shabby shutters + mowed lawn. And for the watering can, I used salvaged patina + hickory smoke. Once all the images were stamped, I used the coordinating dies to cut them all, and then I attached everything on the infinity shaker panel using foam squares.

And finally I created my greeting in two parts. I started by cutting the word "Thanks" out of gold mirror cardstock using a die from the Thank You Words die set. Next I white heat embossed the phrase "for always being there" from Words Of Gratitude on a dark grey slim banner, and then I attached both elements on the bottom left corner of my card using liquid glue and foam squares.

And that's it! I hope that you like this new shaker card! Feels like Spring, right? Thanks for stopping by, and see you next week with more flowers!

Sunny Studio Supplies Used:


Words of Gratitude Stamps
Shop at:
Sunny Studio
Thank You Words Die
Thank You Words Die
Shop at:
Sunny Studio
Dots & Stripes Jewel Tones 6x6 Paper
Shop at:
Sunny Studio
Moroccan Circles Embossing
Shop at:
Sunny Studio
Subtle Grey Tones Paper
Shop at:
Sunny Studio
Watering Can Stamps
Watering Can Stamps
Shop at:
Sunny Studio
Watering Can Dies
Watering Can Dies
Shop at:
Sunny Studio
Mini Mat & Tag 3 Dies
Shop at:
Sunny Studio
Tranquil Tulips Stamps
Shop at:
Sunny Studio
Tranquil Tulips Dies
Shop at:
Sunny Studio

Thursday, August 18, 2022

Designer's Choice Cards with Marine and Marieke

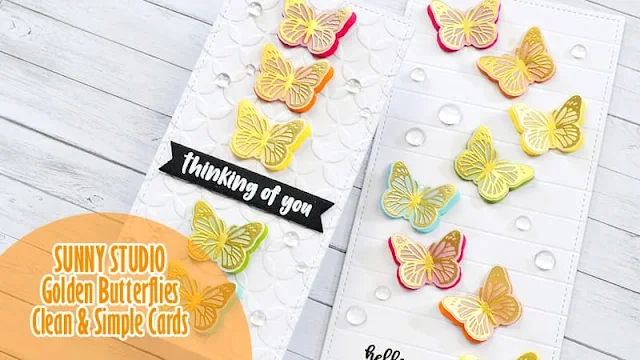
Hey crafty friends, Marine here with you today! I'm super happy to be back on the blog with this duo of cute and bright cards. They feature the butterfly stamp from the Watering Can stamp set, I didn't get a chance to use that stamp before, and I thought it would be nice to use with rainbow colors.

Sunny Studio Stamps: Watering Can Butterfly Cards by Marine Simon (featuring Moroccan Circle Embossing Folder)

I started by cutting a 6 x 3" mini slimline white panel, and an 8,5 x 3,5" slimline white panel. On the mini slimline panel I printed texture using the Moroccan Circles embossing folder, and on the slimline panel I added texture by creating lines each quarter of an inch using a ball tool.

I gold heat embossed a bunch of butterflies on vellum, and I cut them using the coordinating die. I used that same coordinating die to cut colorful butterflies. And I white heat embossed a "Thinking of you" sentiment from Watering Can on a black banner. 

Sunny Studio Stamps: Watering Can Butterfly Cards by Marine Simon (featuring Moroccan Circle Embossing Folder)

Next I assembled the cards. On the mini slimline panel, I added a vertical row of butterflies. I first attached plain butterflies in a rainbow order using foam squares, tucked my "Thinking of you" sentiment between two butterflies, and then stuck a golden butterfly on each plain butterfly using liquid glue.

And on the slimline panel, I stamped a simple "Hello" sentiment from Lovely Lilacs, attached plain butterflies in zigzag using foam squares, and then added a golden butterfly on each plain butterfly. And I finished both cards by gluing clear droplets to bring more light.

Sunny Studio Stamps: Watering Can Butterfly Cards by Marine Simon (featuring Moroccan Circle Embossing Folder)

And that's it! They're both super pretty and they were very quick to make so it would definitely be easy to mass produce them. I hope that those cards will inspire you. As always I leave with the process video so feel welcome to check it out for more details (click on the image above)! Thank you so much for stopping by, and see you next time!

-------------------------------------------------

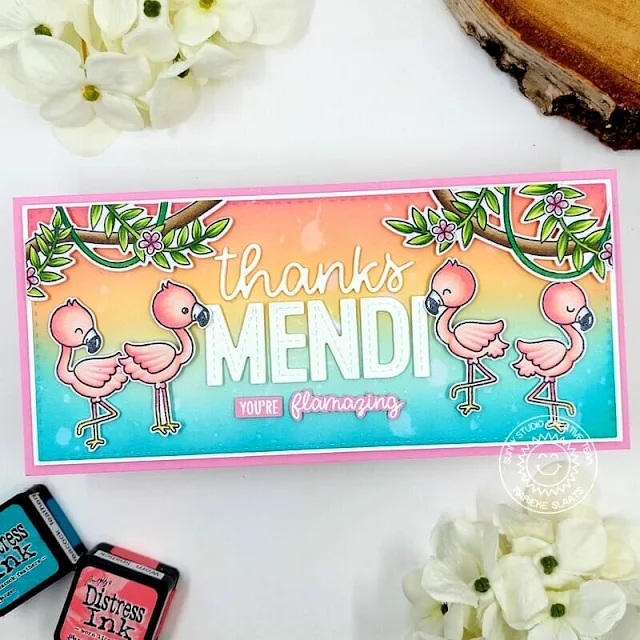
Hello Sunny Studio Friends, Marieke here. Today I hope to inspire you with a personalized card that I made especially for the amazing owner of Sunny Studio; Mendi! 

Sunny Studio Stamps: Fabulous Flamingos Card by Marieke Slaats (featuring Thank You Word Dies, Tropical Scenes)

ink blended Cracked Pistachio, Peacock Feathers, Dried Marigold, Worn Lipstick and Picked Raspberry on to a piece of cardstock and I die cut it. Splattered some water and adhered it onto a slightly larger rectangle.

Out of white cardstock I cut the word Thanks using the Thank You Word Dies four times and glued them together. Die cut the name Mendi and adhered both in the middle of the card. Heat set the other sentiments that are in the Fabulous Flamingo set on pink cardstock. Die cut the small sentiment and cut the other one using my scissors.

Used Copic Colors:
Flamingo - RV13, RV42, R01, R00 / C5,C3,C1,0 / Y13, Y11
Green - YG67, YG63, YG03, YG01
Brown - E47, E44, E43
Dark Green - G28, G09, G07
Pink - R85, R83, R81

Sunny Studio Stamps: Fabulous Flamingos Card by Marieke Slaats (featuring Thank You Word Dies, Tropical Scenes)

Stamped the images out of the Fabulous Flamingos and Tropical Scenes stamps. Colored them up using my Copic markers and cut them using the Fabulous Flamingos and Tropical Scenes Dies.

Adhered the background on to a pink top fold base card and added all the images using different heights of foam tape.

Sunny Studio Supplies Used:

Thank You Words Die
Thank You Words Die
Shop at:
Sunny Studio
Fabulous Flamingos Stamps
Shop at:
Sunny Studio
Fabulous Flamingos Dies
Shop at:
Sunny Studio
Moroccan Circles Embossing
Shop at:
Sunny Studio
Tropical Scenes Stamps
Shop at:
Sunny Studio
Tropical Scenes Dies
Shop at:
Sunny Studio
Lovely Lilacs Stamps
Shop at:
Sunny Studio
Watering Can Stamps
Watering Can Stamps
Shop at:
Sunny Studio
Watering Can Dies
Watering Can Dies
Shop at:
Sunny Studio

Friday, April 1, 2022

Cherry Blossoms Cards with Audrey and Vanessa

Hello friends! Audrey here! Today, I have a card to share with you using the Cherry Blossoms stamp set. 

Sunny Studio Supplies Used: Cherry Blossoms Card by Audrey Tokach (featuring Lovey Dovey)

To create this card, I started off with a piece of watercolor paper cut to 4" x 5.25". I used Worn Lipstick Distress ink to watercolor a drippy background on the panel, concentrating most of the color at the top, then I tipped the panel on end and allowed the color to run down the panel a bit. When I was happy with the placement, I hit it with my heat tool to dry the watercolor and leave hard edges. Then, I added a splattering of black watercolor. I stamped several of the Cherry Blossoms in shades of pink and coral and die cut them with the coordinating Cherry Blossoms dies. I arranged them at the top of the panel and glued some down with a glue pen and popped others up with foam tape. 

Sunny Studio Supplies Used: Cherry Blossoms Card by Audrey Tokach (featuring Lovey Dovey)

I stamped a sentiment from the Lovey Dovey stamp set in black ink and diecut it with the coordinating Lovey Dovey dies. I popped the sentiment up with foam tape, then popped the panel up on an A2 card base. I added a strip of black and white washi tape to the left edge of the card base, and added Onyx Black Crystals to the front most flower centers. Finally, I added some white gel pen accents to each of the blooms.

------------------------------------------

Hello to you! Vanessa here with a spring card using the beautiful Cherry Blossoms set.

Sunny Studio Supplies Used: Cherry Blossoms Card by Vanessa Menhorn (featuring Out on a Limb Dies, Thank You Word Dies)

I stamped the images onto white cardstock and die-cut the pieces with the matching dies. Now I arranged a part of the elements onto the front of my white card base and covered this with a panel of light blue vellum. Then I adhered the remaining die-cuts, using foam-tape for more dimension. I added a pink bow to the branch and finished the card off with the "thank you" die-cut from white cardstock.

For this card, the following sets were used:
Cherry Blossoms stamps + dies
Out on a Limb dies
Thank You Words die

Sunny Studio Supplies Used: Cherry Blossoms Card by Vanessa Menhorn (featuring Out on a Limb Dies, Thank You Word Dies)

Can't wait for the real blossoms to bloom! With this gorgeous stamp set, waiting for spring is much easier :) Have a sunny weekend!

Sunny Studio Supplies Used:

Thank You Words Die
Thank You Words Die
Shop at:
Sunny Studio
Cherry Blossoms Stamps
Shop at:
Sunny Studio
Cherry Blossoms Dies
Shop at:
Sunny Studio
Lovey Dovey Stamps
Lovey Dovey Stamps
Shop at:
Sunny Studio
Lovey Dovey Dies
Lovey Dovey Dies
Shop at:
Sunny Studio
Out on A Limb Dies
Out on A Limb Dies
Shop at:
Sunny Studio

Monday, March 7, 2022

Little Birdie Cards with Mayra and Ashley

Hello and happy Monday everyone, Mayra here. I am sharing this fun card with you today using the adorable Little Birdie stamp set. 

Sunny Studio Stamps: Little Birdie Card by Mayra Duran-Hernandez (featuring A Bird's Life, Scalloped Oval Mat Dies, Stitched Oval Dies)

I began by die-cutting the layers for the card, I used the Frilly Frames Eyelet Lace die for the base of the card, along with the Stitched Oval 2 die set to create the window for the card. To create the scalloped border around the window I used the Scalloped Oval Mat 1 dies and the Stitched Oval 2 die set. 

I then colored the images from the Little Birdie stamp set and the birdhouses from the A Bird's Life stamp set, and the banner from the Balloon Rides stamp set. I colored the images using Copic markers. For the green, I used YG01, FYG2, YG17, G05, G09, and G28. For the pink, I used RV04 and RV55. For the yellow, I used Y11, Y08, Y19, and YR24. 

Sunny Studio Stamps: Little Birdie Card by Mayra Duran-Hernandez (featuring A Bird's Life, Scalloped Oval Mat Dies, Stitched Oval Dies)

I then heat embossed the sentiment from the set onto a piece of vellum and used the coordinating die to die-cut the banner. I hope you enjoy the card I created to share with you today. Thank you very much for taking the time to stop by. I hope you each have a wonderful and blessed day. 

-------------------------------------------

Hello friends! It's Ashley today with a card featuring one of my favorites from the current release - Little Birdie! I am in love with the illustration style of these guys! Plus, they are adorable, petite, and come in several poses to add to any card!

Sunny Studio Stamps: Little Birdie Card by Ashley Ebben (featuring Fluffy Clouds, Thank You Word Dies)

I started by blending Distress Oxide ink in Speckled Egg onto white cardstock. I added several layers to build up the color and left one side of the cardstock white to create an ombre fade. I die cut a few Fluffy Clouds from white cardstock and added them around the blended area to create a sky.

I stamped several birds, the branch, and the nest from Little Birdie onto Bristol smooth cardstock and colored with Zig Clean Color Real Brush markers. I chose yellow for the birds for a nice pop against the blue sky. I used the matching dies to cut everything out, then added the images to my card, popping some birds up with foam tape for dimension. 

Sunny Studio Stamps: Little Birdie Card by Ashley Ebben (featuring Fluffy Clouds, Thank You Word Dies)

For my sentiment, I die cut the word "thanks" from Thank You Words dies three times from a similar light blue cardstock to my background. I added the dimensional word to the card, then finished the sentiment with a sentiment strip I made using a sentiment from Little Birdie embossed in white on black cardstock.

Thank you so much for stopping by! Have a wonderful day!

Sunny Studio Supplies Used:

A Bird's Life Stamps
Shop at:
Sunny Studio
A Bird's Life Dies
A Bird's Life Dies
Shop at:
Sunny Studio
Thank You Words Die
Thank You Words Die
Shop at:
Sunny Studio
Fluffy Clouds Dies
Fluffy Clouds Dies
Shop at:
Sunny Studio
Frilly Frames-Eyelet Lace
Shop at:
Sunny Studio
Balloon Rides Stamps
Shop at:
Sunny Studio
Balloon Rides Dies
Balloon Rides Dies
Shop at:
Sunny Studio
Scalloped Oval Mat 1 Dies
Shop at:
Sunny Studio
Stitched Oval 2 Dies
Shop at:
Sunny Studio
Little Birdie Stamps
Shop at:
Sunny Studio
Little Birdie Dies
Little Birdie Dies
Shop at:
Sunny Studio