Wednesday, June 30, 2021

Candy Shoppe Cards and Video Tutorial with Franci and Julia

Hi there! Franci here with you today with a sweet card showcasing the Candy Shoppe set. Aww I love this set so much! 

Sunny Studio Stamps: Candy Shoppe Beach Buddies Birthday Card by Franci Vignoli

First of all I created my card base out of white cardstock, then masked the front bottom and inked the top with Distress Ink.

Then I stamped, colored with Copics and die cut all my images from these sets: Candy Shoppe + coordinated dies and Beach Buddies + coordinated diesI love these little bears surrounded by sweets and candies, they're so cute! 

Sunny Studio Stamps: Candy Shoppe Beach Buddies Birthday Card by Franci Vignoli

I glued everything in place with foam adhesive, stamped my sentiment and added some details with a white gel pen. Finally I added some Birthday Cake Dot Sprinkles confetti here and there.

I'm so happy about how this card turned out and I hope you like it too :) Have a lovely day!

-------------------------------------------

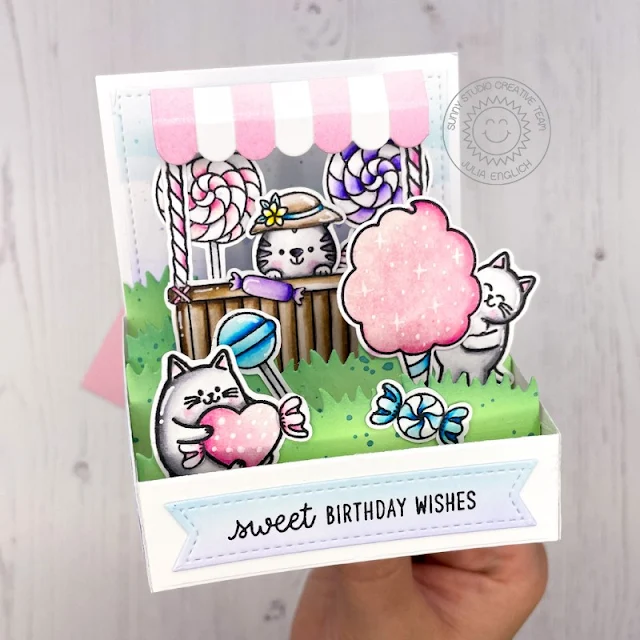
Hey crafty friends! It’s Julia here with sweet birthday box card!

Sunny Studio Stamps: Candy Shoppe Beach Buddies Meow & Furever Tiki Time Stitched Rectangle Dies Birthday Card by Julia Englich


First, I stamped out all of my adorable images from Candy ShoppeMeow & FureverBeach Buddies and Tiki Time onto Strathmore Bristol Smooth paper and I used Zig Clean Color Real Brush Markers to color them in. 

Sunny Studio Stamps: Candy Shoppe Beach Buddies Meow & Furever Tiki Time Stitched Rectangle Dies Birthday Card by Julia Englich

Then, to create the box I used a die set, but you can also do it without any specialty dies! You will need one back panel measuring 3 1/2 x 4 1/2", two side panels 2 1/2" long, 2 slanting downwards to 1" in height. Those side panels are scored at 1/2" on the taller side. Finally, for the front of the box you need a strip of cardstock 4 1/2 x 1 " scored at 1/2" and 4". For the inside grassy borders, the panels measure 4 1/4 x approx. 1" and they are scored at 3/8" and  3 7/8". For the background of my box, I used the second to largest of the Stitched Rectangle dies and I just trimmed a little bit off at the bottom.  

I ink blended the stitched panel using a cloud stencil and Distress Oxide inks. I also added the same ink colors to the sides of the box. For my sentiment strip, I used the banner dies from the Stitched Rectangle dies, added the same ink colors I used for the background and stamped the sentiment from Candy Shoppe in black.

Inks used: Tumbled Glass, Shaded Lilac, Spun Sugar, Kitsch Flamingo, Cracked Pistachio, Evergreen Bough Zig Markers used:  999, 904, 97, 94, 10; 64, 68; 52, 55; 200, 202; 803, 80;32, 31

Sunny Studio Stamps: Candy Shoppe Beach Buddies Meow & Furever Tiki Time Stitched Rectangle Dies Birthday Card by Julia Englich


To assemble the box, I added liquid glue to the flaps of the side pieces and adhered them to the back panel. I adhered my stitched background piece to the back and one of the grassy borders on top of that. Then, I added the front piece to the front of the left side panel and I also started adding my grassy hills with liquid glue to the inside of the left side panel. Once they had a bit of time to dry, I flipped the pieces over to the right, lined them up and added glue to all the flaps. Then I just had to close the right side panel onto the adhesive and give it some time to dry! I added the side panels and the sentiment banner to the outside of the box.

Sunny Studio Stamps: Candy Shoppe Beach Buddies Meow & Furever Tiki Time Stitched Rectangle Dies Birthday Card by Julia Englich


Finally, it was time to build my scene. I wanted to have a little candy stand, so I used the roof of the Sweet Treat House Add-On, the bottom of the tiki bar from Tiki Time and the twizzler sticks from Candy Shoppe to build it! I added all the accessories to the adorable little kitties and I adhered everything to the grassy borders inside the box!

Check out the video tutorial below to see how this card came together:


I had so much fun making this sweet box card and I really hope you like it! Thanks so much for stopping by today! Have an amazing week!

Sunny Studio Supplies Used:

Beach Buddies Stamps
Shop at:
Sunny Studio
Beach Buddies Dies
Beach Buddies Dies
Shop at:
Sunny Studio
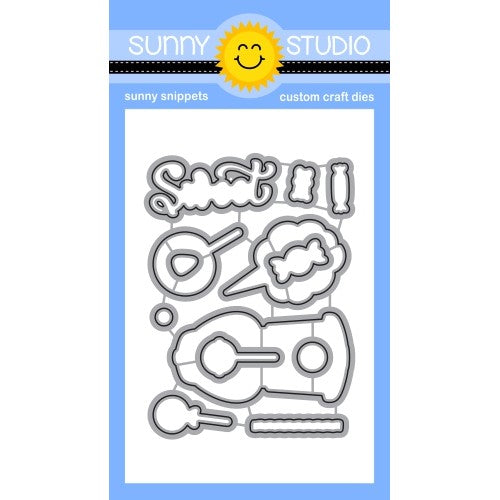
Candy Shoppe Stamps
Candy Shoppe Stamps
Shop at:
Sunny Studio
Candy Shoppe Dies
Candy Shoppe Dies
Shop at:
Sunny Studio
Tiki Time Stamps
Tiki Time Stamps
Shop at:
Sunny Studio
Tiki Time Dies
Tiki Time Dies
Shop at:
Sunny Studio
Stitched Rectangle Dies
Shop at:
Sunny Studio
Sweet Treats House Add-on
Shop at:
Sunny Studio
Meow & Furever Stamps
Shop at:
Sunny Studio
Meow & Furever Dies
Meow & Furever Dies
Shop at:
Sunny Studio

Tuesday, June 29, 2021

Happy Hamsters Cards with Isha and Kavya

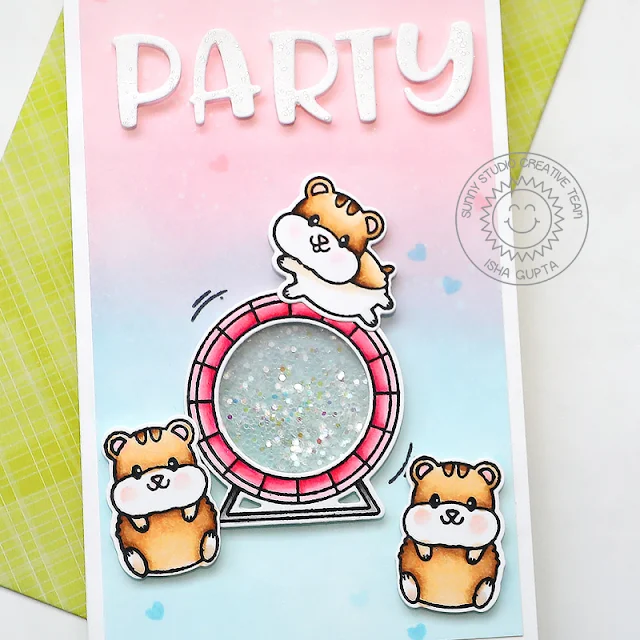
Hello everyone! Isha here with an interactive shaker card featuring the Happy Hamster stamps and dies. I needed to make a card for my younger daughter who is getting her end of the year school report card and did very well. She is soft and fun by nature hence the color choice and shaker element :) Various stamps and dies by Sunny Studio go perfectly well together and this is what I like the most.

Sunny Studio Stamps: Happy Hamster Stitched Circle Dies Balloon Rides Critter Themed Birthday Card by Isha Gupta

I started by creating a white slimline card. Cut a white mat layer and sponge this piece with distress oxide inks. I then stamped the solid heart from the Happy Hamsters stamp set.

Stamp the images from the Happy Hamsters stamp set, color and die-cut using the coordinating dies. I turned the hamster wheel spinner into my shaker element. I die-cut two acetate pieces using one of the Stitched Circle Large dies. Adhere one acetate circle to the center opening from behind. Now I adhered 3d foam to it, surrounding the circle fully leaving no gaps between the foam. Fill the well with chunky glitter and adhere the 2nd. acetate to cover the well.

Sunny Studio Stamps: Happy Hamster Stitched Circle Dies Balloon Rides Critter Themed Birthday Card by Isha Gupta

Stamp the banners from the Balloon rides stamp, color using copic markers and die-cut using the coordinating dies.

Adhere the mat layer to the card base. Stamp the sentiment using words from the Happy HamstersBold Balloons and Everything's Rosy stamp set. Die-cut the word "PARTY" using the Chloe Alphabet dies. Adhere to the card using 3d foam. Apply spectrum noir clear shimmer pen to it. Assemble everything together.

Thanks for dropping by and have a nice day!

-----------------------------------------------

Hi everyone, Kavya here. I am back on the blog with another fun card using the new Happy Hamsters stamp set! These hamsters are just the perfect size to be combined with other stamp sets to create fun critter scenes. I created a fun ‘just because’ card for a friends that loves to bake! 

Sunny Studio Stamps: Happy Hamster Blissful Baking Make A Wish Critter Themed Birthday Card by Kavya

I first started off by stamping and coloring a bunch of images from Happy HamstersBlissful Baking and Make a Wish sets. For the background, I ink blended an A2 card base using shades of red, pink and pale yellow/melon dye inks. I then embossed the panel using the Sunburst embossing folder and added a scalloped frame border (I used a different one but the Fancy Frames Rectangle die is a perfect alternative!) cut using white shimmer cardstock. Finally, I arranged all the stamped images on the panel and added a sentiment from Candy Shoppe stamp set to finish it off! 

Sunny Studio Stamps: Happy Hamster Blissful Baking Make A Wish Critter Themed Birthday Card by Kavya

That’s it folks! I hope you liked this fun card :) Be sure to check back tomorrow for more inspiration … you wouldn’t be disappointed! 

Sunny Studio Supplies Used:

Blissful Baking Dies
Shop at:
Sunny Studio
Blissful Baking Stamps
Shop at:
Sunny Studio
Candy Shoppe Stamps
Candy Shoppe Stamps
Shop at:
Sunny Studio
Happy Hamsters Stamps
Shop at:
Sunny Studio
Happy Hamsters Dies
Happy Hamsters Dies
Shop at:
Sunny Studio
Chloe Alphabet Dies
Chloe Alphabet Dies
Shop at:
Sunny Studio
Bold Balloons Stamps
Shop at:
Sunny Studio
Fancy Frames- Rectangles
Shop at:
Sunny Studio
Sunburst Embossing
Sunburst Embossing
Shop at:
Sunny Studio
Everything's Rosy Stamps
Shop at:
Sunny Studio
Make A Wish Stamps
Make A Wish Stamps
Shop at:
Sunny Studio
Make A Wish Dies
Make A Wish Dies
Shop at:
Sunny Studio
Balloon Rides Stamps
Shop at:
Sunny Studio
Balloon Rides Dies
Balloon Rides Dies
Shop at:
Sunny Studio
Stitched Circle Large Dies
Shop at:
Sunny Studio

Monday, June 28, 2021

Looking Sharp Cards with Ashley and Mayra

Hi friends! It's Ashley with a cute birthday card featuring the Looking Sharp set that is just on point! 

Sunny Studio Stamps: Looking Sharp Slimline Dies Birthday Card by Ashley Ebben

I started this card by ink blending a background using Distress Oxides in Squeezed Lemonade, Worn Lipstick, Seedless Preserves, and Chipped Sapphire. I knew I was going to make a cut out, so I blended my colors sideways to cover the area that would be showing. I then splattered my blending with a bit of watered down white acrylic paint and dried it with my heat gun. If the paper warps, I put it inside a folded up piece of printer paper and run it through my die cutting machine - ta da! Flat again! I used two of the Slimline Basic Border dies on white cardstock to make the top and bottom sections, then added them on top of my blended piece with foam tape to give the window a sunken feel.

Sunny Studio Stamps: Looking Sharp Slimline Dies Birthday Card by Ashley Ebben

I stamped the cacti and party hat from Looking Sharp onto more white cardstock with Lawn Fawn Jet Black ink and colored with Copics. I added a few white gel pen highlights, then used the matching Looking Sharp dies to cut the images out. I added them inside the window with more foam tape. I used the sentiment from Looking Sharp and added it to the opposite side of my card from the images for balance. I finished up with a few Crystal Clear jewels for extra interest.

Thank you so much for stopping by! Have a wonderful day. 

---------------------------------------------

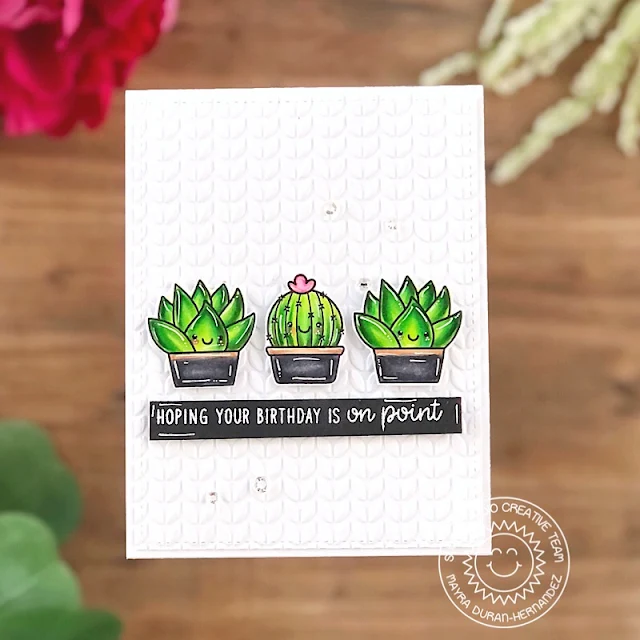
Hello everyone!!! Happy Monday! Mayra here with you today. Can you believe June is almost over already?! Wow!! I hope your summer is off to a wonderful start. I have this CAS card to share with you. I used the cute Looking Sharp stamp set.

Sunny Studio Stamps: Looking Sharp Stitched Rectangle Dies Birthday Card by Mayra Duran-Hernandez

I started by coloring the cute little cactus images using Copic markers. I used YG01, YG00, G28, YG67, YG17, G16, G09, G05, G14, and G02. I then die-cut the base panel using the largest rectangle from the Stitched Rectangles die set. Next, I used the Cable Knit Embossing Folder to add a beautiful embossed texture to the panel.

Sunny Studio Stamps: Looking Sharp Stitched Rectangle Dies Birthday Card by Mayra Duran-Hernandez

I hope you enjoy the card I created to share with you today. Thank you so much for taking the time to stop by. I pray you each have a wonderful and blessed day.

Sunny Studio Supplies Used:

Looking Sharp Stamps
Shop at:
Sunny Studio
Looking Sharp Dies
Looking Sharp Dies
Shop at:
Sunny Studio
Stitched Rectangle Dies
Shop at:
Sunny Studio
Cable Knit Embossing
Shop at:
Sunny Studio
Slimline Basic Borders
Shop at:
Sunny Studio

Saturday, June 26, 2021

Guest Designer Spotlight: Cards with Amy Young

Hi, I'm Amy Young and I'm very excited to be guesting for Sunny Studio today. I've got two fun cards to share using stamps and dies from from the latest release. First up is this crazy cute scene featuring the Happy Hamsters set. Seriously, who can resist a pudgy cheeked hamster, let alone four of them? 


Sunny Studio Stamps: Happy Hamster Card by Amy Young


Right away I knew that I wanted to color all four of them into a cohesive scene showing them hanging out together in their cage. One would be running like crazy on the exercise wheel that is included in the set but what to do with the others? That's when inspiration hit and I decided to try my hand at coloring them all into one of those plastic maze tunnel type set ups. To help sell the idea that they are inside the tube I stamped them up using the lighter Memento desert sand ink versus the Memento tuxedo black that I had used to stamp up the wheel and its occupant. You can especially see the difference this makes on the hamster peeking out up top. 


First I stamped him in desert sand using my Misti then inked up only his top half in tuxedo black, creating the illusion that his bottom half is obscured by the tube that I then colored over top. For extra contrast on the plastic tubing I brushed on Dr. Ph. Martin's Bleed Proof White after my Copic coloring was complete. I also dabbed some around the feet of the running hamster to add to the motion and speed of the spinning wheel.


Sunny Studio Stamps: Tiki Time Chloe Alphabet Dies Card by Amy Young
 
For my second card I had a great time stamping and masking together a tropical beach scene using the Tiki Time set. Rather than have the sweet hula girl elephant dancing out front I thought it would be fun to have her tending bar at this beach front tiki bar instead. Her parrot patron looks quite pleased with the drink she has prepared. Because I also wanted to have those tiki torches blazing bright I ended up coloring in a rather dark sunset sky in the background, which also adds a lot of drama to the overall scene. 


The trade off for all that dynamic color is that it would be hard to stamp on one of the sentiments from the set and have it show up. Luckily for me I had the super cute Chloe Alphabet dies on hand which made adding a sentiment quick and easy. I really can't even tell you how much I love this playful font! In the end it was just what I needed to tie this card design all together. 


So thank you to Mendi for this chance to showcase a few of her darling stamp sets. I can't wait to see what else I can create with your fantastic images.  :) 


Sunny Studio Supplies Used:


Happy Hamsters Stamps
Shop at:
Sunny Studio
Tiki Time Stamps
Tiki Time Stamps
Shop at:
Sunny Studio
Chloe Alphabet Dies
Chloe Alphabet Dies
Shop at:
Sunny Studio

Friday, June 25, 2021

Color My World Cards with Kay and Candice

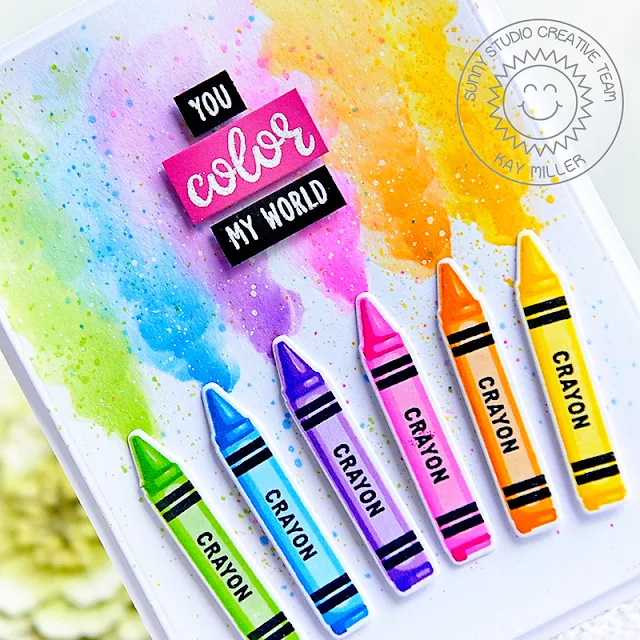
Hi there! Kay here with a card to share with you using the new Color My World stamp set and Color My World coordinating dies. I chose to use just the crayon and sentiment out of the stamp set, but I can't wait to use some of the other fun images too! I have many fun ideas in my head for the paint set!

Sunny Studio Stamps: Color My World Teacher Appreciation Crayon Themed Appreciation Cards by Kay Miller

So I first stamped all of the crayons in the Color My World Stamp set in several different colors using inks from Pinkfresh. These stamps are four step layering stamps, and the Pinkfresh inks come in four shades for each color, so they work perfectly! I then cut out all of the images with the Color My World dies and set them aside.

I created my background using the same inks that I stamped the crayons with. I watercolored onto white cardstock. Cardstock doesn't move the ink around quite as well as watercolor paper, but since the areas were small it worked fine. I then speckled with some more of the same ink colors and some white ink as well.

Sunny Studio Stamps: Color My World Teacher Appreciation Crayon Themed Appreciation Cards by Kay Miller

After this dried, I cut my panel out and mounted it onto a A2 white card base with foam tape. I then added all of the crayons with foam tape as well. The sentient was heat embossed with white embossing powder on black and pink cardstocks and added above the crayons with foam tape.

I hope you have enjoyed my card today! Have a great weekend!

------------------------------------------------

Hello crafty friends, it's Candice back with you this Friday! I know this past year of school has been tough for kids and those special teachers that were there for your kids deserve some recognition! I have a great card with a great sentiment just for that occasion!

Sunny Studio Stamps: Color My World Slimline Dies Crayon Themed Appreciation Card by Candice Fisher

I used these Sunny Studio products to create my mini slimline design:

I began my mini slimline with a 6 1/2 x 4 card base. I then created the stitched background with the slimline pennant die using the partial die cut method (run the die through partway, rotate and line up, and run it partway again!)

Next, I made the rainbow of pencil ends in an assembly way. I first stamped the base in all the colors and then moved to the next layer in all the colors until the pencils were created using Altenew inks. This allowed me to line it up evenly throughout all the stamping. I then used the coordinating dies to cut them all out.

Sunny Studio Stamps: Color My World Slimline Dies Crayon Themed Appreciation Card by Candice Fisher

I finished the clean and simple design by gluing the pencils down the right side in rainbow order, trimmed the edges, and stamped my sentiment on the left!

I hope you find inspiration to show appreciation for the teachers that have helped your family in the past year! Thank you so much!

Sunny Studio Supplies Used:

Color My World Stamps
Shop at:
Sunny Studio
Color My World Dies
Color My World Dies
Shop at:
Sunny Studio
Teacher Appreciation Stamps
Shop at:
Sunny Studio
Slimline Pennant Dies
Shop at:
Sunny Studio