Showing posts with label Backyard Bugs. Show all posts

Saturday, September 3, 2022

Guest Designer Spotlight: Cards with Leanne West

Hello and happy September! Leanne here with you today. We are just a few weeks away from the official start of fall and I can't wait! In the mean time, I enjoyed creating a couple of fall cards in anticipation of sweater weather and pumpkin spice lattes.  

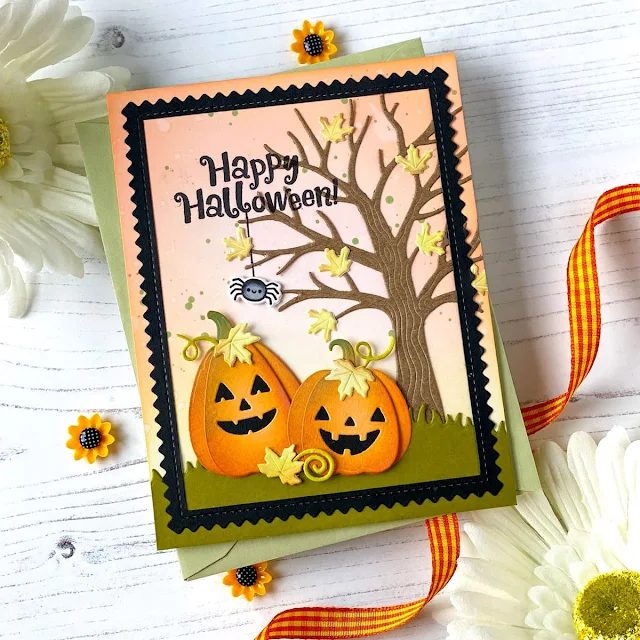
Sunny Studio Stamps: Pumpkin Patch Dies and Autumn Tree Dies Focused Fall Themed Cards by Leanne West

I've used two new standalone die sets to help build my scenes - Pumpkin Patch and Autumn Tree. I just love a card with lots of layers and texture. These new die sets made it so easy to achieve that. 

Both of my cards started out with the same ink blended background which is a combination of Tattered Rose and Saltwater Taffy Distress Oxide Inks. I then added a khaki green die cut grassy hill to each.

Sunny Studio Stamps: Pumpkin Patch Dies and Autumn Tree Dies Focused Fall Themed Cards by Leanne West

To make the pumpkins and Jack-o-lanterns, I die cut the pieces from light orange card stock. For shading on each piece, I used Carved Pumping, Vintage Photo, and Peeled Paint Oxide Ink. The shading is important because I feel this really gives the pumpkins more dimension when the pieces are all layered together. For the Jack-o-lanterns, I die cut the faces into the top pumpkin layer and backed it with black card stock. The face pieces are tiny and I felt this was the easiest way to assemble them. 

After I had the pumpkins and tree placed into the scene, I used lots of leaves for embellishment. I die cut the leaves from white card stock. I used a small blending brush with Shabby Shutters, Carved Pumpkin, Vintage Photo, and Peeled Paint Oxide Inks to color them. I scattered the leaves on the tree and pumpkins and even some in the air on the Happy Fall card. The little dashed lines have been stamped. These stamps come from the Backyard Bugs set. They are meant for bug trails but work just as well for blowing leaves. 

Sunny Studio Stamps: Pumpkin Patch Dies and Autumn Tree Dies Focused Fall Themed Cards by Leanne West

For the Halloween card I added the stamped sentiment and tiny spider. These are from a new set called Too Cute To Spook. I hand drew the line the spider is hanging from. For the fall card, I added a part stamped, part die cut greeting. Happy Thoughts and the Chloe Alphabet were the sets I used. Finally to complete my cards, I added some frames. I wanted these frames to be fairly thin so they wouldn't cover up too much of the scenes. I used two different Frilly Frames dies - Chevron & Stripes. With a craft knife and straight edge, I was able to thin the sides of each frame.   

I hope my cards have inspired you to get started on your fall projects. Thanks for stopping by! 

Sunny Studio Supplies Used:
Backyard Bugs Dies
Backyard Bugs Dies
Shop at:
Sunny Studio
Backyard Bugs Stamps
Shop at:
Sunny Studio
Chloe Alphabet Dies
Chloe Alphabet Dies
Shop at:
Sunny Studio
Happy Thoughts Stamps
Shop at:
Sunny Studio
Frilly Frames Chevron Die
Shop at:
Sunny Studio
Frilly Frames Stripes Die
Shop at:
Sunny Studio
Too Cute To Spook Stamps
Shop at:
Sunny Studio
Too Cute To Spook Dies
Shop at:
Sunny Studio
Autumn Tree Die
Autumn Tree Die
Shop at:
Sunny Studio
Pumpkin Patch Dies
Pumpkin Patch Dies
Shop at:
Sunny Studio

Friday, January 1, 2021

Snail Mail Cards with Rachel and Candice

Hello friends and Happy New Year! It's Rachel here with a card featuring the new Snail Mail Stamp Set. I combined this adorable set with both the Backyard Bugs and Turtley Awesome stamp sets to create a fun little scene.

Sunny Studio Stamps: Snail Mail Backyard Bugs Turtley Awsome Friendship Card by Rachel Alvarado

To start, I first trimmed a piece of Neenah Solar White 110lb Card Stock slightly larger than 4.25" x 5.5". I then stamped my images using the masking technique and some Gina K. Designs Masking Magic Sheets to create a single layer card. While my masking pieces were still in place, I then blended the background sky with some Spun Sugar and Milled Lavender Distress Oxide Inks.

Copic Colors Used: Mailbox: W2, W4, W6, W9; Greens: G20, G21, G24, YG67; White/Grays: 0, C0, C2, C4; Reds: R14, R46, R89; Mailbox Base: E30, E23, E25; Turtle Shell: E40, E41, E42, E43, E44

Sunny Studio Stamps: Snail Mail Backyard Bugs Turtley Awsome Friendship Card by Rachel Alvarado

Next, I blended the grass area with Shabby Shutters Distress Oxide Ink and splattered both the top and bottom distressed areas with diluted opaque white paint. I then removed my masking sheets and allowed my panel to dry completely before trimming it down to 4.25" x 5.5". Next, I colored my images with Copic Markers and then stamped my sentiment into the top left corner with black ink.

Thanks so much for stopping by! Wishing you all a lovely weekend!

---------------------------------------------

Hello and Happy New Year! Candice with you on this first day of 2021 and sharing a sweet Valentine's Day card using the adorable Snail Mail set!

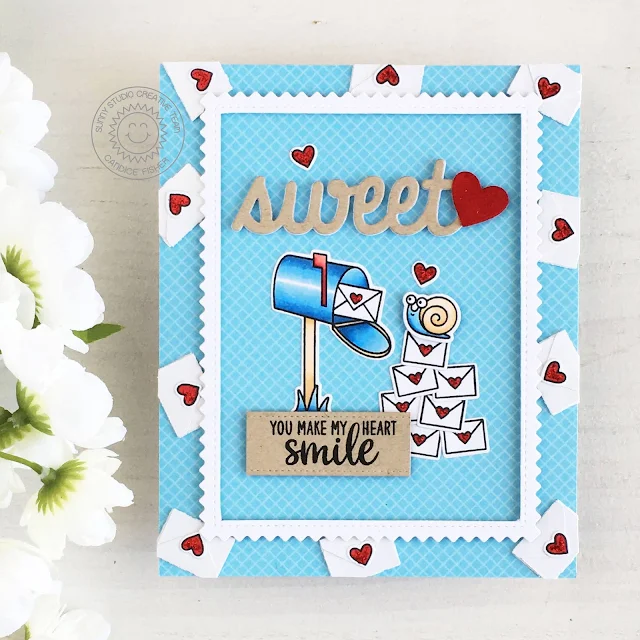
Sunny Studio Stamps: Snail Mail Sweet Word Dies Fancy Frame Dies Friendship Card by Candice Fisher

I used these Sunny Studio products to create my card:

For the background, I trimmed my pattern paper and created my deckled edge frame by cutting out the center with my trimmer and using foam tape to adhere to the front. I then created multiple envelopes using my Cameo Silhouette, adhered around the outside edge of the card and trimmed with scissors. I added some hearts and colored in red Stickles.

Sunny Studio Stamps: Snail Mail Sweet Word Dies Fancy Frame Dies Friendship Card by Candice Fisher

Next, I stamped the mailbox, snail, envelopes and hearts, colored them with Copic markers and used the coordinating dies to cut them out. I then die cut multiples of the sweet with the top layer in kraft and put a heart at the end in red velvet paper to create the word "sweetheart". To put it together, I added the images under the sweet and added the sentiment on a stitched banner under the mailbox! 

Valentine's are my favorite cards to make and I look forward to making many more and I hope you are inspired to start yours! Thank you for stopping by!

Sunny Studio Supplies Used:

Backyard Bugs Dies
Backyard Bugs Dies
Shop at:
Sunny Studio
Backyard Bugs Stamps
Shop at:
Sunny Studio
Sweet Word Die
Sweet Word Die
Shop at:
Sunny Studio
Turtley Awesome Dies
Shop at:
Sunny Studio
Turtley Awesome Stamps
Shop at:
Sunny Studio
Fancy Frames- Rectangles
Shop at:
Sunny Studio
Mini Basic Shape Dies
Shop at:
Sunny Studio
Gingham Pastels 6x6 Paper
Shop at:
Sunny Studio
Frilly Frames Chevron Die
Shop at:
Sunny Studio
Snail Mail Stamps
Snail Mail Stamps
Shop at:
Sunny Studio
Snail Mail Dies
Snail Mail Dies
Shop at:
Sunny Studio

Tuesday, December 29, 2020

Snail Mail Cards with Leanne and Isha

Hello everyone, Leanne here! I have a bright and cheerful card to share that features images from a cute new set called Snail Mail. I think this is a must have little set for any card maker.

Sunny Studio Stamps: Snail Mail Background Basics Easter Wishes Slimline Dies Friendship Cards by Leanne West

I have combined the images from Snail Mail with elements from some older stamp sets so this card is a true mix and match design. First I stamped gingham borders on a panel of white card stock that's cut slightly smaller than A2 size. This gingham stamp comes from the Background Basics set. Next, I masked off the gingham to ink blend the background for the scene. I Copic colored all the images to make a spring scene. The mailbox, snail, and hearts are from Snail Mail. The tulips are from Easter Wishes.  

Sunny Studio Stamps: Snail Mail Background Basics Easter Wishes Slimline Dies Friendship Cards by Leanne West

I pulled sentiments from two stamp sets to create the very appropriate greeting. The first part, a little snail mail, is from Backyard Bugs. The second part, for you, is from Over the Rainbow. Lastly I added skinny strips of dark grey card stock to frame in the scene and then adhered the finished panel to an A2 white card base.  

-----------------------------------------------

Hello everyone, Isha here with a CAS card using masking technique. Today, I am featuring the Snail Mail stamp and dies.

Sunny Studio Stamps: Snail Mail Slimline Dies Friendship Card by Isha Gupta

I started by die-cutting a circle onto a masking paper. Adhere it to a white layer. Die-cut the clouds and grass onto white card using the Slimline Nature Border dies. Sponge distress ink using these die-cut stencils. Remove the mask.

Stamp the images from the Snail Mail stamps using alcohol friendly ink and color using Copic markers. Die-cut using the coordinating dies. Die-cut a heart using the dies in the die set.

Sunny Studio Stamps: Snail Mail Slimline Dies Friendship Card by Isha Gupta

Adhere the images using 3d foam and liquid glue for various dimensions. Stamp the sentiment and adhere the heart. To finish, I applied spectrum noir clear sparkle to the letters.

Wishing you a happy new year and a wonderful year ahead. Thanks for stopping by!

Sunny Studio Supplies Used:

Backyard Bugs Stamps
Shop at:
Sunny Studio
Easter Wishes Dies
Easter Wishes Dies
Shop at:
Sunny Studio
Easter Wishes Stamps
Shop at:
Sunny Studio
Background Basics Stamps
Shop at:
Sunny Studio
Over The Rainbow Stamps
Shop at:
Sunny Studio
Slimline Nature Borders
Shop at:
Sunny Studio
Snail Mail Stamps
Snail Mail Stamps
Shop at:
Sunny Studio
Snail Mail Dies
Snail Mail Dies
Shop at:
Sunny Studio

Tuesday, April 28, 2020

Tea-riffic Cards with Leanne and Ana

Hello crafters, Leanne here! I'm excited to start sharing what I've been working on using the newest release. For today's project, I've made a Mother's Day card featuring the sweet images from Tea-riffic

Sunny Studio Stamps: Tea-riffic Background Basics Frilly Frame Dies Stitched Oval Dies Mother's Day Card by Leanne West

I started by stamping out and Copic coloring the tea cup and tea pot from Tea-riffic. I also stamped out several tiny flowers and leaves which can be found in the Backyard Bugs stamp set.  

Copic colors used for the tea cup and pot are BV01, BV02, BV04. Colors used for the flowers and leaves are RV52, RV55, YG11, YG17.

Next I applied some Spun Sugar Distress Oxide ink with a blending brush to the center of an A2 sized card. I stamped a strip of white card stock with the gingham stamp from Background Basics using some bright green ink. This gingham piece will serve as a table cloth. I positioned the gingham strip towards the bottom half of the card front. I arranged the colored images as if they were sitting on the table. Once I had my images in place, I could stamp the greeting right above them. The word stamps to build this greeting come from the Tea-riffic set.  

Sunny Studio Stamps: Tea-riffic Background Basics Frilly Frame Dies Stitched Oval Dies Mother's Day Card by Leanne West

To complete the card I created a custom frame. I covered a panel of white card stock with Spun Sugar Distress Oxide ink. I spattered the inked panel with water and thinned pink paint. To give the panel a scalloped edge, I used a die from the Frilly Frames Hexagon set. To make the opening, I used the second largest die from the Stitched Oval set. Lastly, I adhered the frame onto the card front with adhesive foam tape. 

-----------------------------------------------------

Hi crafty friends! Ana here today with a sweet Mother’s Day card showcasing brand new Tea-riffic stamps and dies. As soon as I saw this beautiful stamp set, it made me think of England and I wanted nothing more than to create a beautiful card that has a feel of English afternoon tea time, with fine china and delicate lace.

Sunny Studio Stamps: Tea-riffic Background Basics Frilly Frame Dies Heartstring Border Dies Mother's Day Card by Ana Anderson

I stamped the images from Tea-riffic set with very light blue ink for no line Copic coloring. I used BV04, BV13, BV02, BV31 markers to color both images, then free-handed a floral pattern on both teapot and cup and die cut with coordinating dies.

I created the floral pattern for the bottom part of my card by stamping a little flower (from Chickie Baby stamp set) in same light blue ink and coloring each flower with BV markers. I added dots in three different sizes to fill in the space between the flowers.
I used Heartstring Border dies to die cut heart borders, colored the pierced one with markers, then layered white border and hearts on top.

Sunny Studio Stamps: Tea-riffic Background Basics Frilly Frame Dies Heartstring Border Dies Mother's Day Card by Ana Anderson

For my background scalloped mat, I used Frilly Frames Eyelet Lace die and colored it with the same BV markers. I stamped the sentiment (from Tea-riffic set) with dark gray ink, trimmed it into a strip and assembled my card popping the teapot, cut and the sentiment with foam tape.

I just love how this card turned out and I really hope you like it too and that you got inspired. Thank you so much for spending some time with us today – I hope you have a wonderful rest of your week!

Sunny Studio Supplies Used:

Backyard Bugs Dies
Backyard Bugs Dies
Shop at:
Sunny Studio
Backyard Bugs Stamps
Shop at:
Sunny Studio
Background Basics Stamps
Shop at:
Sunny Studio
Stitched Oval Dies
Stitched Oval Dies
Shop at:
Sunny Studio
Frilly Frames Hexagon Dies
Shop at:
Sunny Studio
Chickie Baby Stamps
Chickie Baby Stamps
Shop at:
Sunny Studio
Frilly Frames-Eyelet Lace
Shop at:
Sunny Studio
Heartstrings Border Dies
Shop at:
Sunny Studio
Tea-riffic Stamps
Tea-riffic Stamps
Shop at:
Sunny Studio
Tea-riffic Dies
Tea-riffic Dies
Shop at:
Sunny Studio