Showing posts with label Christmas Icons. Show all posts

Tuesday, November 30, 2021

Lacy Snowflake Die Focused Cards with Kavya and Isha

Hi folks! Kavya here with another fun project! With the holidays around the corner, I decided to make some fun tags to go with my gifts. 

Sunny Studio Stamps: Lacy Snowflake Tags by Kavya (featuring Christmas Icons, Build-A-Tag 2 Dies)

I first started off by ink blending die cut Build a Tag #2 using two different distress oxide inks for each color:

  • Blue: Faded Jeans and Tumbled Glass
  • Green: Mowed Lawn and Shabby Shutters
  • Red: Abandoned Coral and Tattered Rose
Sunny Studio Stamps: Lacy Snowflake Tags by Kavya (featuring Christmas Icons, Build-A-Tag 2 Dies)

Sunny Studio Stamps: Lacy Snowflake Tags by Kavya (featuring Christmas Icons, Build-A-Tag 2 Dies)

I added some 
Lacy Snowflake die cuts and white splatter paints to make a fun background.

Sunny Studio Stamps: Lacy Snowflake Tags by Kavya (featuring Christmas Icons, Build-A-Tag 2 Dies)

Finally, I added some cute critters from Christmas Icons and sentiments from Holiday Express stamp set to finish off my tags!

I hope you liked these tags! Happy Crafting.

-------------------------------------------------

Hello everyone! Isha here with a CAS mixed media card featuring our Lacy Snowflakes. I really like the size and the intricate design of these dies. 

Sunny Studio Stamps: Lacy Snowflake Card by Isha Gupta (featuring Slimline Scalloped Frame Dies)

To start, I die-cut the slimline stitched rectangle from the Slimline Scalloped Frame dies. I then applied some crackle paste to it and let it dry. Once dry, we will get fine cracks, it's tough to capture them in the photo but it really looks pretty in real life.

Now I added a light watercolor using worn lipstick distress ink to this piece. Once dry, mat it with a pink cardstock. Adhere to a white card base. Flick gold paint.

Sunny Studio Stamps: Lacy Snowflake Card by Isha Gupta (featuring Slimline Scalloped Frame Dies)

I die-cut the snowflakes using pearl paper in pink and beige. Adhere these to the card by layering them as per your liking to create some movement. Add a gold floss for some more movement. Stamp the sentiment from the Holiday Express stamp, cut in stripes, sponge some ink to the edges and adhere to the card. To finish, adhere, some Crystal Clear Jewels.

Thank you for stopping by. Have a nice day!

Sunny Studio Supplies Used:

Christmas Icons Dies
Shop at:
Sunny Studio
Christmas Icons Stamps
Shop at:
Sunny Studio
Holiday Express Stamps
Shop at:
Sunny Studio
Lacy Snowflakes Die
Lacy Snowflakes Die
Shop at:
Sunny Studio
Build-A-Tag #2 Dies
Build-A-Tag #2 Dies
Shop at:
Sunny Studio
Slimline Scalloped Frame
Shop at:
Sunny Studio

Wednesday, December 18, 2019

Scalloped Tags Holiday Projects with Ana and Franci

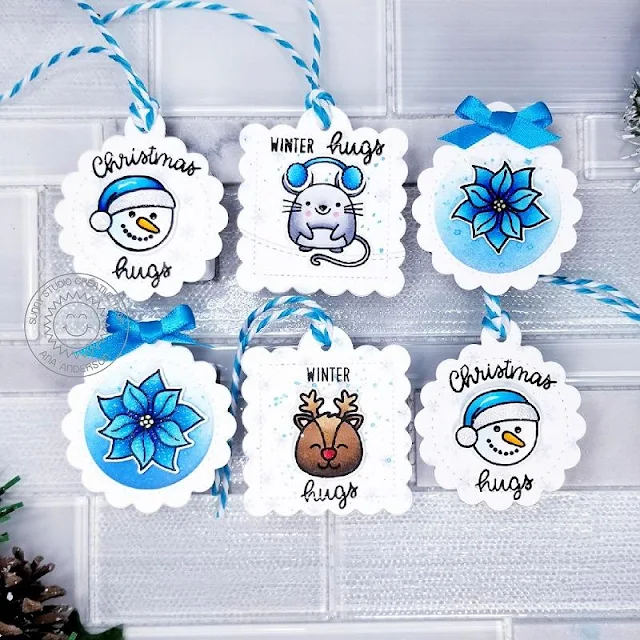
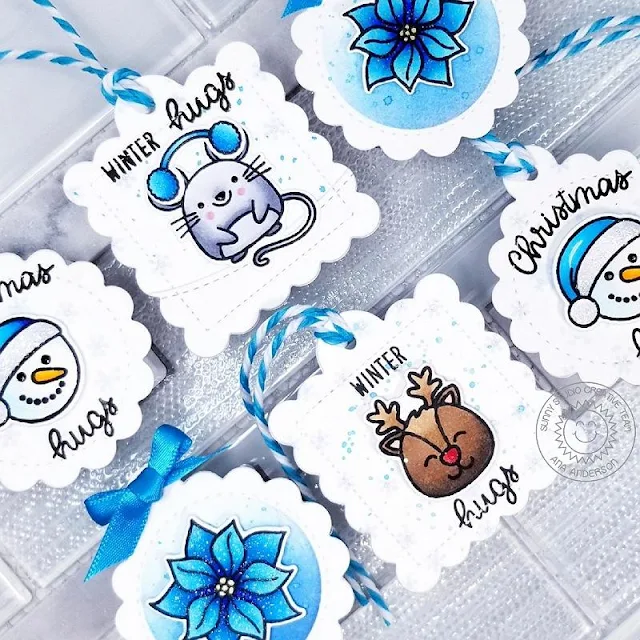
Hello friends! It’s Ana here today with a project featuring Scalloped Tags Circle dies and Christmas Icons stamps and dies

Sunny Studio Stamps: Scalloped Tag Dies Merry Mice Christmas Icons Christmas Gift Tags by Ana Anderson

I decided to use small Scalloped Tags Circle dies and Christmas Icons for my tags, as I don’t always have the time to make all the gift tags for the presents, and I knew I could mass produce these easily. Christmas Icons are just the perfect size to add on every tag, and were so fun and easy to make! The only image not from Christmas Icons set is the little mouse with earmuffs – he is from Merry Mice set.

I started with die cutting two pieces of cardstock for each tag (front and back) and decorating the front piece for each tag. Since our wrapping paper is in blue tones, I created all the tags to match the color scheme.

Sunny Studio Stamps: Scalloped Tag Dies Merry Mice Christmas Icons Christmas Gift Tags by Ana Anderson

I did some ink blending on several of them, added splatter with diluted blue ink on some and stamped light blue snowflakes on the rest for the backgrounds. Next, I stamped each back piece with from/to words (also from Christmas Icons) and adhered all fronts and backs of the tags together with liquid glue.

I stamped, colored and die cut the Christmas Icons images and adhered each little icon to each tag with foam tape. I added blue ribbon or twine to the tags, stamped the sentiments (from Alpaca Holiday stamps) and added glitter Stickles to the hats and snowflakes to embellish each one.

I am so happy the way they turned out so excited to have all the gift tags handmade this year! Thank you so much for stopping by today, I really hope I have given you some fresh ideas for the handmade gift tags and inspired you!

-------------------------------------------------------

Hi everyone! Franci here with you today, showcasing the Scalloped Tags Square dies set!

Sunny Studio Stamps: Scalloped Tag Dies Feeling Frosty Woodland Borders Scenic Route Christmas Gift Tags by Franci Vignoli

I love these dies so much I can't wait to make Valentine's Days tags, Easter tags .. and so much more with them, but I have another Xmas/ Winter one for today to show you. First of all I die cut the main tag multiple times out of white cardstock to cover all the different layers you see and I also cut one out of this bright light blue patterned paper from the Very Merry paper pad. 

I die cut 3 of the white tags with the Woodlands Borders and I stamped 3 more with the Scenic Route stamp set. I colored these last ones with my Copics and die cut them out with their coordinated dies. I glued all of them on to my patterned paper tag with liquid glue and I started working on my images.

Sunny Studio Stamps: Scalloped Tag Dies Feeling Frosty Woodland Borders Scenic Route Christmas Gift Tags by Franci Vignoli

I stamped, colored and die cut some of my fave snowmen from the Feeling Frosty set and glued them with foam adhesive. Finally I die cut one more tag out of white cardstock and glued it on the back ( there's a lot of room there for your personal message this way!). I stamped my sentiments on the front and added lots of details with a white gel pen + some embellishments as White Nuvo Drops + a white ribbon at the top.

I'm so happy about how it turned out, hope you like it too and thank you so much for stopping by today!

Sunny Studio Supplies Used:

Christmas Icons Dies
Shop at:
Sunny Studio
Christmas Icons Stamps
Shop at:
Sunny Studio
Woodland Borders Dies
Shop at:
Sunny Studio
Alpaca Holiday Stamps
Shop at:
Sunny Studio
Very Merry 6x6 Paper
Shop at:
Sunny Studio
Feeling Frosty Stamps
Shop at:
Sunny Studio
Feeling Frosty Dies
Feeling Frosty Dies
Shop at:
Sunny Studio
Merry Mice Stamps
Merry Mice Stamps
Shop at:
Sunny Studio
Merry Mice Dies
Merry Mice Dies
Shop at:
Sunny Studio
Scenic Route Stamps
Scenic Route Stamps
Shop at:
Sunny Studio
Scenic Route Dies
Scenic Route Dies
Shop at:
Sunny Studio
Scalloped Tags-Circle
Shop at:
Sunny Studio
Scalloped Tags-Square
Shop at:
Sunny Studio

Friday, November 29, 2019

Hedgey Holidays Cards with Rachel and Candice

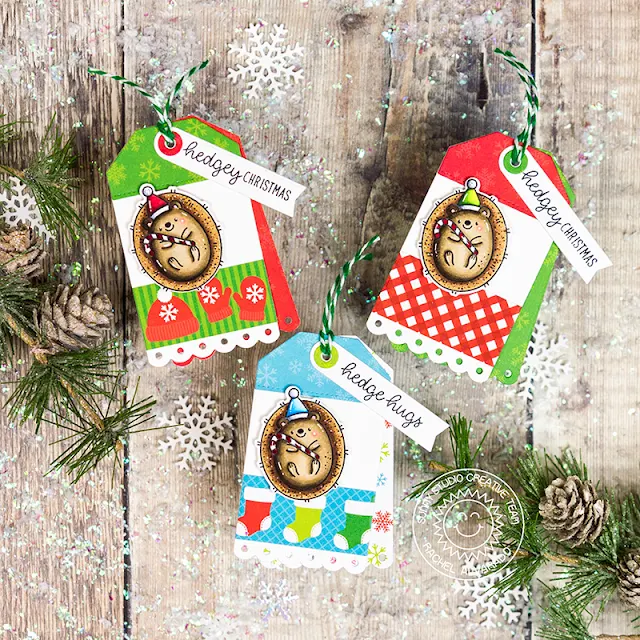
Hello, crafty friends! It's Rachel here and I have some fun Christmas tags to share with you today featuring the sweetest little hedgehog from the Hedgey Holidays Stamp Set. I combined this cute little mini stamp set with the Build-A-Tag #2 Die Set and the Holiday Cheer 6x6 Paper Pack to create some easy tags that would go great with your Christmas gifts!

Sunny Studio Stamps: Hedgey Holidays Build-A-Tag Dies Holiday Tags by Rachel Alvarado

I stamped my hedgehogs onto a sheet of Neenah Solar White 110lb Card Stock and colored them with Copics. (Colors used: Body: E41, E41, E43, E44; Spines: E31, E23, E25; Reds: R46, R89; Greens: YG01, YG07, YG17, G28; Blues: B0000, B01, B02, B06; Whites: 0, C00, C2, C4.) I used the coordinating Dies to cut them out and attached them to my tags with some 3D Foam Adhesive Tape.

Sunny Studio Stamps: Hedgey Holidays Build-A-Tag Dies Holiday Tags by Rachel Alvarado

I cut a second coordinating tag layer to attach behind all of my tags and stamped each of them with some "To:" and "From:" sentiments from the Christmas Icons Stamp Set. I fished off each tag by stamping the sentiment onto another strip of white card stock and attaching it all together with some green & white striped twine.

I hope you enjoyed my tags today! Thanks so much for stopping by!

-----------------------------------------------------

Hey, it's Candice here. This little cutie is part of the Black Friday deals at Sunny Studio Stamps and I used it to make a cute Christmas card!

Sunny Studio Stamps: Hedgey Holidays Hogs & Kisses Scenic Route Christmas Garland Frame Dies Holiday Card by Candice Fisher

All the Sunny Studio Stamps products I used:
I started my card by creating an 8 1/2 x 3 1/2 card base which fits into a standard or 9A size envelope. For the background, I first inked a trimmed piece with worn lipstick & spun sugar and splattered with red shimmer spray. I then repeatedly stamped the Hedgehogs, colored them with Copic markers and die cut one extra and pop dotted on top of the center one.

Sunny Studio Stamps: Hedgey Holidays Hogs & Kisses Scenic Route Christmas Garland Frame Dies Holiday Card by Candice Fisher

To finish the card, I added some strings of lights that I layered for depth along with the Merry Christmas topped with foil mint paper. I also added the sentiment onto the speech bubble along with the holly colored with Copics.

Make sure you take advantage of the Black Friday deal at Sunny Studio Stamps here!


All retail purchases of any size will have 10% donated to Convoy of Hope to help with children’s feeding initiatives and disaster response.

And as always orders will also come with our mini holiday light bulb die (not pictured).

Sunny Studio Supplies Used:

Christmas Icons Stamps
Shop at:
Sunny Studio
Holiday Cheer 6x6 Paper
Shop at:
Sunny Studio
Build-A-Tag #2 Dies
Build-A-Tag #2 Dies
Shop at:
Sunny Studio
Scenic Route Stamps
Scenic Route Stamps
Shop at:
Sunny Studio
Scenic Route Dies
Scenic Route Dies
Shop at:
Sunny Studio
Hogs & Kisses Stamps
Shop at:
Sunny Studio
Hogs & Kisses Dies
Hogs & Kisses Dies
Shop at:
Sunny Studio
Christmas Garland Frame
Shop at:
Sunny Studio

Tuesday, December 18, 2018

Build-A-Tag Holiday Tags: Ugly Christmas Sweater Tags with Juliana

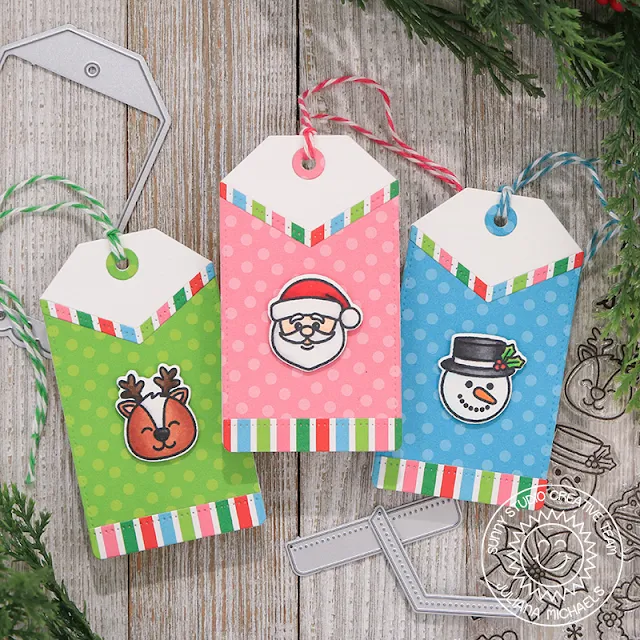
Happy Holidays friends! It's Juliana Michaels and today I'm here to share a set of Ugly Christmas Sweater Tags featuring the Build-A-Tag die sets and Christmas Icons stamp set.

Sunny Studio Stamps: Build-A-Tag Holiday Cheer Paper Christmas Icons Ugly Christmas Sweater Tags by Juliana Michaels

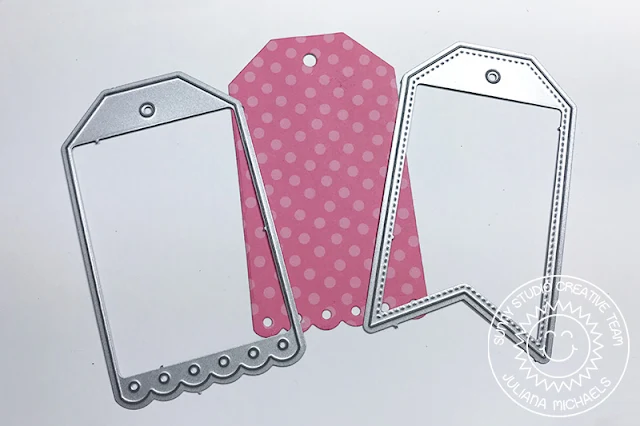
For these tags, begin by creating the tag base. Cut 3 pieces of patterned paper from the Holiday Cheer 6x6" paper pad using the scalloped edged die from Build-A-Tag #2. Use this same die to cut 3 more tags from white cardstock and set them to the side.

Sunny Studio Stamps: Build-A-Tag Holiday Cheer Paper Christmas Icons Ugly Christmas Sweater Tags by Juliana Michaels

Next, take the other tag die in the Build-A-Tag #2 set and position it as shown in the photo on top of the tags you just cut.

Sunny Studio Stamps: Build-A-Tag Holiday Cheer Paper Christmas Icons Ugly Christmas Sweater Tags by Juliana Michaels

Make sure you line the die up so that it doesn't cut off the bottom scalloped edges. You are using this die to cut the “V” in the top of the tag. This will create the top of your sweater.

Sunny Studio Stamps: Build-A-Tag Holiday Cheer Paper Christmas Icons Ugly Christmas Sweater Tags by Juliana Michaels

Take the straight edge and angled dies from the Build-A-Tag #1 set and die cut a piece of the striped patterned paper from the Holiday Cheer 6x6 paper pad. This will become the trim on your sweaters.

Sunny Studio Stamps: Build-A-Tag Holiday Cheer Paper Christmas Icons Ugly Christmas Sweater Tags by Juliana Michaels

Once you have all of the pieces die cut. You can begin to assemble the tags. Adhere the “V” cut piece on top of the solid white die cut tag.

Sunny Studio Stamps: Build-A-Tag Holiday Cheer Paper Christmas Icons Ugly Christmas Sweater Tags by Juliana Michaels

Next, adhere the trim to the bottom of the tag making sure t
o cover the scallops. Then adhere the trim along the “V” edge at the top of the tag.

Sunny Studio Stamps: Build-A-Tag Holiday Cheer Paper Christmas Icons Ugly Christmas Sweater Tags by Juliana Michaels

The final step is to decorate your Ugly Christmas Sweater Tags using some of the fun images from the Christmas Icons stamp set. I probably could have gone a bit uglier, but I stuck with one image for each tag and colored them with Copic markers.

Sunny Studio Stamps: Build-A-Tag Holiday Cheer Paper Christmas Icons Ugly Christmas Sweater Tags by Juliana Michaels

So, how would you decorate your Ugly Christmas Sweater Tags? I hope you enjoyed today's project and thanks so much for joining me today!

Sunny Studio Supplies Used:

Christmas Icons Dies
Shop at:
Sunny Studio
Christmas Icons Stamps
Shop at:
Sunny Studio
Holiday Cheer 6x6 Paper
Shop at:
Sunny Studio
Build-A-Tag #1 Dies
Build-A-Tag #1 Dies
Shop at:
Sunny Studio
Build-A-Tag #2 Dies
Build-A-Tag #2 Dies
Shop at:
Sunny Studio