Showing posts with label Tag Toppers. Show all posts

Saturday, May 21, 2022

Guest Designer Spotlight: Cards with Tammy Stark

Hello friends! Tammy here. I'm thrilled to be guest designing today with Sunny Studio's newest release. I absolutely adore this new release and have a few projects to share using one of my favorite sets, Baby Elephants.

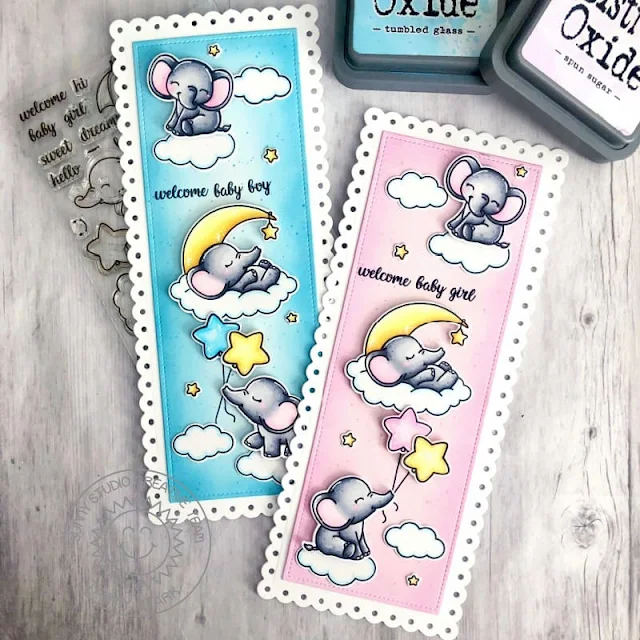
Sunny Studio Stamps: Baby Elephants Baby Cards by Tammy Stark (featuring Slimline Dies)

For my first project, I created a pair of baby cards. How sweet are these images? So cute, I had to make both a baby girl and baby boy version!

To begin, I stamped the images from Baby Elephants, colored with Copic markers, and die cut the colored images using the Baby Elephants Dies

Next, I die cut 2 white scalloped mats using the Slimline Scalloped Frame Dies. I then cut the smaller panels from Bristol smooth cardstock and ink blended the backgrounds with Kitsch Flamingo and Spun Sugar (baby girl card) and Peacock Feathers and Tumbled Glass (baby boy card). I then stamped the sentiments onto the cards using black ink and arranged the colored images onto the cards, attaching some with foam tape for dimension. Lastly, I adhered my completed card to a white card base to finish up. 

Sunny Studio Stamps: Graduation Cards by Tammy Stark (featuring Woo Hoo, Tag Topper Dies, Fancy Frame Dies)

I just love how versatile this stamp set is! I had fun creating some grad themed projects with Baby Elephants.

To begin, I stamped, colored with Copic markers, and die cut images from the following sets:
Baby Elephants Coordinating Dies
Woo Hoo Coordinating Dies

Sunny Studio Stamps: Graduation Cards by Tammy Stark (featuring Woo Hoo, Tag Topper Dies, Fancy Frame Dies)

My first project is a fun box card. I began by die cutting a basic box die using black cardstock and assembled it. The back panel of the box is ink blended with Blueprint Sketch Distress Oxide inks, which I then splattered with some white and black acrylic paint that was thinned with water. Next, I cut some cloud borders using the Slimline Nature Borders Dies from white cardstock and trimmed them to fit the width of the box. I then cut a rectangle panel using the blue patterned paper from the Classic Gingham 6X6 Paper, matted it with white cardstock, and attached it to the front of the box. I stamped the sentiment from Woo Hoo onto the smallest pennant from the Slimline Pennant Dies and cut to fit the front of the box. Lastly, I arranged the stamped images, attaching some with foam tape for dimension.

Sunny Studio Stamps: Graduation Cards by Tammy Stark (featuring Woo Hoo, Tag Topper Dies, Fancy Frame Dies)

I also created some coordinating gift card holders; perfect for presenting a gift card or money to the grad!

To begin, I stamped, colored with Copic markers, and die cut images from the following sets:
Baby Elephants Coordinating Dies
Woo Hoo Coordinating Dies

Next, I created the gift card holders simply by cutting a piece of black cardstock 3 1/2 X 7", scoring at 3 1/2" from the bottom. I created the tag shape using the Tag Topper Die - Traditional. I then folded on the score line and placed red line tape on the sides to create a pocket. Next, I cut 2 white scalloped square frames using the Fancy Frames Square Dies. I attached the frames over a square of Bristol smooth cardstock, ink blended with Blueprint Sketch Distress Oxide ink, which I then splattered with some white and black acrylic paint that was thinned with water. I stamped the sentiment from Woo Hoo in black ink, then attached the stamped images using foam tape. Lastly, I finished off the gift card holders with a fun tassel, made from embroidery floss.

Thanks so much for stopping by and thanks to Sunny Studio for having me! I hope you enjoyed my projects! 

Sunny Studio Supplies Used:

Tag Topper Dies-Traditional
Shop at:
Sunny Studio
Woo Hoo Dies
Woo Hoo Dies
Shop at:
Sunny Studio
Woo Hoo Stamps
Woo Hoo Stamps
Shop at:
Sunny Studio
Fancy Frames-Square Dies
Shop at:
Sunny Studio
Classic Gingham 6x6 Paper
Shop at:
Sunny Studio
Slimline Nature Borders
Shop at:
Sunny Studio
Slimline Scalloped Frame
Shop at:
Sunny Studio
Slimline Pennant Dies
Shop at:
Sunny Studio
Baby Elephants Stamps
Shop at:
Sunny Studio
Baby Elephants Dies
Baby Elephants Dies
Shop at:
Sunny Studio

Friday, December 28, 2018

A Bird's Life Birthday Card with Lexa

Hi everyone! Lexa here today, finally back from a family holiday. And today I'm sharing a birthday card using an older set called A Bird's Life Stamps and the coordinating dies. This stamp set is so cute and I can't get enough of it.

Sunny Studio Stamps: A Bird's Life Sun Ray Dies Tag Topper Dies Birthday Card by Lexa Levana

I'm going to play with bright colors today. I stamped all of the images with Versafine black ink and watercolored them with Distress markers. After I finished with the coloring I used the coordinating dies to cut all of the images. I had so much fun coloring these images.

I used the largest Tag Topper Dies on the top and bottom part of my center scene. After that, I blended some Tumbled Glass and Peacock Feather Distress inks for the sky and added bright yellow stripes using the Sun Ray Dies

Sunny Studio Stamps: A Bird's Life Sun Ray Dies Tag Topper Dies Birthday Card by Lexa Levana

As for the green hills and the card base, I used patterned papers from Sunny Studio's 6x6" Striped Silly and Classic Gingham paper pad collections. I white heat embossed the sentiment on a piece of brown cardstock that was cut as a fish tail banner. I love how happy this card looks. Do you agree with me?

Thank you so much for stopping by today. I hope you'll like this card as much as I do. Have a wonderful day everyone!

Sunny Studio Supplies Used:

A Bird's Life Stamps
Shop at:
Sunny Studio
A Bird's Life Dies
A Bird's Life Dies
Shop at:
Sunny Studio
Sun Ray Dies
Sun Ray Dies
Shop at:
Sunny Studio
Tag Topper Dies-Traditional
Shop at:
Sunny Studio
Classic Gingham 6x6 Paper
Shop at:
Sunny Studio
Striped Silly 6x6 Paper
Shop at:
Sunny Studio

Wednesday, May 16, 2018

Background Basics Puppy Themed Birthday Tags with Franci

Hello there! Franci here with you today with 2 little birthday tags. I was inspired by the new Background Basics set to create a simple tag design. I thought these backgrounds would pop up nicely with a clean look and white cardstock. 


Sunny Studio Stamps: Background Basics Party Pups Puppy Themed Birthday Tags by Franci Vignoli

First, I created the two tags using the Tag Topper dies and the Ric Rac Border diesThen I stamped my favorite dog from the Party Pups set twice, colored them with Copics and die cut them with the coordinating dies.

Sunny Studio Stamps: Background Basics Party Pups Puppy Themed Birthday Tags by Franci Vignoli

I stamped the background stripes with Spice Marmalade and Broken China Distress Oxide inks and let them dry.

Sunny Studio Stamps: Background Basics Party Pups Puppy Themed Birthday Tags by Franci Vignoli

I also stamped the sentiment from the Party Pups set and glued down the dogs with foam tape. Finally, I added some ribbon and twine.

Hope you like them and thank you so much for stopping by today!

Sunny Studio Supplies Used:

Tag Topper Dies-Traditional
Shop at:
Sunny Studio
Ric Rac Border Dies
Ric Rac Border Dies
Shop at:
Sunny Studio
Party Pups Stamps
Party Pups Stamps
Shop at:
Sunny Studio
Party Pups Dies
Party Pups Dies
Shop at:
Sunny Studio
Background Basics Stamps
Shop at:
Sunny Studio

Friday, December 22, 2017

Christmas Themed Gift Tags with Lexa

Hello everyone! Lexa here with you today. Have you got all of your presents wrapped up? Don’t forget the gift tags too. This time of the year is the most wonderful and hectic at the same time. So today I will share some inspiration for last-minute tags that can maybe save you a little time in these last few days before Christmas.


Sunny Studio Stamps: Gleeful Reindeer and Jolly Gingerbread Christmas Themed Gift Tags by Lexa Levana

I used the Tag Toppers Traditional Dies together with the Fishtail Banner II Dies. Attached them to the paper with low tack tape and die cut them at the same time. Such a time saver. I blend Distress Inks for the background, Spun Sugar, Worn Lipstick, Cracked Pistachio, Peacock Feathers. After I'm happy with the blending I stamped Frosty Flurries with matching dye inks.


Sunny Studio Stamps: Gleeful Reindeer and Jolly Gingerbread Christmas Themed Gift Tags by Lexa Levana

I stamped all of the images with Versafine black ink and watercolored them with Distress markers. The Gleeful Reindeers are so adorable, and no one can get enough of the cute gingerbread boy from Jolly Gingerbread. After I finished putting them all together, now it's time to tie up some ribbons and twines to finish the tags.


Sunny Studio Stamps: Gleeful Reindeer and Jolly Gingerbread Christmas Themed Gift Tags by Lexa Levana

Thank you so much for visiting the blog today! I hope you enjoy today's post and have an amazing holiday.

Sunny Studio Supplies Used:

Fishtail Banner II Dies
Shop at:
Sunny Studio
Gleeful Reindeer Dies
Shop at:
Sunny Studio
Gleeful Reindeer Stamps
Shop at:
Sunny Studio
Tag Topper Dies-Traditional
Shop at:
Sunny Studio
Frosty Flurries Stamps
Shop at:
Sunny Studio
Jolly Gingerbread Stamps
Shop at:
Sunny Studio
Jolly Gingerbread Dies
Shop at:
Sunny Studio

Monday, December 18, 2017

Polar Playmates Christmas Themed Tags with Eloise

Hi everyone, Eloise here and today I have some quick tags to share with you all using the Polar Playmates and Tag Topper Crescent Dies.

Sunny Studio Stamps: Polar Playmates Christmas Themed Tags by Eloise Blue

To begin I cut down three pieces of watercolor paper to 3" wide by 4 1/2" tall. I then used the largest Crescent Topper Die and cut down each of the pieces to have a tag-like edge. Then I ink blended some Tumbled Glass and Salty Ocean Distress Ink on top of each of the tags and sprinkled them with water to appear like snow. Next, I cut down some Neenah Solar White cardstock to 3" wide and used my scissors to cut a snowy hill on each of the pieces. I then stamped 'Merry Christmas' from the Jolly Gingerbread stamp set with some black ink onto each of the snow pieces. I then added some foam tape along the back and adhered it down onto the bottom of each of my tags.

Sunny Studio Stamps: Polar Playmates Christmas Themed Tags by Eloise Blue

Next, I stamped, colored, and cut my images out from the Polar Playmates stamp set. I used Copic Markers for my coloring and the coordinating dies to cut them out. Once they were cut out I adhered them onto my tags with more foam tape. To finish up my tags, I punched holes at the top of my tags and threaded through some twine, and that finished up my tags.

Thanks so much for stopping by today and I'll catch you next time!

Sunny Studio Supplies Used:


Tag Topper Dies-Crescent
Shop at:
Sunny Studio
Jolly Gingerbread Stamps
Shop at:
Sunny Studio
Polar Playmates Stamps
Shop at:
Sunny Studio
Polar Playmates Dies
Shop at:
Sunny Studio

Wednesday, December 13, 2017

Gleeful Reindeer Christmas Ornaments and Treat Bags with Franci

Hi there, happy Wednesday! It's Franci here with you today with a little Christmas party! 


Sunny Studio Stamps: Gleeful Reindeer Christmas Ornaments and Treat Bags by Franci Vignoli

"Rudolph the red-nosed reindeer had a very shine nose". And that's where my inspiration came from! I love the Gleeful Reindeer stamp set so much that I thought it would have been perfect for my little party! So first of all - the little Christmas tree.


Sunny Studio Stamps: Gleeful Reindeer Christmas Ornaments and Treat Bags by Franci Vignoli

I found this little Christmas tree at one of my local stores and loved how tiny and festive it is. I wrapped it in some gold starry twine and then I created my ornaments. I stamped all of my reindeer in memento black ink, colored them with Copics, and drew some details with a white gel pen. I then added some Wink of Stella sparkle and die cut them with the coordinating dies

Then I die cut some circles out of white cardstock and embossed the Frosty Flurries in white on the top of them. I let them cool and then sponged some Peacock Feathers distress ink to create the sky and make them pop.


Sunny Studio Stamps: Gleeful Reindeer Christmas Ornaments and Treat Bags by Franci Vignoli

This mini background is amazing, and I love the beautiful snowy effect! To complete my ornaments, I glued down all my reindeer with foam tape to give extra dimension and I also added a little clear twine. 


Sunny Studio Stamps: Gleeful Reindeer Christmas Ornaments and Treat Bags by Franci Vignoli

Then of course I had to make treat bags! For these I took some clear plastic bags and I cut 2 rectangles out of some white cardstock to match in size. I decorated them as I did for my ornament with the embossed Frosty Flurries and Distress ink. Then I created a mini tag out of white cardstock with the Tag Topper dies, stamping my little reindeer on them and coloring them with Copics. 

Then I filled my bags with treats and closed them with my decorated rectangles, gluing down the little tags on top with foam tape and adding a little red bow. So festive, right! For the treats, I took some salted dried pretzels, coated them with chocolate and let them cool. I sprinkled them with powdered sugar to finish them off. Super easy. Nothing fancy, but oh they are so yummy!


Sunny Studio Stamps: Gleeful Reindeer Christmas Ornaments and Treat Bags by Franci Vignoli

And speaking about yummy Christmas treats, here they come. Last, but not least, my reindeer cupcakes! How cute are these? And they perfectly match my reindeer! YAY! If you would like to create these too, here's how I made them. I just decorated some vanilla cupcakes with some chocolate. Then I cut some salted dried pretzels in a half to create the horns, and added some eye candies and a little mini red chocolate peanut for my Rudolph nose!

This party was so, so, sooo much fun to make. I hope you enjoyed it and host a little reindeer themed party too! Thank you so much for stopping by and have a lovely day! 

Sunny Studio Supplies Used:

Gleeful Reindeer Dies
Shop at:
Sunny Studio
Gleeful Reindeer Stamps
Shop at:
Sunny Studio
Tag Topper Dies-Traditional
Shop at:
Sunny Studio
Frosty Flurries Stamps
Shop at:
Sunny Studio