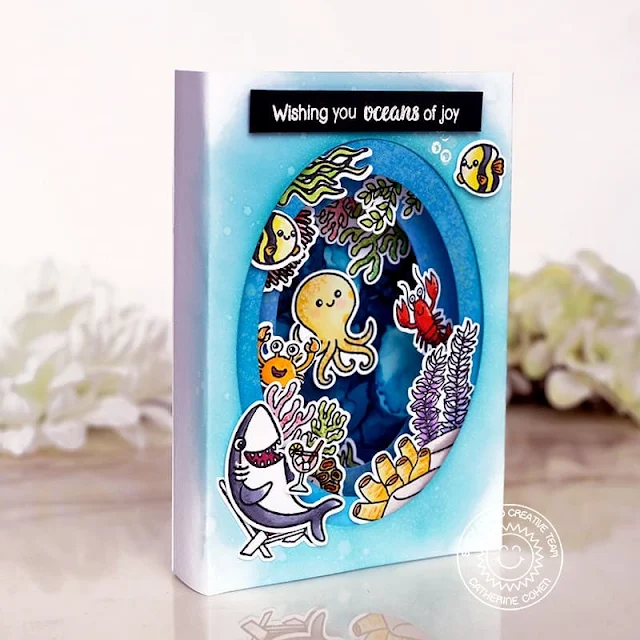
Hello Friends! Catherine here, sharing an oval shaped tunnel card featuring the wonderful Fintastic Friends!
To start, I cut four pieces of white cardstock into the following sizes:
A.
1 x (7”x 6”) – front of card, scored at .25” and 1.25”
on both right and left side
B.
1 x (4.5” x 6”) - middle, scored at .25” on both right
and left side
C.
1 x (4.5” x 6”) - middle, scored at .25” on both right
and left side
D.
1 x ( 4” x 6” ) – back of card
I ink blended A with Salvaged Patina and Tumbled Glass Distress Oxide ink. I ink blended B with Mermaid Lagoon and Tumbled Glass Distress Oxide Ink and C with Salty Ocean and Mermaid Lagoon Distress Oxide Ink. I splattered each piece with water and some Salvage Patina mixed with a few drops of water.
I used the three largest ovals in Stitched Oval 2 Dies to make the oval die cut in the center of A, B, and C. I scored A, B, and C according to the measurements listed above and used a bone folder to make the creases.
I colored the following; sea friends and ocean plants from Fintastic Friends and Best Fishes, beach chair from Kiddie Pool, and the yummy drink from Tiki Time with Copic Markers and die cut all the images with the coordinating dies.
For the background, I added blue and green alcohol ink onto alcohol ink cardstock and used an alcohol ink blower to move the ink around the cardstock. Once dried, I trimmed the cardstock to 4” x 6.”
I adhered the sea friends and plants onto B and C and added double-sided tape onto the scored areas. I then adhered B and C onto A starting with the right hand side and then the left.
For the background, I adhered the octopus and plants onto the alcohol ink cardstock. I added double sided tape onto the outer score lines of A. I folded the edges, removed the tape, and adhered the alcohol ink background. I then adhered D onto the back of the card.
I finished off the card by adding a white heat embossed sentiment and some bubbles from Oceans Of Joy along with a cute shark relaxing with a drink.
For more details and inspiration, please drop by my blog Craft-Cat! Have a wonderful day!
----------------------------------------------------
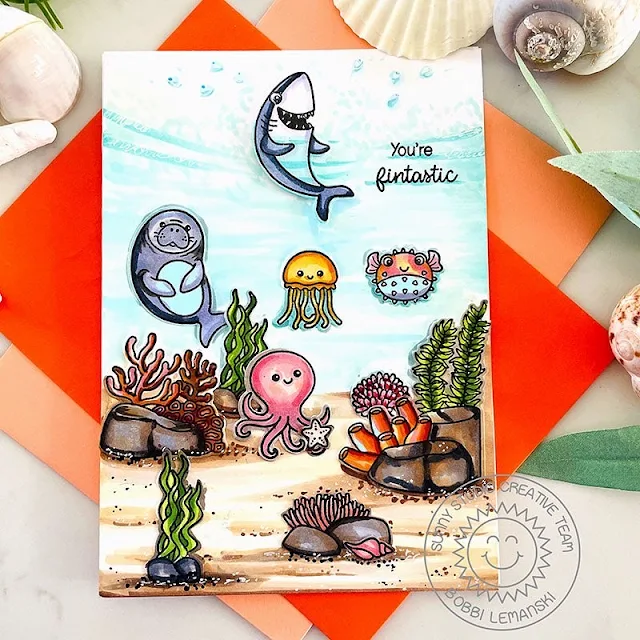
Hello Sunny Studio friends. It’s Bobbi with a colorful card set in the ocean. I’m using the new Fintastic Friends stamps and dies by Sunny Studio Stamps. This set contains lots of "fin" friends and ocean extras that work so well together. For my card today, I did a simple scene set on the ocean floor. It’s a good way to show so many of the cute elements in this set. I also added a few images from a coordinating set called, Ocean View.
To make this 5″ X 7″ card, I stamped, colored and die cut all most of the elements in the Fintastic Friends set. I also included the two larger rock/foliage images from Ocean View. Before adding them to my card front, I colored in a sand floor to anchor the elements on the deep ocean base.
Here’s the colors I used to color the
background and images:
Floor:
E47, E44, E43, E42, E53, E50, W2
Water:
BG23, BG11, Bg10, B02, B00, B000
Rocks:
E47, E44, E43, W6, W4, W3, C3, C1
Foliage:
YG67, YG17, YG03
Shells,
Coral: YR27, YR24, R22, R20, E47
Octopus:
RV95, RV93, R22, R20, BV000
Shark
and Manatee: BV29, BV23, BV000, BG10 and BG11
Other
fin friends: YR24, Y19, Y08, BG11, BV000, RV83
Just a few quick TIPS for the background design:
For the floor, I like to
make it appear bumpy, not perfect. You can achieve the look by adding in darker
shadows /thicker lines to create dips in the sand. It also helps to anchor the
elements using the darker colors around the rocks and foliage bases. Here’s a
step-by-step process I use to do this. Once I finish step 4, I often go back
over with my darkest shade (E47) and deepen that line again. I like the depth
that the stronger contrast offers.
I like to use my fine-tip
black marker in brown and black and my white gel pen to create the specks in
the sand. Tiny stones, bits of shell and other fragments help create an
interesting sandy bottom. It’s also a good way to fix a speck/smudge at times,
too.
I did a swoop of the
blue-greens at the top for the shark to pop through. The swoop defines the
water line. I find these scenes a bit harder because, you really should have a
water color cast over all the elements UNDER the water line. Instead, I just
colored in the whites of the blowfish, shark and manatee to give the appearance
of being in the water. I think it works without having to have a blue green
cast on the entire scene.
To create some “action” at
the top, I added water droplets in the sky as if the shark was creating quite a
splash.
To finish my card, I stamped the phrase, “You’re fintastic” by the shark. I think this guy is pretty fantastic so it works! I also like this phrase because it can be used to congratulate, celebrate or just say, “I’m thinking of you today.” It works for so many needs.
Thanks
for stopping by today. If you want to see more ideas and inspiration from me,
subscribe to my blog, BobbiHartDesign.com. I’ll send you updates on new
posts! You can also find me on Instagram as @BobbiHartDesign and
on Facebook as BobbiHartDesign.
Sunny Studio Supplies Used:
 Oceans of Joy Stamps Shop at: Sunny Studio |
 Tiki Time Stamps Shop at: Sunny Studio |
 Tiki Time Dies Shop at: Sunny Studio |
 Best Fishes Stamps Shop at: Sunny Studio |
 Best Fishes Dies Shop at: Sunny Studio |
 Stitched Oval 2 Dies Shop at: Sunny Studio |
 Fintastic Friends Stamps Shop at: Sunny Studio |
 Fintastic Friends Dies Shop at: Sunny Studio |
 Ocean View Stamps Shop at: Sunny Studio | |
 Ocean View Dies Shop at: Sunny Studio |
 Kiddie Pool Stamps Shop at: Sunny Studio |
 Kiddie Pool Dies Shop at: Sunny Studio |


I love ocean / aquatic scenes. Great job on both of these! Thanks for sharing and happy 4th!
ReplyDeleteLori S in PA