Hello crafty friends! Marine here, super happy to be back this week with a super cute and easy shaker card showcasing Santa who is experiencing a new way to deliver the Christmas presents this year!
If you know me, you know that I like to create cute and busy scenes with lots of images. Well this time I went with a very few of them: Santa is from Holiday Express, and the hot air balloon and the banner are from Balloon Rides. And that's it. I stamped those images using an alcohol marker friendly black ink, I cut them all using the coordinating dies and then colored everything using my alcohol markers.
Once the coloring was done, I cut a Subtle Grey Tones paper panel
measuring 5,25 x 4", and I also took a plastic sleeve from stash. I cut
the flap at the top of that sleeve, as well as the seams on the three other
edges. I ended up with two plastic sheets, I kept on of those and applied
strong double sided tape on the four edges.
I placed my grey panel in the middle of the
plastic sheet, and cut the four corners off. Next I removed three of the
backing papers, and folded the flaps to stick them at the back of my panel. I
filled my pocket with some accessories: polymer clay peppermint
candy, Pure White Jewels,
clear sequins, some shiny red sequins, and a million tiny stars.
When I was happy with my shaker mix, I shook the pocket to spread the sequins inside of it, and I closed the sleeve by folding the remaining flap. Next I cut a 5,5 x 4,25" white card base, and attached my shaker panel on top using liquid glue.
I assembled the hot air balloon and the banner, and placed Santa inside the basket, and I stuck those pieces on the shaker panel using foam squares, along with my sentiment "Season's Greetings" from Holiday Express that I heat embossed on white cardstock using silver embossing powder.
Finally I used the Lacy Snowflakes die to cut some snowflakes out of white glitter cardstock, and I attached those sparkly snowflakes around the balloon.
And that's it for today! I hope you like this lovely shaker card. Feel welcome to watch the process video above (click on the photo above) for more information. Thanks for stopping by, and see you next week!
-----------------------------------------------
Hello
everyone, Anja here with you
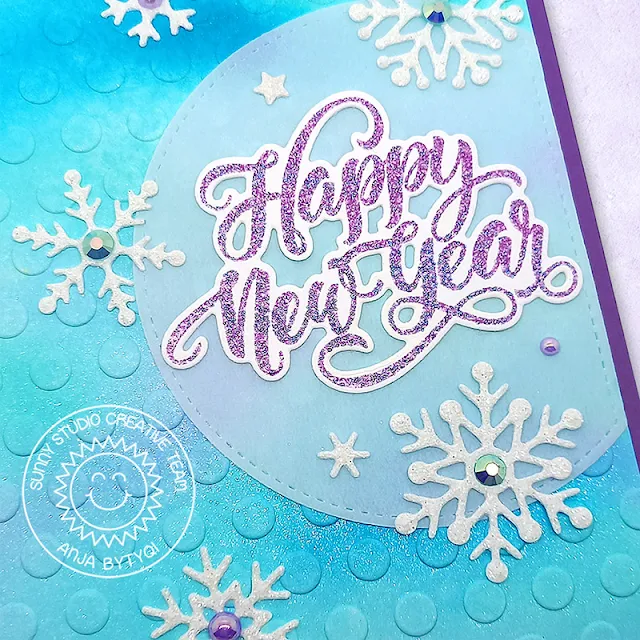
and today I'm sharing a shimmery winter card using the Lacy Snowflake Dies.
They go perfectly with the snowflakes from the Snowflake Circle Frame Dies.
First, I started off with an A2 card base made from purple cardstock. Next, I created a watercolor background using Nuvo Shimmer Powders (Atlantis Burst and Blue Blitz) and Distress Oxide Inks (Salvaged Patina and Wilted Violet). I also added some shimmer spray to the whole background (see photo below).
To add some texture, I ran the dried background through my die cutting machine with the Lots of Dots Embossing Folder. I trimmed the panel down to be a bit smaller than A2 and adhered it to the card base.
The snowflakes were die cut from white glitter cardstock. I die cut a piece of vellum with the second largest of the Stitched Semi-Circle Dies. I stamped the scripty 'Happy New Year' sentiment from the Season's Greetings set in VersaMark Ink onto white cardstock and heat embossed it with some pretty WOW! Royal Crush Embossing Glitter. I used the coordinating word die to cut it out.
Finally, I assembled my card by scattering the snowflakes over the card. All the die-cuts are perfect to hide the adhesive behind the vellum semi-circle which I attached to the right side. I added some pearls and crystals as embellishments.
Thank you so much for stopping by! Have an amazing day!
Sunny Studio Supplies Used:
 Holiday Express Stamps Shop at: Sunny Studio |
 Holiday Express DIes Shop at: Sunny Studio |
 Lacy Snowflakes Die Shop at: Sunny Studio |
 Lots of Dots Embossing Shop at: Sunny Studio |
 Subtle Grey Tones Paper Shop at: Sunny Studio |
 Season's Greetings Stamps Shop at: Sunny Studio |
 Season's Greetings Dies Shop at: Sunny Studio |
 Snowflake Circle Frame Shop at: Sunny Studio |
 Stitched Semi-Circle Dies Shop at: Sunny Studio | |
 Balloon Rides Stamps Shop at: Sunny Studio |
 Balloon Rides Dies Shop at: Sunny Studio |


No comments:
Post a Comment