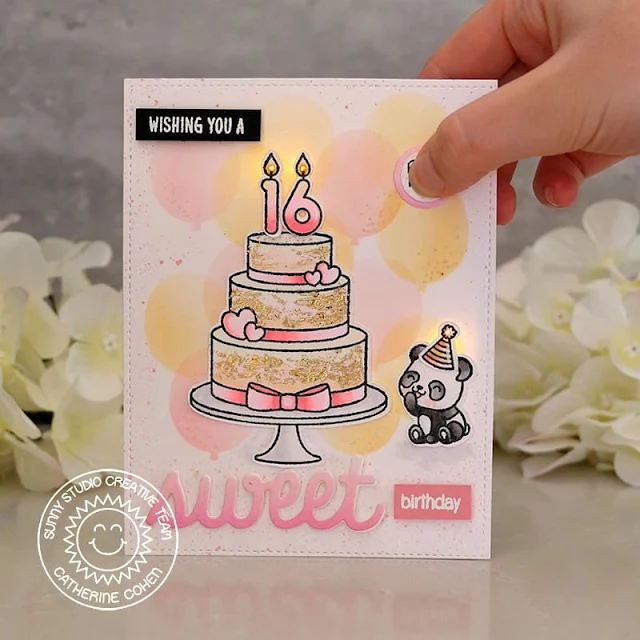
Hello Crafty Friends, Catherine here! Today, I am sharing a light up birthday card created with the pretty layered cakes stamps in the new Special Day Stamps set and Pear Blossom E-Z Lights.
To start, I die cut white cardstock with the largest die in Stitched Rectangle Dies. I added a balloon background by creating a stencil using Bright Balloons Dies. I die cut stencil paper with the oval balloon die in the set and ink blended the stencil with Squeezed Lemonade, Spun Sugar, and Dried Marigold Distress Oxides. I splattered the panel with Picked Raspberry Distress Ink mixed with a little bit of water.
Next, I stamped and die cut the panda from Panda Party and the party hat from Purrfect Birthday. I then stamped and die cut the beautiful layered cake and number candles from Special Day Stamps. I colored all the images with Copic markers listed in my blog link below. I decorated the cake with some “gold leaves” by applying a thin layer of Tombrow glue and gently rubbing strips of deco foil over top.
I placed the images onto the front panel with removable glue dots. Once all the images were in place, I placed a piece of A2 white cardstock (back panel) underneath the front panel. Next, I used a paper piercer and pierced the candle flames and the pompon on top of the hat making sure that the front panel was pierced all the way through, and a mark was left on the back panel.
I removed the front panel and set it aside. I used a pencil to darken the markings on the back panel. I used double sided tape to adhere the EZ light onto the card. I placed the three lights onto the pencil markings and taped the wires into place. The EZ lights are very easy to use. Each mechanism comes with three lights and a battery. All you need to do is put in the battery, push the button and the lights will switch on.
After I tape down the wires in place, I removed the images from the front panel and adhered the panel onto the back panel with double sided foam tape. I adhered the images back onto the front panel with permanent adhesive.
I die cut the word “Sweet” from Sweet Word Die out of white cardstock and inked it with Picked Raspberry and Spun Sugar DIstress Oxides. I added white heat embossed sentiments from Birthday Cat Stamps and Turtley Awesome Stamps. I finished off the card with a round “push here” button.
Thank you so much for joining me today. Fo
Sunny Studio Supplies Used:
 Sweet Word Die Shop at: Sunny Studio |
 Turtley Awesome Stamps Shop at: Sunny Studio |
 Stitched Rectangle Dies Shop at: Sunny Studio |
 Purrfect Birthday Stamps Shop at: Sunny Studio |
 Purrfect Birthday Dies Shop at: Sunny Studio |
 Panda Party Stamps Shop at: Sunny Studio |
 Panda Party Dies Shop at: Sunny Studio |
 Birthday Cat Stamps Shop at: Sunny Studio |
 Special Day Stamps Shop at: Sunny Studio | |
 Special Day Dies Shop at: Sunny Studio |
 Bright Balloons Dies Shop at: Sunny Studio |


Adorable! Great card. One day I might try these light-up types. So far I haven't. You're amazing!
ReplyDeleteLori S in PA