Hi Sunny friends! It’s Bobbi sharing a card using the new Tranquil Tulips stamps and dies. These layered beauties are so pretty in any color. I’m using shades of oranges for my bouquet today. I arranged them in a rusty watering can using the Watering Can stamps and dies.
To make this 5″ X 7″ card, I stamped the tulips, stems and leaves following the layered numbers provided on the stamp set sheet. I also stamped the watering can in Ranger Distress Oxide Ink in Lost Shadow and colored it using Copic Sketch Markers in YR27, YR24, E55, E53, E50, and E40. I also used a few cool grays to shade some of the Lost Shadow inked lines. The YRs create the rusty spots! I cut the blossoms, leaves, and stems as well as the watering can using the coordinating dies.
For the card base, I attached a grey and white paper from our Subtle Grey Tones pattern paper pack for the background and two 1/8″ strips of orange and peach to the bottom of the 6″ long pattern, leaving 1″ strip of white at the bottom of the panel. I stamped the "thinking of you" sentiment from the Watering Can set in the white space. I arranged the tulips in the watering can and added a hemp twine bow to the can’s handle to finish the card.
Thanks for stopping by
today. If you want to see more ideas and inspiration from me, subscribe to my
blog, BobbiHartDesign.com. I’ll
send you updates on new posts! You can also find me on Instagram as @BobbiHartDesign and
on Facebook as BobbiHartDesign.
-------------------------------------------------
Hey
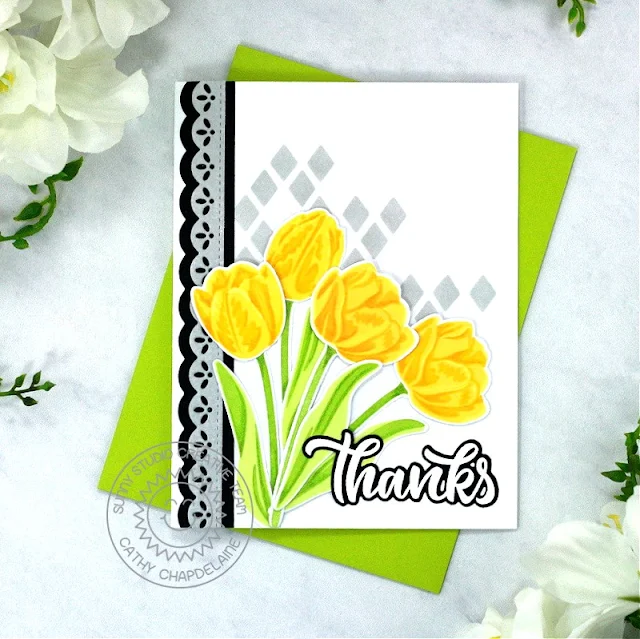
friends! Cathy here today and Spring has sprung in my neck of the woods. I
couldn’t be happier about the warmer weather! The tulips are blooming and
inspired me on this card today featuring the beautiful Tranquil Tulips Stamps.
This
is an A2 size card and I began with the lace borders on the left side of the
card front. First, I inked a 1” x 7” piece of white cardstock with Lost Shadow
Distress ink and placed a doily lace die from the Ribbon & Lace Border Dies face
down along one edge. I then placed the straight stitched die from the same dies
face down right next to the lace die, taped them in place and die-cut the
cardstock. I cut a piece of black cardstock 3/4" x 7” and die-cut one edge
with a small scallop border die from the Ribbon & Lace Border Dies. I
adhered the gray piece centered on the black piece and adhered them to the card
front. I then trimmed the excess from the top and bottom edges.
To add a little more gray and extra interest, I adhered gray diamonds to a portion of the card front. I first inked a piece of white cardstock with Lost Shadow Distress ink and die-cut it using the lattice portion of the Frilly Frames Lattice Die. I placed the lattice frame on the card front as a guide and adhered the die-cut diamonds in the pattern shown.
Next,
I stamped the Tranquil Tulips Stamps on
white cardstock and die-cut them using the coordinating dies. I
adhered them to the card front and trimmed the excess along the bottom edge of
the card.
To
finish, I stamped the “Thanks” sentiment from the Big Bold Greetings Stamps in
Versamark ink on black cardstock, heat embossed it in white and die-cut it
using the coordinating dies.
I hope you enjoyed and thanks for stopping by today! For more inspiration, please visit my blog www.inkredibleadventures.com and you can also find me on Instagram as @cathy.chapdelaine.
Sunny Studio Supplies Used:
 Frilly Frames Lattice Dies Shop at: Sunny Studio |
 Subtle Grey Tones Paper Shop at: Sunny Studio |
 Watering Can Stamps Shop at: Sunny Studio |
 Watering Can Dies Shop at: Sunny Studio |
 Big Bold Greetings Stamps Shop at: Sunny Studio |
 Big Bold Greetings Dies Shop at: Sunny Studio |
 Tranquil Tulips Stamps Shop at: Sunny Studio |
 Tranquil Tulips Dies Shop at: Sunny Studio |
 Ribbon & Lace Dies Shop at: Sunny Studio | |


No comments:
Post a Comment