Hello there, Waleska here with you. I have a fun penguin card to share with you today using the Penguin Party Stamps. For my card today I used a some of my favorite oxide ink colors.
To create this card I started with the background I inked a piece of white cardstock with oxide inks in colors Shaded Lilac, Kitsch Flamingo and Salvaged Patina, I then cut a snow hill from white cardstock. I stamped and color the cute penguins (it was hard to choose from all the adorable penguins on this set).
I stamped some snowflakes with versamark ink and added white embossing powder, I cut and inked them with the same colors I used for the background and used foam tape to add them to the sky. I added some iridescent stars and the sentiment fun and festive at the bottom of this panel.
I adhered this panel to a lilac frame and then a white card base, I love the fun faces of this penguins, they are definitely enjoying the cold weather. Thank you for stopping by, have a wonderful rest of your day!
-----------------------------------------
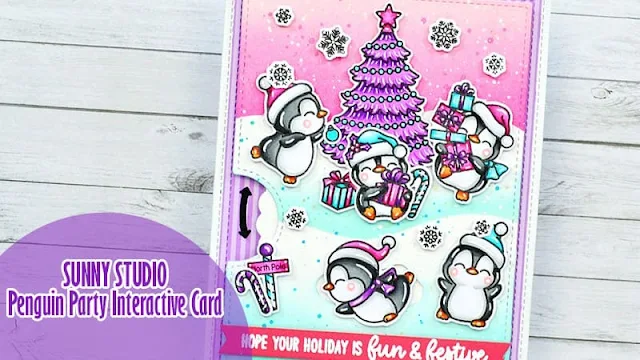
Hello crafty friends, Marine here, I'm back this week with this super cute and fun interactive card showcasing Penguin Party. Today we're going all non-traditional again with a pink sky, a violet Christmas tree and a penguin snow surfing on his belly!
And to make this
fun little scene, I picked:
- the tree
from Cozy Christmas
- the snowflakes
from Snowman Kisses
- one more
penguin from Passionate Penguins
- the North pole
sign from North Pole
I started off by cutting my background panel out of bristol cardstock, and I stenciled it using oxide inks: at the top I created a bright pink sky using spun sugar, kitsch flamingo and picked raspberry, and on the lower part, I created snow hills using salvaged patina.
I stamped my images using an alcohol marker friendly black ink, cut them all using the coordinating dies and then colored everything using my alcohol markers. Next I created the interactive panel, and I invite you to watch the process video down below to see how it was made, it's always easier to understand with images.
Once my interactive panel was done, I attached it on a Dots & Stripes Pastels purple panel, and then that purple panel on a white panel. And next I attached all my cute images on the interactive panel using foam squares and liquid glue.
Next I added the final details: an arrow to let the recipient of the card know that they have to go back and forth with the wheel to make the penguin surf. I also white heat embossed my "Hope your holiday is fun & festive" greeting from Penguin Party on a pink banner that I attached at the bottom of the panel using foam squares, and finally I added a dot of glossy accents on each light in the Christmas tree.
And that's it! We have a super adorable and fun interactive card showcasing the cutest penguins ever! As always you can watch the process video for more details & information (click on the image above). Thanks so much for stopping by, and see you next time!
Sunny Studio Supplies Used:
 Dots & Stripes Pastels 6x6 Paper Shop at: Sunny Studio |
 North Pole Stamps Shop at: Sunny Studio |
 North Pole Dies Shop at: Sunny Studio |
 Passionate Penguins Stamps Shop at: Sunny Studio |
 Passionate Penguins Dies Shop at: Sunny Studio |
 Cozy Christmas Stamps Shop at: Sunny Studio |
 Cozy Christmas Dies Shop at: Sunny Studio |
 Penguin Party Stamps Shop at: Sunny Studio |
 Penguin Party Dies Shop at: Sunny Studio | |
 Snowman Kisses Stamps Shop at: Sunny Studio |
 Snowman Kisses Dies Shop at: Sunny Studio |


Both scenes are adorable!! Thanks for sharing!
ReplyDeleteLori S in PA