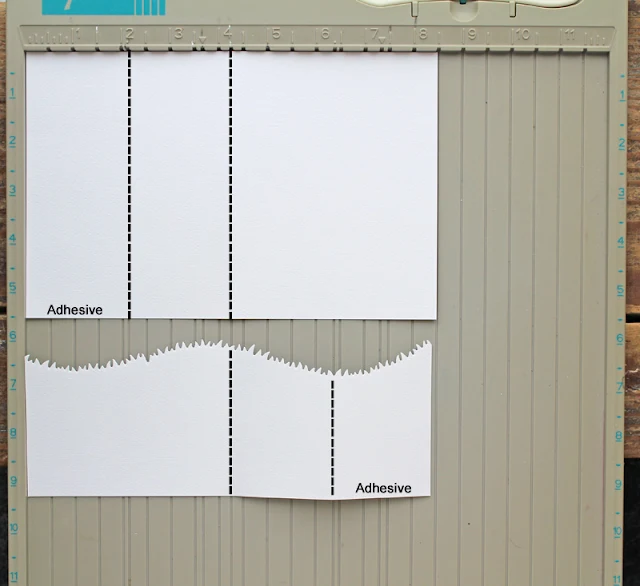
As you can see, I
trimmed the upper panel 5 1/2 x 8 1/2 and scored it at 2 1/8 and 4 1/4. For the
grass layer, I scored the panel at 4 1/4 and 2 1/8 from the other side. To assemble
the card, I put on the adhesive as shown in the pic.
But before assembling, I
used a cloud stencil on the base to create the sky, then I die-cut the birch
trees and leaves from Rustic Winter, colored them with Copics
and adhered them.
Now I trimmed a strip of cardstock, inked it with green Distress Oxide ink, die-cut a grass edge and adhered it.
Now I trimmed a strip of cardstock, inked it with green Distress Oxide ink, die-cut a grass edge and adhered it.
I stamped all the images onto
white cardstock, colored them with Copics and adhered them, raising some with
foam tape.
As you can see, I added
two more strips of grass into the square to add more dimension here. And when
folded, the card fits into an envelope easily.
I'll be trying to provide you with a video of this card in action, so you might like to check my Instagram account for it! Thanks for stopping by today!
I'll be trying to provide you with a video of this card in action, so you might like to check my Instagram account for it! Thanks for stopping by today!
-------------------------------------------------------------
Hello everyone, Anja here and I'm happy to be back again with a new card showcasing the adorable Chubby Bunny Stamps. I just love their cute little faces!
Hello everyone, Anja here and I'm happy to be back again with a new card showcasing the adorable Chubby Bunny Stamps. I just love their cute little faces!
At first, I
created an A2 landscape top-folding card base from white cardstock. I used
the Window Trio Square Dies to cut three openings into a panel of lilac cardstock. I
also chose a stitched scalloped die to create a decorative border.
Next, I took a
piece of Strathmore Bristol Smooth Cardstock and marked where
the windows would be with a pencil. I did some light handed ink blended
with Distress Oxide Inks (Spun Sugar, Milled Lavender, Tumbled
Glass). I picked one of the purple Gingham Pastels 6x6 Papers, cut it to size and adhered it at the bottom of my card base and
popped up the window panel with foam tape.
I stamped the
bunnies, sentiment banner and a little flower in Memento Tuxedo Black Ink and colored them with Copic Markers (colors listed below). I
used the coordinating dies to cut the images out and adhered them with foam squares.
(Copic colors used - Aqua: BG10, BG11, BG32, BG45; Green: G40, YG11, YG13; Grey: C00, C0, C1, C3; Pink: RV10, RV02, RV55; Purple: V000, V01, V12, V15)
Thank you so much for stopping by! Have a fabulous day!
Sunny Studio Supplies Used:
(Copic colors used - Aqua: BG10, BG11, BG32, BG45; Green: G40, YG11, YG13; Grey: C00, C0, C1, C3; Pink: RV10, RV02, RV55; Purple: V000, V01, V12, V15)
Thank you so much for stopping by! Have a fabulous day!
Sunny Studio Supplies Used:
 Window Trio- Square Die Shop at: Sunny Studio |
 Rustic Winter Dies Shop at: Sunny Studio |
 Gingham Pastels 6x6 Paper Shop at: Sunny Studio |
 Chubby Bunny Stamps Shop at: Sunny Studio |
 Chubby Bunny Dies Shop at: Sunny Studio |


Love the card layout / funfold!!!!
ReplyDeleteI love both cards!! These bunnies are so cute!
ReplyDeleteWonderful cards...I am so glad there is a tutorial for the zfold card.
ReplyDelete