Hello Everyone, Marie here! Spring is one of my most favorite times of the
year because everything is beautiful and flowers are blooming left and right.
If I could think of a flower that is the quintessential Spring flower, tulips definitely
come to mind first! That being said, I am excited to share my latest
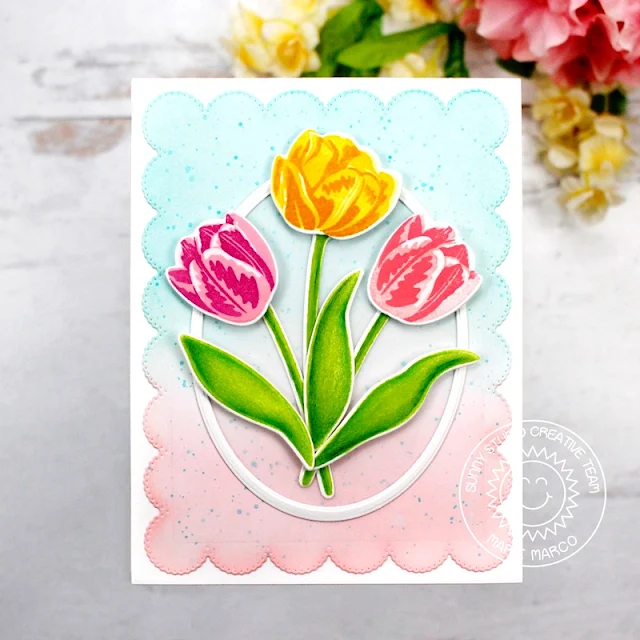
inspiration card that features Sunny Studio Stamps' Tranquil Tulips Stamps.
This layering stamp set allows you to quickly create gorgeous tulips during
their different stages of bloom. This set is perfect for mass producing
cards!
My card today has a very simple design. To start, I die cut an A2 sized base panel from 110 lb. Neenah Solar White Cardstock. For my background panel I used the Frilly Frames Eyelet Lace Die. I love the scalloped border this die creates! Then taking some Salvaged Patina Distress Oxide Ink, I lightly inked a little more than half the panel, and finished distress inking the rest with Saltwater Taffy Distress Oxide Ink. I also splattered some Salvaged Patina throughout the panel for a little texture. I then adhered the background panel to the base panel using double sided tape adhesive.
Next step was to stamp out all my lovely tulips onto Neenah Solar White Cardstock. Each layering flower stamp is individually labeled so it's easy to follow which order they go in. For each tulip bloom, I used three different colors with 3 different ink tones. For the purple tulip, I used a very light Princess Pink Dye Ink for the base, and then a slightly darker Pink in the shade Cotton Candy Dye ink for the mid tone.These two inks are from MFTstamps. The darkest shade I used is Seedless Preserves Distress Oxide which is a purple that compliments the pink layers very well. For my full bloom yellow tulip, I used Lemon Chiffon Dye Ink, followed by a darker Lemon Drop Dye ink from MftStamps, and the darkest Ink is Fossilized Amber Distress Oxide Ink.
To make the base of the flower a little darker giving it a more defined gradient, I added a touch of Wild Honey Distress Oxide Ink only to the base. For the pink tulip, I used Spun Sugar Distress Ink, Saltwater Taffy Distress Ink, and finally Worn Lipstick Distress Oxide as the darkest shade. For all the stems and leaves, I used a bright green Twisted Citron Distress Ink, and then Polychromos Color pencils to add some shading. I cut out all the images using the corresponding Tranquil Tulips Dies.
To
highlight their beauty, I kept my design very simple by placing all three
tulips inside a white oval frame that I created using two oval nesting dies. I
gave the flowers dimension by adhering each one with foam tape. I also used
foam tape on all the leaves. For the inside of my card, I lightly inked the
center of an oval with Salvaged Patina and added a single stemmed tulip, placed
off to the side, to create room for my "You're the Best" sentiment.
My sentiment was created using the Loopy Letter Dies which I cut from a gold metallic cardstock.
That
concludes this week's card inspiration using the awesome Tranquil Tulips
Layering stamps! I had a lot of fun experimenting with various different inks
to create the perfect tulip colors! I hope this inspires you to create more
Spring projects especially for the upcoming Easter holiday! Thanks so much for
joining me today and until next time, Happy Cardmaking!
-----------------------------------------
Hello Crafty Friends! Catherine here, and today I am
sharing some floral gift tags created with Tranquil
Tulips Stamps and Vintage
Jar Stamps.
To start, I die-cut the tulips, leaves, and stems, with white cardstock using the coordinating Tranquil Tulips Dies. I placed the die cut images back into the negative spaces. I stamped the images layer by layer with the following Altenew inks:
Yellows: Citrus Burst, Fresh Lemon, Maple Yellow
Pinks: Frosty Pink, Cotton Candy, Coral Berry
Purples: Soft Lilac, Wisteria, Lavendar Fields
Greens: Firefly, Grass Field
I added some highlights onto the tulips and leaves with a white gel pen.
For the jar, I die cut 6 jars (3 for the front and 3 for the back) out of white cardstock using Vintage Jar Dies. I placed 3 of the jars back into the negative space and stamped the jar using Vintage Jar Stamps with Lawn Fawn Kiddie Pool Ink. I set the 3 jars aside for the back of the tags. For the front of the jars, I placed the remaining 3 white cardstock jars back into the negative space and stamped the stem images. Next, I stamped the jar on top of the stems using Vintage Jar Stamps and Lawn Fawn Kiddie Pool Ink.
I adhered the tulips, stems, and leaves onto the back of
the jar fronts and then glued on the back of the jars. I tied some brown string
around the top of the jars. I added tags from Window
Quad Square Dies using paper from Gingham
Pastels Paper. I added a “thanks” sentiment in the Tranquil
Tulips Stamps set using the pennant from Fancy
Frames Rectangle Dies.
Thank you so much for joining me today! I would love for
you to visit me at Crafti-Cat! Have
a lovely day!
Sunny Studio Supplies Used:
 Vintage Jar Dies Shop at: Sunny Studio |
 Vintage Jar Stamps Shop at: Sunny Studio |
 Fancy Frames- Rectangles Shop at: Sunny Studio |
 Loopy Letters Dies Shop at: Sunny Studio |
 Gingham Pastels 6x6 Paper Shop at: Sunny Studio |
 Frilly Frames-Eyelet Lace Shop at: Sunny Studio |
 Window Quad Square Die Shop at: Sunny Studio |
 Tranquil Tulips Stamps Shop at: Sunny Studio |
 Tranquil Tulips Dies Shop at: Sunny Studio | |


No comments:
Post a Comment