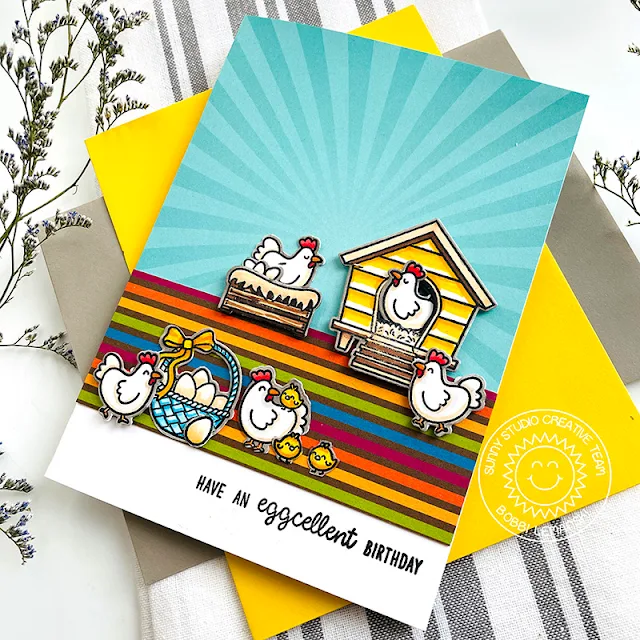
Cluck, cluck…what’s up? Bobbi here with you! It’s the Clucky Chickens stamps and dies! New for spring, these chickens come with all their cute accessories like the hen house, basket, crate with hay, chicks, eggs and more. This stamp set can make all sorts of cards including cards for birthdays. My 5″ X 7″ card features pattern papers from the Classic Sunburst paper pack and the Critter Country paper pack for the background.
To make this 5″ X 7″ card, I attached the pattern papers to create a vibrant background and stamped the birthday phrase at the bottom, in the white space. Next, I stamped the cute images from the set and cut them out using the coordinating dies. I colored the images using the following Copic Sketch Marker colors:
Chickens: E53, E50, YR68, R29, R17
Hen house: Y38, Y19, E55, E59, E49, 100,
C9, C7, C5
Chicks: Y38, Y18
Crate with hay: E57, E55, E53, E50, E49
Basket: B04, B02, B00, Y19, Y15, Y08,
E53, E50
Shadow color: W5
I don’t love a white border around my cut images, so I generally color the borders using a shadow color such as W5. It keeps the attention on the image instead of the border when creating a scene like this one.
I attached all of the items to the card front. The hen house, crate with hay and three of the chickens were attached with foam tabs, making them stand out a bit. It gives more dimension to the scene. I added one chicken inside the house. There’s a die in the set that cuts out the door opening making this super easy to do! I like that this card has more masculine colors in the background, making the white chickens really pop off the page. It would be a great card for males as well.
Thanks for stopping by today. If you want to see more ideas and inspiration from me, subscribe to my blog, BobbiHartDesign.com. I’ll send you updates on new posts! You can also find me on Instagram as @BobbiHartDesign and on Facebook as BobbiHartDesign.
---------------------------------------------------
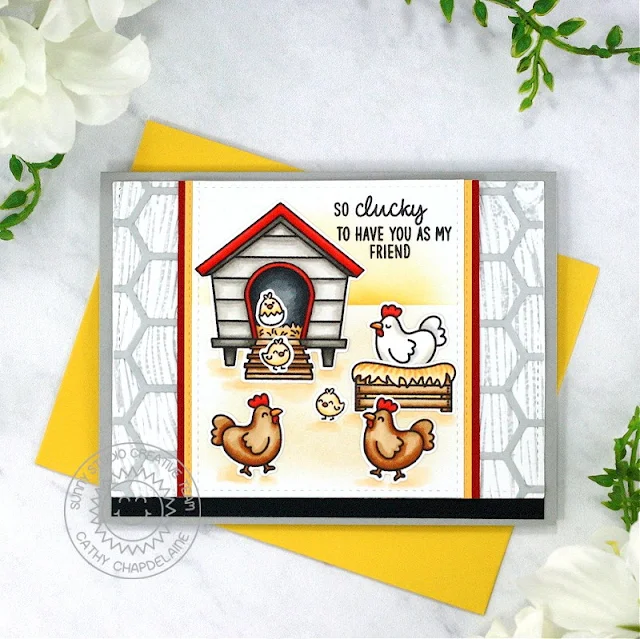
Hey friends! Cathy here today and I’ve got a cute friendship card to share using the Clucky Chickens Stamps. Fast food chicken restaurants inspired my color scheme today but, shhhhh… Don’t tell these chickens!
I started this A2 card by die-cutting a piece of white cardstock
with a Stitched
Rectangle Die. I then inked the inside of the Woodgrain
Embossing Folder with Lost Shadow Distress ink and embossed the
die-cut rectangle.
Next, I die-cut the center portion of the Frilly
Frames Hexagon Die from white cardstock and inked it with Lost
Shadow Distress ink. I cut the hexagon pattern from the cardstock, adhered it
to the left half of the stitched rectangle and trimmed the excess from the
outside edges. I then repeated this on the right half of the stitched
rectangle. Before I adhered the stitched rectangle to the card front, I die-cut
a 5 1/2" long piece of black cardstock using the ribbon die from the Ribbon
& Lace Border Dies and adhered the stitched rectangle
slightly overlapping the ribbon piece. I trimmed the excess black ribbon piece
along the right and left edges of the stitched rectangle and adhered the
combined piece centered on the card front.
For my chicken scene, I die-cut a piece of white cardstock with the largest Stitched Rectangle Die. With the die-cut rectangle placed horizontally, I taped the second largest Stitched Rectangle Die vertically across the piece and die-cut it again. This gave a stitched edge to all sides. I then masked off a horizon line 1 1/2" from the top edge and lightly inked the sky with Fossilized Amber Distress ink. I removed the masking tape and lightly inked the ground with Antique Linen Distress ink. I stamped a sentiment from the Clucky Chickens Stamps in the top right corner making sure to leave enough room for the chicken coop.
I brought my red and yellow color scheme together with the help of 2 borders on each side of the center panel that I die-cut using the ribbon die from the Ribbon & Lace Border Dies. I overlapped each piece and adhered them to the back of the center panel trimming the excess from the top and bottom edges. I then adhered the combined piece to the center of the card front.
To finish, I stamped the images from the Clucky Chickens Stamps on Neenah Classic Crest 80lb solar white cardstock, colored them with Copics and die-cut them using the coordinating dies. I also deepened the ground around the images with Copic E50 and E51.
I hope you enjoyed and thanks for stopping by! For more inspiration, please visit my blog www.inkredibleadventures.com and you can also find me on Instagram as @cathy.chapdelaine.
Sunny Studio Supplies Used:
 Stitched Rectangle Dies Shop at: Sunny Studio |
 Frilly Frames Hexagon Dies Shop at: Sunny Studio |
 Woodgrain Embossing Shop at: Sunny Studio |
 Classic Sunburst Paper Shop at: Sunny Studio |
 Critter Country Paper Shop at: Sunny Studio |
 Clucky Chickens Stamps Shop at: Sunny Studio |
 Clucky Chickens Dies Shop at: Sunny Studio |
 Ribbon & Lace Dies Shop at: Sunny Studio |


These are EGG-celent!
ReplyDeleteLori S in PA