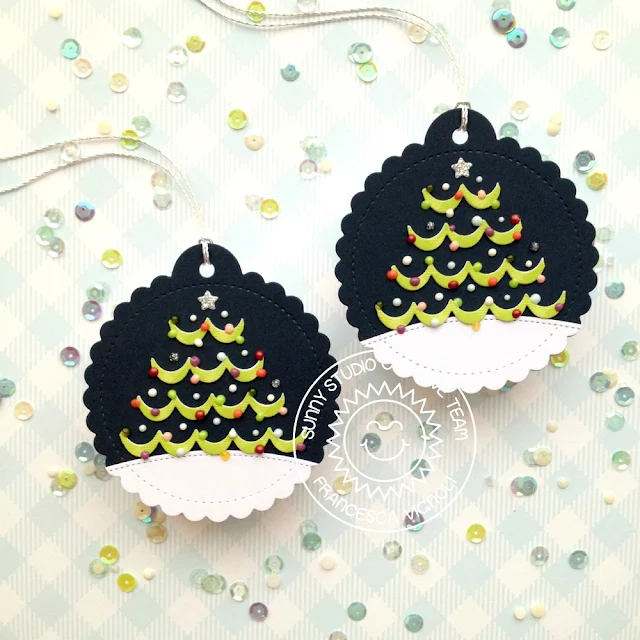
Hello there and happy Wednesday! It's Franci here with some Christmas tags featuring the new Icing Border dies. Ta daaa! Yes, I used one of the new border to create a Christmas tree for my tags!
First of all I die cut all the tag elements out of white and blue cardstock using the Scalloped Tag Circle dies and the Slimline Nature Borders dies and put them together.
I stamped my sentiment on the back of both tags (it's from the Inside Greetings Holiday set) and then moved onto the trees at the front. I die cut one of the new borders multiple times out of this green paper from the All is Bright 6x6 set and out of white cardstock.
I layered them all to give my tree more dimension and then I cut them out into shorter pieces. You can count the scallop details as a guide: I chose to create a tree with 4 layers + the 5th one = the star! So my bottom layer counts 5 scallop details, the next one 4, then 3 and the last one 2. I glued them down and added all my decorations. I used lots of colored Nuvo Drops but you can use sequins, clay embellishments, gems.
Hope you like this fun idea to stretch your supplies and thanks a lot for stopping by! Have a lovely day!
------------------------------------------
Hello!
It’s Julia here and I am super excited
to share this fun gingerbread house-shaped card with you!
First,
I stamped the images from Christmas Cookies and Candy Shoppe onto Bristol Smooth
cardstock and I colored them in using Zig Clean Color Real Brush Markers.
Then,
to create my shaped card, I used an A2-sized card base and the outline house
die from the Gingerbread House dies. I lined up the top
edge of the die with the edge of the folded card base, making sure to leave a
little gap between the cutting edge and the card base, so the top won't be cut
through. I ran it through the die-cutting machine twice to make it cuts through
both layers of cardstock. After that, I also die-cut all the other pieces of
the Gingerbread House and I ink blended them with
Distress Oxide inks.
I
adhered all the decorative house pieces to my shaped card base. I also die-cut
all three of the Icing Borders and adhered them to the
roof, door, and sides of the house. Then it was time to embellish! I added Rubellite and Pink Spinel jewels to the roof lining
as well as to the door and then I added lots and lots of stickles to all the
areas that I thought could use a little extra sparkle! So basically everywhere
- haha!
Have you ever made a shaped card? I had so much fun making this one and I hope you like it! Thanks so much for stopping by today and have a wonderful day!
Sunny Studio Supplies Used:
 Candy Shoppe Stamps Shop at: Sunny Studio |
 Candy Shoppe Dies Shop at: Sunny Studio |
 Christmas Cookies Stamps Shop at: Sunny Studio |
 Christmas Cookies Dies Shop at: Sunny Studio |
 Gingerbread House Dies Shop at: Sunny Studio |
 Icing Border DIes Shop at: Sunny Studio |
 Scalloped Tags-Circle Shop at: Sunny Studio |
 Slimline Nature Borders Shop at: Sunny Studio |
 Inside Greetings-Holidays Shop at: Sunny Studio | |
 All Is Bright Paper Shop at: Sunny Studio |


No comments:
Post a Comment