

I started with a 5.25x4
piece of white card stock. I chose three green inks to use for the layered
stamps, lightest to darkest: Altenew's Frayed Leaf and Forest Glades, and
Taylored Expressions Peapod ink. I stamped the lightest layer first to make
sure the leaves wouldn't touch each other.


Next I used the middle
size Fancy Frames Circle Die to die-cut a window. I
also die-cut 2 more circles out of matching green card stock and white card stock.
I flipped the stamped card front over and taped the first die cut circle back
into place. I added foam tape to the back before flipping the paper back over.
I glued on the card stock circles, making sure the scallops matched up
perfectly.
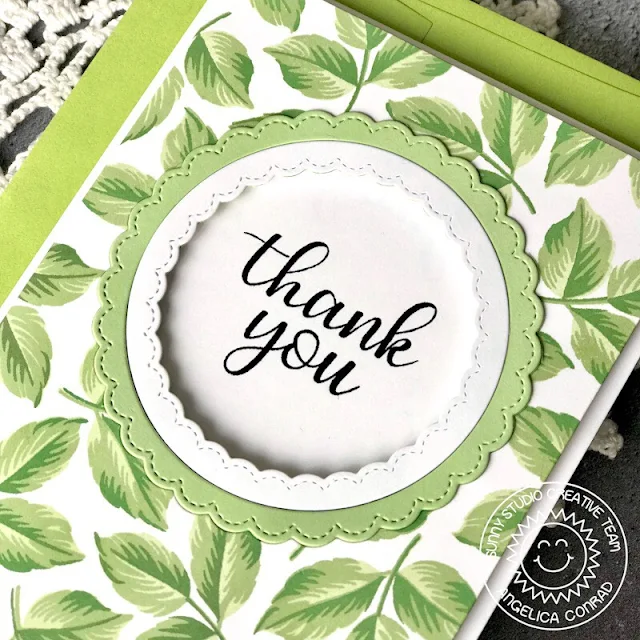
I stamped "Thank You" from the Everyday Greetings stamp set onto white card stock, stacking the words so the sentiment fit in the circle window. I attached the card front on to the sentiment, making sure the words were centered. My last step was adding the card front to an A2 size card base.
Thanks so much for stopping by!
--------------------------------------------------
Hello friends! It's Juliana Michaels here and today I'm sharing a hello card featuring the gorgeous layering stamp set called Everything's Rosy Stamp Set. I combined it with some other of my favorite stamps and dies to create this card.
Hello friends! It's Juliana Michaels here and today I'm sharing a hello card featuring the gorgeous layering stamp set called Everything's Rosy Stamp Set. I combined it with some other of my favorite stamps and dies to create this card.

To get started,
I die cut a piece of white cardstock using only the outside frame from the Frilly
Frames Lattice Die. I then used the center part to emboss the design into
the paper. I recommend following the directions for your specific die cutting
machine to achieve this. I used Therm O Web Purple Tape to hold the die in
place while I did the embossing. I then applied some Distress Oxide Ink in
Peeled Paint to bring out the design. To complete the card front, I adhered
this to a piece of blue patterned paper from the Flirty
Flowers 6x6 Paper Pad.
Next, I stamped the images from the Everything's Rosy Stamp Set onto white cardstock using Scrapbook.com's Premium Hybrid Ink Pads. These ink pads are perfect for use with layering stamps.
Next, I stamped the images from the Everything's Rosy Stamp Set onto white cardstock using Scrapbook.com's Premium Hybrid Ink Pads. These ink pads are perfect for use with layering stamps.

I then stamped
the jar from the Vintage Jar
Stamp Set. Once all of the stamping was finished, I die cut them using the Everything's
Rosy Die Set and Vintage Jar Die
Set. Before I assembled the flowers and leaves to create the bouquet, I
stamped some stems from the Daffodil
Dreams Stamp Set directly onto the jar.
Here is a list of the colors I used for the roses: Lantern Light Yellow 1, Rubber Ducky Yellow 2, Daffodil Yellow 3, Honeycomb Yellow 4 and Sugar Cookie Tan 1. For the leaves and stems I used: Pear Green 1, Guacamole Green 2 and Olive Green 4. Finally, for the jar, I used Glass Slipper Sky 1 and Sky Blue Sky 2.
Here is a list of the colors I used for the roses: Lantern Light Yellow 1, Rubber Ducky Yellow 2, Daffodil Yellow 3, Honeycomb Yellow 4 and Sugar Cookie Tan 1. For the leaves and stems I used: Pear Green 1, Guacamole Green 2 and Olive Green 4. Finally, for the jar, I used Glass Slipper Sky 1 and Sky Blue Sky 2.

Another thing I
did before assembling the bouquet was to create a tag to tie around the jar. I
die cut a tag using the circle tag die from the Build
A Tag No. 1 Die Set. I then stamped “hello” onto it using the Chubby
Bunnies Stamp Set. Once the tag was done, I tied it around the jar die cut
with a piece of jute twine.
To complete the card, I then created the bouquet. I used double sided foam squares to give the flowers and leaves some dimension.
Thanks so much for stopping by today! I hope you were inspired by the hello card I created using the Everything's Rosy Stamp Set.
To complete the card, I then created the bouquet. I used double sided foam squares to give the flowers and leaves some dimension.
Thanks so much for stopping by today! I hope you were inspired by the hello card I created using the Everything's Rosy Stamp Set.
Sunny Studio Supplies Used:
 Daffodil Dreams Stamps Shop at: Sunny Studio |
 Vintage Jar Dies Shop at: Sunny Studio |
 Vintage Jar Stamps Shop at: Sunny Studio |
 Fancy Frames-Circle Dies Shop at: Sunny Studio |
 Build-A-Tag #1 Dies Shop at: Sunny Studio |
 Flirty Flowers 6x6 Paper Shop at: Sunny Studio |
 Chubby Bunny Stamps Shop at: Sunny Studio |
 Everything's Rosy Stamps Shop at: Sunny Studio |
 Everything's Rosy Dies Shop at: Sunny Studio | |
 Frilly Frames Lattice Dies Shop at: Sunny Studio |
 Everyday Greetings Stamps Shop at: Sunny Studio |


I don't copy card often, I TRY to be original! But this 1st all green card...oh my!!! So so beautiful!!! Can't wait to try all green!!! Wonderful idea!!!
ReplyDeleteThese cards are Gorgeous!!!
ReplyDelete