Hello everyone! Lexa here
today with an early Easter card that screams "spring" featuring the most
adorable Chubby
Bunny Stamp and the
coordinating dies. I just can't get enough of them and I think everyone will
agree with me.
First of all, I stamped all
the images with Versafine black ink and watercolor them with Distress Markers.
I love to add rosy cheeks on the chubby faces, it makes them look even more
adorable. After I finished with the coloring I use the
coordinating dies to cut each pieces. It surely help me to save time
cutting tricky and detail pieces.
To create the scene I decided to use Sunny
Studio patterned papers, Spring Sunburst Paper (for the
sky) and Gingham
Jewel Tones Papers (I use both sides for the grassy hills). The most exciting
part is of course building the scene together.
That's all for today, thank you so much for stopping by. I hope you have an amazing day!
--------------------------------------------------------
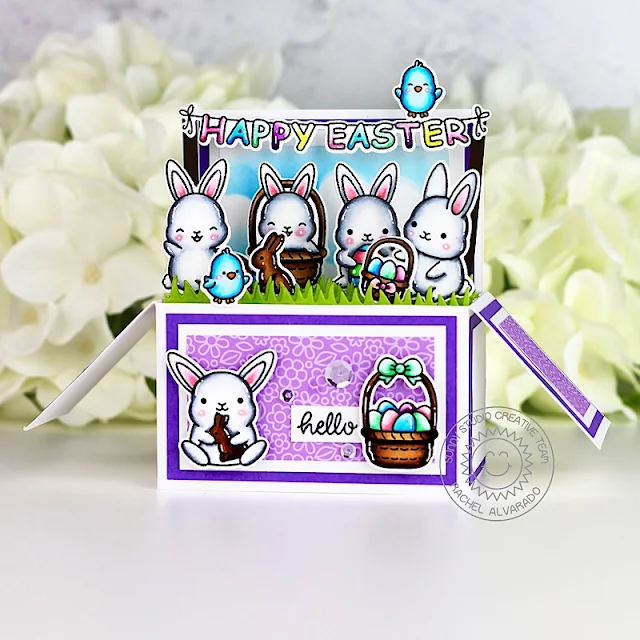
Hello, crafty friends! It's Rachel here today to share with you a fun box card featuring the adorable Chubby Bunny Stamp Set. I absolutely love these sweet little bunnies and had a lot of fun working with them.
To start, I first created the
box portion of my card with a sheet of white card stock, scoring board,
scissors, glue, and a paper trimmer. I stamped all of my images with
Copic friendly black ink, colored them with Copics and used their coordinating dies to cut them out.
Copic Colors Used: Bunnies: 0, C00, C0, C2, C3, C4; Baskets & Chocolate Bunny: E31, E23, E25, E29, E49; Yellow: Y000, Y11, Y06; Pastel Green: G0000, G000, G00, G02; Blues: B0000, B00, B01, B04, B05; Pinks: RV0000, RV00, RV52, RV55; Purples: V000, V01, V04, V06, V09; Ears: RV00, R81, R85; Cheeks: R81
Copic Colors Used: Bunnies: 0, C00, C0, C2, C3, C4; Baskets & Chocolate Bunny: E31, E23, E25, E29, E49; Yellow: Y000, Y11, Y06; Pastel Green: G0000, G000, G00, G02; Blues: B0000, B00, B01, B04, B05; Pinks: RV0000, RV00, RV52, RV55; Purples: V000, V01, V04, V06, V09; Ears: RV00, R81, R85; Cheeks: R81
I then added some purple
patterned paper from the Flirty Flowers Paper Pad to decorate the side panels of my
card. This paper pad is just gorgeous! I love the subtle details of
the flowers.
Lastly, I adhered all of
images to either the inside shelves (with liquid adhesive) of the box or to the
front of it (with 3D Foam Adhesive Squares). I love the "Happy
Easter" banner that comes with this set. When I first saw it, I immediately
knew that I wanted to make a box card using it as a 3D banner.
I hope you enjoyed my card
today! I will be back next week with another project using some more
amazing Sunny Studio products! Have a great weekend!
Sunny Studio Supplies Used:
Sunny Studio Supplies Used:
 Gingham Jewel Tones 6x6 Paper Shop at: Sunny Studio |
 Spring Sunburst 6x6 Paper Shop at: Sunny Studio |
 Flirty Flowers 6x6 Paper Shop at: Sunny Studio |
 Chubby Bunny Stamps Shop at: Sunny Studio |
 Chubby Bunny Dies Shop at: Sunny Studio |


No comments:
Post a Comment