I picked a blue pattern paper from the Heroic Half Tones Paper Pack, and cut it to 4
x 5.25. I added a strip of gold washi tape to the bottom of the paper, then
attached it to a card base with foam adhesive. I attached the critters and
speech bubble with thin foam squares to finish the card.
I hope I have given you ideas for this adorable stamp set. Thanks
for stopping by!
------------------------------------------------------
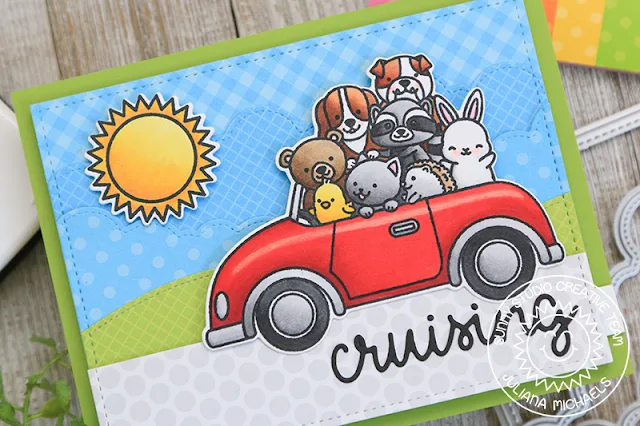
Hello friends! It's Juliana here today to share a new for me interactive card featuring a hidden pull tab! I combined this with the adorable Cruising Critters Stamp Set, so that when you pull the tab, the sentiment is revealed and the little critters go cruising along! Let me share with you how it all came together.
Sunny Studio Supplies Used:
------------------------------------------------------
Hello friends! It's Juliana here today to share a new for me interactive card featuring a hidden pull tab! I combined this with the adorable Cruising Critters Stamp Set, so that when you pull the tab, the sentiment is revealed and the little critters go cruising along! Let me share with you how it all came together.
To get started,
I stamped, colored and die cut the Cruising
Critters image and the sun from the Sunny
Sentiments Stamp Set and set them to the side. I then began working on how
to create the hidden pull tab feature. I
watched a few videos to see what might work best and came up with the following
plan.
Background
Panel: I selected a piece of blue gingham paper (Gingham
Pastels) for the background. I then
took a blue grid paper (Gingham
Pastels) and die cut it using one of the Fluffy
Clouds Border Dies. Next, I took a blue polka dot paper (Dots
and Stripes Pastels) and cut it with a different Fluffy
Clouds Border Die. Then, I took one of the Woodland
Border Dies and cut a piece of green grid paper (Gingham Pastels). Finally,
I cut a strip of grey polka dot paper (Polka
Dot Parade). Put this piece to the side for later.
I then layered
each of these to create the scene adhered all of them together EXCEPT for the
grey polka dot and then I took the stitched rectangle die from the Frilly
Frames Retro Petals and die cut them. The die cut through all 4 layers of
paper with no problems! When placing the green grass area, make sure to leave
at least 1.75 inches of paper below the top of the die cut so you have room for
the pull tab mechanism.
Pull Tab
Mechanism: To create this, I used a ruler and pencil to help me draw 2 slits on
each edge of the background panel. They are 0.25 inches from the bottom and 0.5
inches from each side. Each slit is 0.5 inches tall and about 1/8” wide. I then
used a craft knife to cut through the layers to create the slit.
Next, I took a plastic treat bag and cut a strip of it that was slightly thinner than 0.5 inches and long enough to go through both slits and wrap around the back. I used a tape runner to adhere the ends together and trimmed off any excess. Make sure to place this taped section toward the left slit on the backside of the card. Add double sided foam tape on the outer side of each of the slits and cut a piece in half and place it below the plastic strip. At this time, you can cut 2 cardstock strips to 0.5 x 1.25” and adhere them to the backside of the plastic strip. Add foam tape to the top of these. This is where the card will be attached. Play around with the exact placement of these tabs so that your car slides.
Next, I took a plastic treat bag and cut a strip of it that was slightly thinner than 0.5 inches and long enough to go through both slits and wrap around the back. I used a tape runner to adhere the ends together and trimmed off any excess. Make sure to place this taped section toward the left slit on the backside of the card. Add double sided foam tape on the outer side of each of the slits and cut a piece in half and place it below the plastic strip. At this time, you can cut 2 cardstock strips to 0.5 x 1.25” and adhere them to the backside of the plastic strip. Add foam tape to the top of these. This is where the card will be attached. Play around with the exact placement of these tabs so that your car slides.
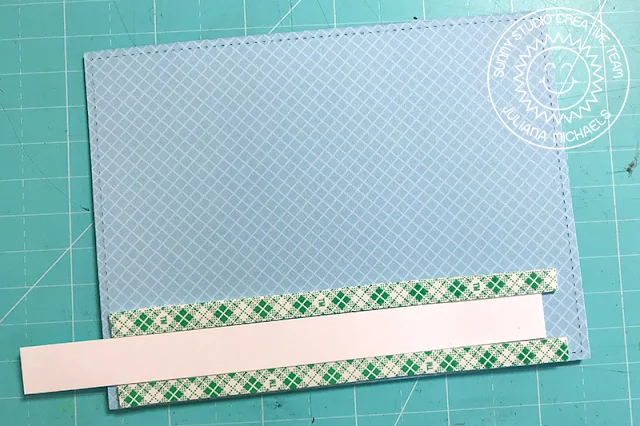
Flip the panel
over and adhere your pull tab. I used a piece of white cardstock trimmed to
0.5” wide and then I trimmed off the excess once I had my card completed and
the sentiment stamped on the pull tab. Next, take double sided foam tape, cut
it in half and adhere a piece above and below the pull tab on the backside.
This helps hold the slider in place. You can also add a piece of fun foam to
the backside , above the top piece of foam tape, so the panel is flat against
your card base.
Once the pull
tab mechanism was completed, I could add the grey polka dot paper. I used the
stitched rectangle die from the Frilly
Frames Retro Petals to cut the paper and then used my paper cut to trim a
strip from this to 11/8 inches tall.
I then adhered
the Cruising
Critters image to the pull tab mechanism making sure the tires where on the
road! I then added the sun and the cruising die cut that comes with the Cruising
Critters Die Set. To complete the card, I stamped the sentiment onto the
pull tab and then mounted the entire panel onto a piece of green cardstock cut
to 4.25x5.5 inches.
I hope you enjoyed learning how I created this hidden pull tab card using the Cruising Critters Stamp Set. Thanks so much for stopping by today!
I hope you enjoyed learning how I created this hidden pull tab card using the Cruising Critters Stamp Set. Thanks so much for stopping by today!
Sunny Studio Supplies Used:
 Sunny Sentiments Dies Shop at: Sunny Studio |
 Sunny Sentiments Stamps Shop at: Sunny Studio |
 Polka-dot Parade 6x6 Paper Shop at: Sunny Studio |
 Woodland Borders Dies Shop at: Sunny Studio |
 Gingham Pastels 6x6 Paper Shop at: Sunny Studio |
 Dots & Stripes Pastels 6x6 Paper Shop at: Sunny Studio |
 Heroic Halftones 6x6 Paper Shop at: Sunny Studio |
 Cruising Critters Stamps Shop at: Sunny Studio |
 Cruising Critters Dies Shop at: Sunny Studio | |
 Fluffy Clouds Border Dies Shop at: Sunny Studio |
 Comic Strip Speech Bubble Dies Shop at: Sunny Studio |
 Frilly Frames Retro Petals Dies Shop at: Sunny Studio |


So inspirational!!! The backgrounds are as amazing as the main image!!!
ReplyDeleteFun cards with these adorable critters. Thanks for sharing your creativity.
ReplyDeleteOh my gosh, the chick is such an adorable addition!! I LOVE the car, and how they are all piled in.
ReplyDelete