Hi friends, Angelica here
with a fun Father's Day project. Can you believe we're getting towards that
time of the year?? I am in a family of avid Football fans, so I thought it
would be fun to incorporate the colors of my husband's and my father-in-law's favorite
football teams into these Sweater Vest cards.
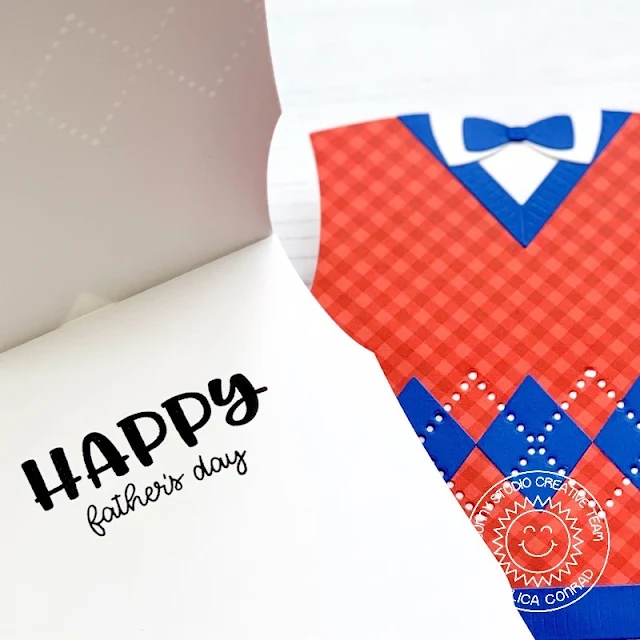
How cute are these Sweater Vest Dies?!!
I used pattern papers from the Classic
Gingham Paper Pack for the sweaters, the red representing my
father-in-law's Buffalo Bills team, and the blue representing my husband's (and
Mine!) Seattle Seahawks team. I die-cut the trimmings out of card stock in the
secondary team colors.
To turn these sweaters into cards, I die-cut four more sweater
bases out of white card stock. I used double-sided adhesive to adhere the
completed sweaters to two of the white bases to make them card fronts.
The other two bases I stamped Happy Father's Day using words from the Happy Thoughts stamp set, then added score lines 3/4 inches from the top of each base. I added strong adhesive above the score lines, then attached the card fronts to them.
I LOVE how these sweaters turned out. I can't wait to get started on Christmas cards with this die set! I hope I have given you ideas about sweater cards. Thanks for stopping by!
--------------------------------------------------
Hello Friends, it's Juliana here and I'm excited to be sharing how to add extra texture and interest to your card today using the Sunny Studio Stamps Sweater Vest Die Set, and embossing folder and flocking.
Because I
wanted the texture to be the main focus for the card, I went clean and simple
and only used dies to create my card front. To add the texture, I used a new
product called DecoFoil Flock Transfer Sheets by Therm O Web. This fun new
product allows you to easily add flocking to your paper crafting and card
making projects for a fun fuzzy effect. And even better, I love that you can do
it without all the mess that previous flocking powders caused.
I began by taking a piece of iCraft Easy Cut Adhesive Sheets and peeled off the liner on one side. I then adhered this to a piece of white cardstock. (I've found the cardstock to be helpful when using this adhesive to give your project a bit of stability as you apply the flocking.) Next, I took this piece and die cut all of the elements for my card using the Sweater Vest Die Set making sure to cut with the liner side up. Once the die cutting was complete, I took DecoFoil Flock in various colors and adhered them to the die cut pieces. Make sure during this step that you adhere the fuzzy flocked side to the adhesive. You are then going to run each piece through your die cutting machine to press the flock into the adhesive for permanent adhesion.
I began by taking a piece of iCraft Easy Cut Adhesive Sheets and peeled off the liner on one side. I then adhered this to a piece of white cardstock. (I've found the cardstock to be helpful when using this adhesive to give your project a bit of stability as you apply the flocking.) Next, I took this piece and die cut all of the elements for my card using the Sweater Vest Die Set making sure to cut with the liner side up. Once the die cutting was complete, I took DecoFoil Flock in various colors and adhered them to the die cut pieces. Make sure during this step that you adhere the fuzzy flocked side to the adhesive. You are then going to run each piece through your die cutting machine to press the flock into the adhesive for permanent adhesion.
After I had
flocked all the things, I wanted to take things a step further by adding even
more texture. I adhered the diamond shaped die cuts to the main sweater vest
image and then placed this piece inside the Cable Knit
Embossing Folder. I then ran this entire piece through my die cutting
machine to emboss the design right into the flock. Isn't it fabulous?! And in
real life, the soft fuzziness of the flock is the perfect thing for this
adorable sweater vest.
Thanks so much for stopping by today. I hope you enjoyed learning how to add texture and interest to your die cuts using flocking combined with the Sweater Vest Die Set. Imagine the possibilities with the other fun Sunny Studio Stamps dies!
Thanks so much for stopping by today. I hope you enjoyed learning how to add texture and interest to your die cuts using flocking combined with the Sweater Vest Die Set. Imagine the possibilities with the other fun Sunny Studio Stamps dies!
Sunny Studio Supplies Used:
 Classic Gingham 6x6 Paper Shop at: Sunny Studio |
 Happy Thoughts Stamps Shop at: Sunny Studio |
 Cable Knit Embossing Shop at: Sunny Studio |
 Sweater Vest Dies Shop at: Sunny Studio |


