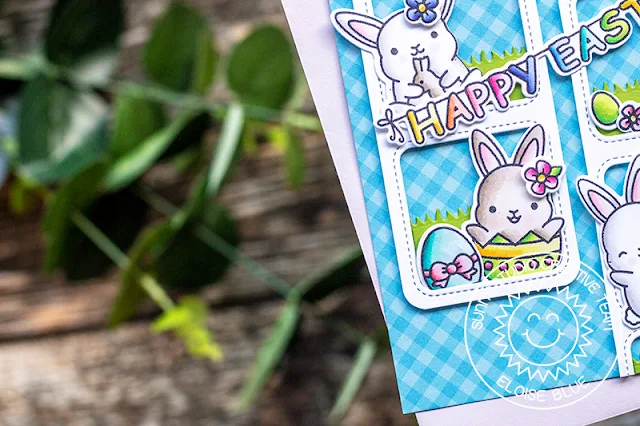
I started off with stamping out my images from Chubby
Bunny and coloured them with Copic Markers. I used very similar
colours to last
time I used this set since I loved them so much. I die cut them out
using the coordinating
dies and set them off to the side. I then took the Window
Trio Square Dies and cut it twice out of some white cardstock.
(Copic Markers – Y11, Y13, Y15, Y17 / YR00, YR02, YR12,
YR18 / R000, R00, R30, R21, R22 / RV10, RV13, RV25, RV19 / B63, BV02, BV04,
BV08 / B41, B21, B24, B26 / BG10, BG11, BG13, BG49 / YG01, YG03, YG07, YG09 /
E41, E42, E43, E44 / W00, W0, W1, W3 / 0)
I then added foam tape onto the back and adhered them onto
some blue patterned paper from the Gingham
Pastels Paper Pad. I then took some green cardstock and cut the same
Window
Trio Square Dies from it. I used the insides and then used the Comic
Strip Everyday Dies and used the grassy border from it and die cut
them. I adhered them inside of the squares flat.
I lastly added foam tape onto the backs of all the images and adhered them into place as well as the sentiment.
Thanks for stopping by today and I’ll see you next week.
I lastly added foam tape onto the backs of all the images and adhered them into place as well as the sentiment.
Thanks for stopping by today and I’ll see you next week.
---------------------------------------------------------
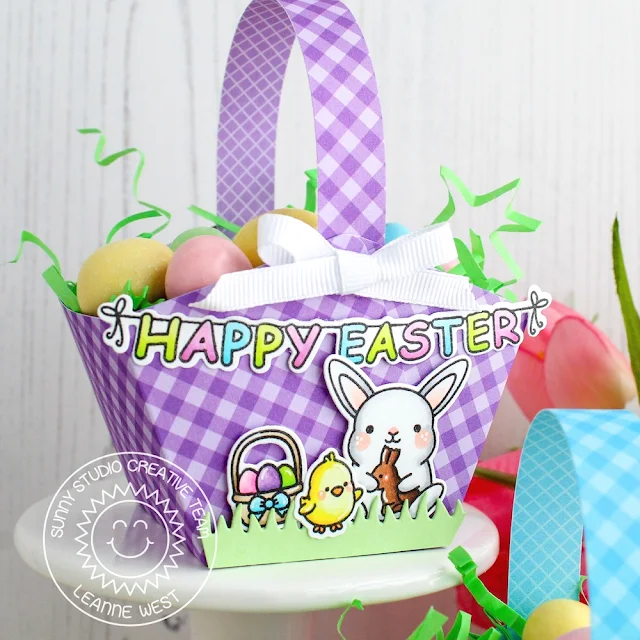
Hi there! Leanne here and I’m happy to be sharing a fun Easter
project with you today. I’ve made some little treat baskets using an old
school method that requires no special dies. I learned to make these
baskets years ago. They are super quick and easy to make and I’ve used
some adorable images from Chubby Bunny to decorate them.
For the basket, I used three different colors of pattern paper
from the Gingham Pastel paper pack. The weight of paper is perfect for this project.
I started by rounding all four corners with a corner rounder punch. I then used a scoring board to score the paper in both directions at 2 inches and 4 inches. I then cut right along the scores lines on two sides. Cut only to where the the score lines intersect. Fold all the non cut score lines and you will see the basket start to take shape. Bring the two non cut sides together until the corners meet and secure with a strong adhesive. I cut a skinny strip of the paper for a handle. I used an 1/8 inch hole punch and a small brad to attach the handle to the basket.
I started by rounding all four corners with a corner rounder punch. I then used a scoring board to score the paper in both directions at 2 inches and 4 inches. I then cut right along the scores lines on two sides. Cut only to where the the score lines intersect. Fold all the non cut score lines and you will see the basket start to take shape. Bring the two non cut sides together until the corners meet and secure with a strong adhesive. I cut a skinny strip of the paper for a handle. I used an 1/8 inch hole punch and a small brad to attach the handle to the basket.
To decorate the basket, I stamped and Copic colored several images
from Chubby Bunny including the Happy Easter banner image for each basket. I die cut a grass border from light green card stock using a die from
the Sunny Sentiments coordinating die set. I created a different scene for each and adhered
to the front of the baskets with some low profile foam squares.
As an optional step, I added a ribbon bow with hot glue on the front to cover the brad. I filled the baskets with green crinkle cut paper shred and some egg shaped chocolates. Of course any small Easter treat would fit inside. The opening of the basket measures 3.5 inches long by 2 inches wide.
As an optional step, I added a ribbon bow with hot glue on the front to cover the brad. I filled the baskets with green crinkle cut paper shred and some egg shaped chocolates. Of course any small Easter treat would fit inside. The opening of the basket measures 3.5 inches long by 2 inches wide.
I plan on using these baskets to give to some of our neighbors and
as a special treat for my kid’s teachers. They would also be perfect for
adding to your Easter table for a festive decoration by easy place setting. Be sure to stop by the blog next Monday. I’ll be sharing one more fun
Easter project idea.
Sunny Studio Supplies Used:
Sunny Studio Supplies Used:
 Sunny Sentiments Dies Shop at: Sunny Studio |
 Window Trio- Square Die Shop at: Sunny Studio |
 Comic Strip Everyday Dies Shop at: Sunny Studio |
 Gingham Pastels 6x6 Paper Shop at: Sunny Studio |
 Chubby Bunny Stamps Shop at: Sunny Studio |
 Chubby Bunny Dies Shop at: Sunny Studio |


These are Sooooo ADORABLE!!!!
ReplyDeleteEloise - your card is adorable! The square windows are perfect to showcase those chubby bunnies. Leanne - your Easter baskets are so creative! I love the cute banner you put on them. I'm going to make a few of these up. The bunny eating the chocolate bunny makes me giggle every time I see it! The gingham papers you ladies used is so pretty!
ReplyDelete