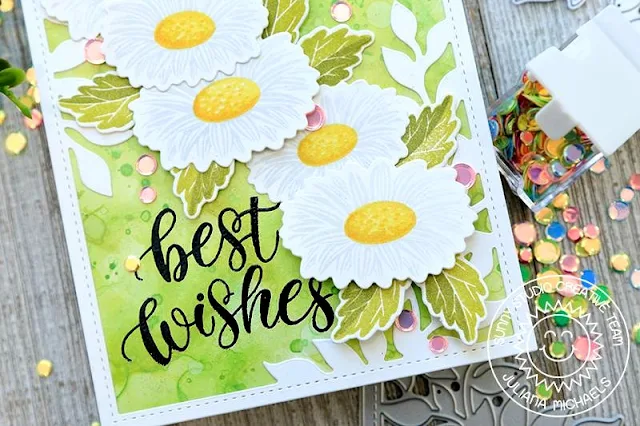
Hello crafty friends! It's Juliana here and today I'm
excited to share a birthday card I created using the Cheerful
Daises Stamp Set. As always, the Sunny Studio Stamps layering stamps are so
much fun to create with.
I began actually by creating the background for this card. I
knew I wanted white daises, so I thought a green colored background would work
nicely. I used a technique called Distress Oxide Glazing technique that Jennifer
McGuire shared. I'm pretty sure it's my new favorite technique right now!
You begin by stamping your Distress Oxide colors onto a craft mat. You then
spritz the inks with water and drag and dab a piece of Ranger Alcohol Ink
Cardstock through the inks. You dry it with a heat tool and then repeat
process. You can even flick ink onto it with a paintbrush. Always drying in
between each layer. Once you are happy with the design, grab some Distress
Micro Glaze and a foam blending tool. This is where the magic happens. Dab the
foam into the Glaze and then wipe it on to the cardstock. You will instantly
see how the paper, colors and design are altered. They colors begin to pop and
the layers are revealed. It's seriously magical! For this card I used a mix of
green Distress Oxide to help avoid the colors from getting muddy.
Once the background was complete, I die cut a piece of white cardstock using the Botanical Backdrop Die. Before I adhered this piece, I stamped Best Wishes from the Pink Peonies Stamp Set with Versafine Ink. I then sprinkled it with black embossing powder and heat set it with a heat gun.
Now onto those Cheerful Daisies! As I mentioned, I knew I wanted white daises. To achieve this, I skipped stamping the base image and only stamped the detailed image using Scrapbook.com Hybrid Ink in Rainy Day. I then used Lantern Light, Daffodil and Honeycomb to stamp the flower center. I repeated this for both flowers until I had five flowers stamped. I then die cut them with the coordinating dies. For the leaves, I again skipped stamping the base and stamped the other layers using Guacamole and Olive.
To complete the card, I added a touch of sparkle and shine using some of the pink confetti from the Iridescent Pastel Confetti.
Thanks so much for stopping by today!
--------------------------------------------------------
Hello! Candice with you today wishing you a fabulous crafty weekend! To get you inspired, I am sharing a bright card using the Cheerful Daisies stamp set from the new spring release! I used some new and older sets to create my card:
- Cheerful Daisies stamps & coordinating dies
- Banner Basics stamps & coordinating dies
- Chubby Bunnies stamps & coordinating dies
- Frilly Frames Chevron dies
- Frilly Frames Stripes dies
- Rainbow & White Pearls
For the background, I first die cut the scalloped frame with
the chevron from thick
white cardstock and a second chevron from
Bristol smooth that I had inked with mustard seed and squeezed lemonade oxide
inks. I glued the frame down and added the yellow pieces in between.
Next, I stamped the daisies and leaves using
the wonderful guides printed right on the stamp cover with colored inks and cut
out using the coordinating dies. I then stamped the bunny and chick in
light grey, using the no line coloring technique with copic markers and cut out
with the coordinating dies.
I used the light grey ink to stamp the banner, cut out with the banner dies and stamped the sentiment in green. I used foam tape to adhere them to the card front and added some yellow and white pearls for shine.
Thank you so much for visiting and have a wonderful day!
I used the light grey ink to stamp the banner, cut out with the banner dies and stamped the sentiment in green. I used foam tape to adhere them to the card front and added some yellow and white pearls for shine.
Thank you so much for visiting and have a wonderful day!
Sunny Studio Supplies Used:
 Chubby Bunny Stamps Shop at: Sunny Studio |
 Chubby Bunny Dies Shop at: Sunny Studio |
 Botanical Backdrop Die Shop at: Sunny Studio |
 Frilly Frames Chevron Die Shop at: Sunny Studio |
 Frilly Frames Stripes Die Shop at: Sunny Studio |
 Banner Basics Stamps Shop at: Sunny Studio |
 Banner Basics Dies Shop at: Sunny Studio |
 Cheerful Daisies Stamps Shop at: Sunny Studio |
 Cheerful Daisies Dies Shop at: Sunny Studio | |
 Pink Peonies Stamps Shop at: Sunny Studio |


No comments:
Post a Comment