Wednesday, October 31, 2018

Alpaca Holiday Easy To Mail Christmas Cards with Franci

Hello there! Franci here with you today with a trio of festive cards that are easy to mail! First though, Happy Halloween! Hope you'll all have a too fun to spook night full of treats and candies!

Alpaca Holiday Christmas Trimmings Stitched Oval Dies Easy To Mail Christmas Cards by Franci Vignoli

Christmas is coming in less than 2 months and I noticed that I needed some more festive cards to wish all my friends around the world Happy Holidays. So I made these cute cards with the Alpaca Holiday set.

Alpaca Holiday Christmas Trimmings Stitched Oval Dies Easy To Mail Christmas Cards by Franci Vignoli

They are super easy and quick to make but the most important thing for me: they are light in weight and easy to mail! First, I cut out all the card bases out of white cardstock and I stamped, colored and die cut all the images using the coordinating dies.

Alpaca Holiday Christmas Trimmings Stitched Oval Dies Easy To Mail Christmas Cards by Franci Vignoli

I took a piece of cardstock - you can also use acetate - and I cut it down to match my card fronts. Then I die cut an oval window (with the Stitched Ovals dies) on the top-center and I used this, plus masking tape, as a stencil to ink all my card fronts with a bright orange ink.

Alpaca Holiday Christmas Trimmings Stitched Oval Dies Easy To Mail Christmas Cards by Franci Vignoli

I stamped the sentiment from the Christmas Trimmings set on to every card with a grey ink and glued down all the elements. I also added some snow flakes (I die cut those with the mini free die you get with every order at the Sunny Studio Store) and some details with a white gel pen. Finally I cut out 6 thin stripes of pink pattern paper from the new Holiday Cheer 6x6 paper pack and I glued 2 of them on each card to create a pretty frame around my little scenes.

Thank you so much for stopping by today!

Sunny Studio Supplies Used: 


Tuesday, October 30, 2018

Here Comes Santa Christmas Shaker Card with Juliana

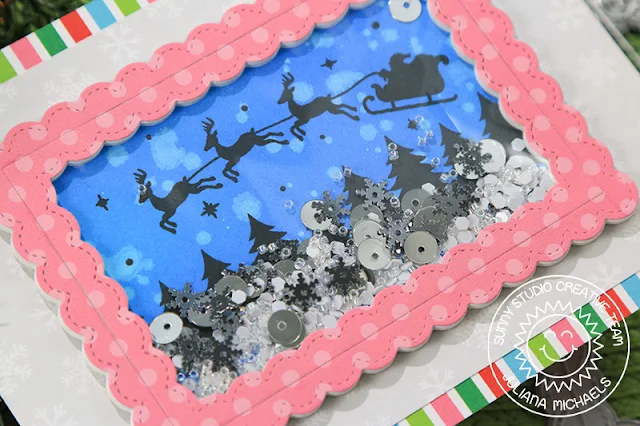
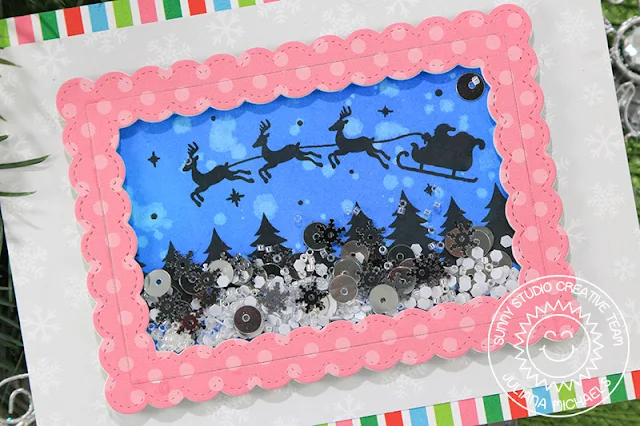
Hello friends! It's Juliana Michaels and today I'm sharing a festive shaker card I created using the new stamp set called Here Comes Santa and the Fancy Frames Rectangle dies.

Sunny Studio Stamps: Here Comes Santa Fancy Frames Rectangles Christmas Shaker Card with Juliana Michaels

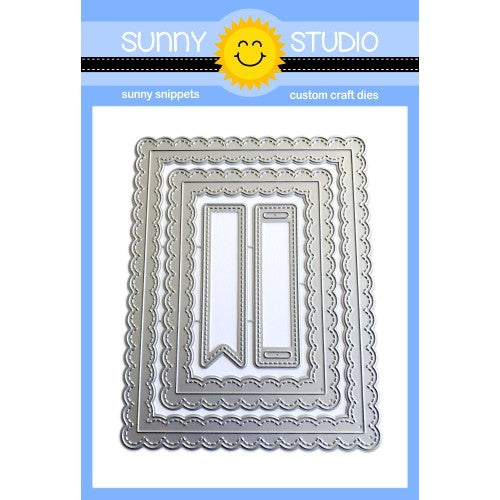
I began by cutting a piece of double sided foam adhesive with the smallest frame die from the Fancy Frames Rectangle die set. I then used it to cut a piece of pink polka dot paper from the Holiday Cheer 6x6 paper pad. Next, I cut a piece of acetate to just smaller than the opening on the frame and adhered it to the top of the die cut foam frame. I then adhered the pink polka dot frame on top of the acetate to complete the shaker box.

Sunny Studio Stamps: Here Comes Santa Fancy Frames Rectangles Christmas Shaker Card with Juliana Michaels

To create the background of the shaker card, I cut a piece of Bristol smooth paper to just smaller than the die cut frames and inked it with Distress Oxide in Salty Ocean and Blueprint Sketch. I then lightly splattered it with water and dabbed it dry with a paper towel. I love how this gives you the look of falling snow! Next, I took Ranger archival ink in black and stamped the trees along the bottom edge and the Santa with his reindeer across the top. I curved the stamp just slightly to give it a more animated feel. After the background was complete, I filled the shaker box with a mix of sequins and beads. I then adhered the background to the back side of the shaker box to complete the shaker.

Sunny Studio Stamps: Here Comes Santa Fancy Frames Rectangles Christmas Shaker Card with Juliana Michaels

For the card front, I again used some patterned papers from the Holiday Cheer 6x6 paper pad. To keep the patterns and colors from competing with the shaker box, I used a grey snowflake pattern behind the shaker and then added a striped pattern to the edge to add in a bit more color and balance the shaker box.

I hope you enjoyed learning how to create a Christmas shaker card using the new Here Comes Santa stamp set and Fancy FramesRectangle dies. Thanks so much for stopping by today!

Sunny Studio Supplies Used:

Fancy Frames- Rectangles
Shop at:
Sunny Studio
Holiday Cheer 6x6 Paper
Shop at:
Sunny Studio
Here Comes Santa Stamps
Shop at:
Sunny Studio

Monday, October 29, 2018

Happy Owlidays Colorful Holiday Card with Eloise

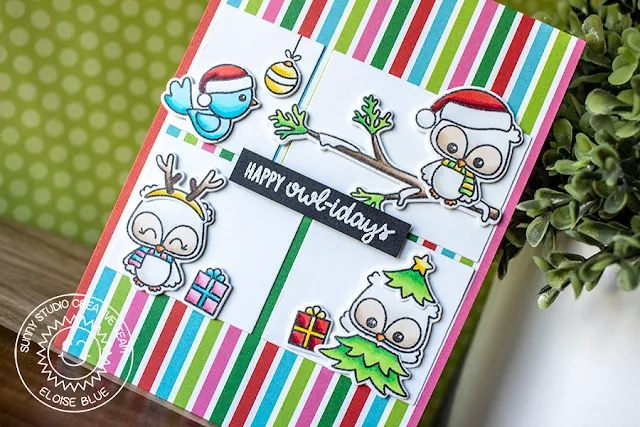
Hi friends, Eloise here and today I have a card to share with you all using the Happy Owlidays stamp set along with the new Holiday Cheer 6x6 patterned paper and also the Comic Strip Everyday dies.

Sunny Studio Stamps: Happy Owlidays Comic Strip Everyday Dies Colorful Holiday Card with Eloise Blue

To start I stamped out my images and coloured them in with Copic markers. I then cut them out using the coordinating dies. I also die cut the Comic Strip Everyday dies from white cardstock as well. 

Sunny Studio Stamps: Happy Owlidays Comic Strip Everyday Dies Colorful Holiday Card with Eloise Blue

Next I cut down a piece of striped patterned paper from the Holiday Cheer 6x6 paper pad and adhered it onto a card base. I then added adhesive to the backs of the rectangles cut from the Comic Strip Everyday dies earlier and adhered them into place. Lastly I adhered my images down using foam tape and then white heat embossed the simple 'Happy Owl-idays' sentiment onto a thin strip of black cardstock and adhered it in the centre. 

Thanks so much for stopping by today, I hope you all enjoyed and I'll see you next week.

Sunny Studio Supplies Used: 

Comic Strip Everyday Dies
Shop at:
Sunny Studio
Holiday Cheer 6x6 Paper
Shop at:
Sunny Studio
Happy Owlidays Stamps
Shop at:
Sunny Studio
Happy Owlidays Dies
Happy Owlidays Dies
Shop at:
Sunny Studio

Saturday, October 27, 2018

Guest Designer Spotlight: Alpaca Holiday Card with Kay Miller

Hi there, Kay Miller here. I have a fun project to share with you today using the adorable Alpaca Holiday stamp set from Sunny Studio Stamps! Seriously these alpacas are the cutest I have seen!

Sunny Studio Stamps: Alpaca Holiday Holiday Cheer Interactive Pop Up Christmas Card by Kay Miller

First I created a pop up box using papers from the Sunny Studio Holiday Cheer 6 x 6 Card stock paper pack to decorate it.

Sunny Studio Stamps: Alpaca Holiday Holiday Cheer Interactive Pop Up Christmas Card by Kay Miller

For the snowy hills, I just used a stitched circle die and cut them to fit the box.  

Sunny Studio Stamps: Alpaca Holiday Holiday Cheer Interactive Pop Up Christmas Card by Kay Miller

I used sentiments from the Alpaca Holiday stamp set. I cut them out with banner dies and adhered to the back and front flap of my box.

Sunny Studio Stamps: Alpaca Holiday Holiday Cheer Interactive Pop Up Christmas Card by Kay Miller

All of the adorable images were colored with Copic markers, cut out with the coordinating dies, and adhered to the snowy hills with adhesive tape.

Thanks so much for stopping by!

Sunny Studio Supplies Used:

Holiday Cheer 6x6 Paper
Shop at:
Sunny Studio
Alpaca Holiday Stamps
Shop at:
Sunny Studio
Alpaca Holiday Dies
Alpaca Holiday Dies
Shop at:
Sunny Studio

Friday, October 26, 2018

Rustic Winter Dies Starry Night Sky Christmas Card with Lexa

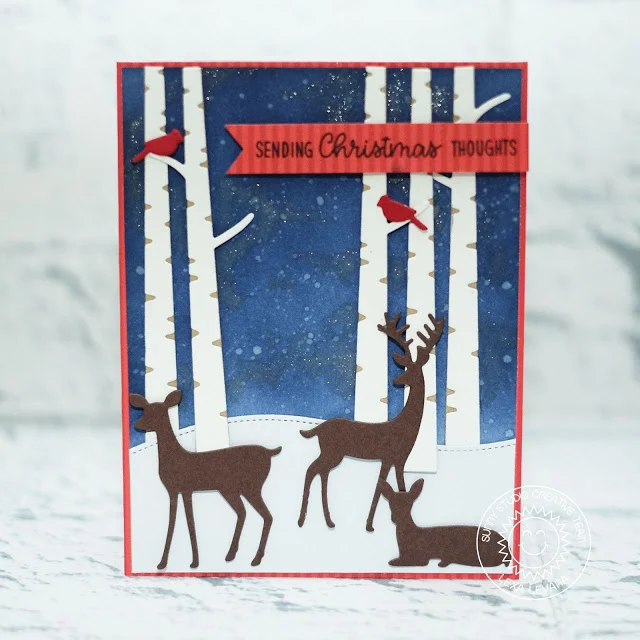
Hi everyone! Lexa here today with a Christmas card that highlights the brand new Rustic Winter Dies. It's so beautiful, with three layered birch trees, and the deer are so darling. These dies are perfect if you want to create the same cards multiple times, as they're so simple and easy.

Sunny Studio Stamps: Rustic Winter Dies Woodland Borders Starry Night Sky Christmas Card by Lexa Levana

I started my card with the background. I wanted to make a starry night sky by blending Chipped Sapphire Distress Inks all over the base and then I splattered some water to create the stars. I also added some silver sparkle using Wink of Stella, my oldies, but still goodies. I used different cardstock colors for each element. As for the birch trees, I layered kraft cardstock behind the white ones.

Sunny Studio Stamps: Rustic Winter Dies Woodland Borders Starry Night Sky Christmas Card by Lexa Levana

To create the snow hill I used Woodland Borders Die and I love those faux stitches so much. I adhered the elements, both with glue and foam tapes, to create dimension. To match the red birds on my card, I decided to have red borders around my card using the red stripes patterned paper from Striped Silly 6x6 Paper Pad. The sentiment is from Alpaca Holiday Stamps that's stamped on the same patterned paper.

I love how easy and pretty this card turns out. Without any coloring, you can make tons of this design for your family and friends this Christmas. I hope you like today's inspiration and thank you so much for stopping by. Have a wonderful day!

Sunny Studio Supplies Used:

Striped Silly 6x6 Paper
Shop at:
Sunny Studio
Woodland Borders Dies
Shop at:
Sunny Studio
Alpaca Holiday Stamps
Shop at:
Sunny Studio
Rustic Winter Dies
Rustic Winter Dies
Shop at:
Sunny Studio

Thursday, October 25, 2018

Foxy Christmas Grey and Blue Reindeer Fox Christmas Card with Vanessa

Hi everyone! Vanessa here today with a cute card using Foxy Christmas. I can't get over how adorable the foxes are! For today's card, I chose the dressed up reindeer fox.

Sunny Studio Stamps: Foxy Christmas Woodland Borders Reindeer Fox Christmas Card by Vanessa Menhorn

First, I trimmed a panel from the grey patterned paper from the Holiday Cheer 6x6 paper pad slightly smaller than the card base. To the bottom of the panel I adhered a snow drift that I had cut with the Woodland Borders die. Then I stamped the "trees" that really are the stems of the leaves from the Autumn Splendor set. After I had stamped the sentiment, I adhered the panel to the card.

Sunny Studio Stamps: Foxy Christmas Woodland Borders Reindeer Fox Christmas Card by Vanessa Menhorn

Now I stamped the fox and the holly, colored the images with Copics, die-cut them with the matching dies and adhered the elements with foam tape.

I love that this patterned paper looks like snow falling, how about you? Thank you for stopping by! See you next week!

Sunny Studio Supplies Used:

Autumn Splendor Stamps
Shop at:
Sunny Studio
Woodland Borders Dies
Shop at:
Sunny Studio
Holiday Cheer 6x6 Paper
Shop at:
Sunny Studio
Foxy Christmas Stamps
Shop at:
Sunny Studio
Foxy Christmas Dies
Foxy Christmas Dies
Shop at:
Sunny Studio

Wednesday, October 24, 2018

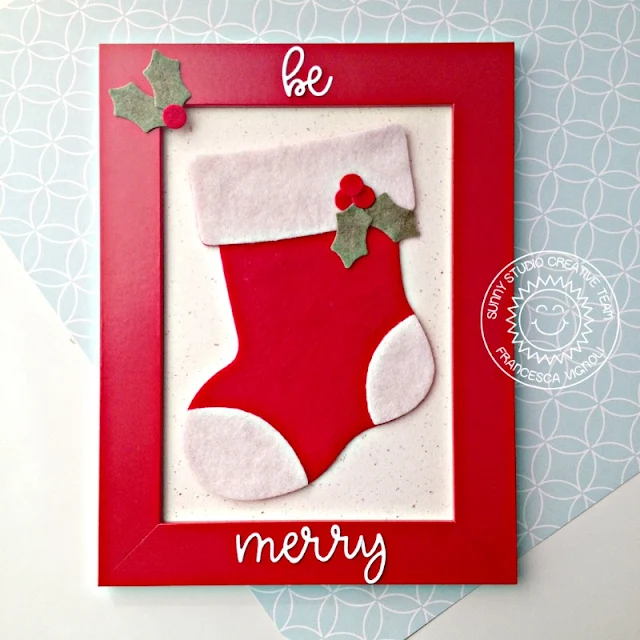
Santa's Stocking Dies Christmas Felt Stocking Frame with Franci

Hello there! Franci here with you today with a little Christmas frame, using the Santa's Stocking dies, that's the perfect festive "craft with kids" project! 

Sunny Studio Stamps: Santa's Stocking Dies Loopy Letters Christmas Felt Stocking Frame by Franci Vignoli

First, I picked out a frame. I chose a red one that was large enough to fit my Christmas stocking and I cut out a panel from the creamy white paper to be the backdrop. I die cut all of the elements for my stocking from felt and I glued them together with double side adhesive. It totally worked fine and I think it's the easiest kind of glue to use with kids :)

Sunny Studio Stamps: Santa's Stocking Dies Loopy Letters Christmas Felt Stocking Frame by Franci Vignoli

I glued it onto my panel and then I die cut all of the letters from the Loopy Letters dies set to form my sentiment, "be merry", from white cardstock. I glued them all to my frame with liquid glue and I added a little holly on the top left corner and the frame is done!

It's so super simple to make and so pretty to share your craft room with your kids, or even if you are a teacher it's a super fun project to make :) Thank you so much for stopping by today!

Sunny Studio Supplies Used:


Loopy Letters Dies
Loopy Letters Dies
Shop at:
Sunny Studio
Santa's Stocking Dies
Shop at:
Sunny Studio

Tuesday, October 23, 2018

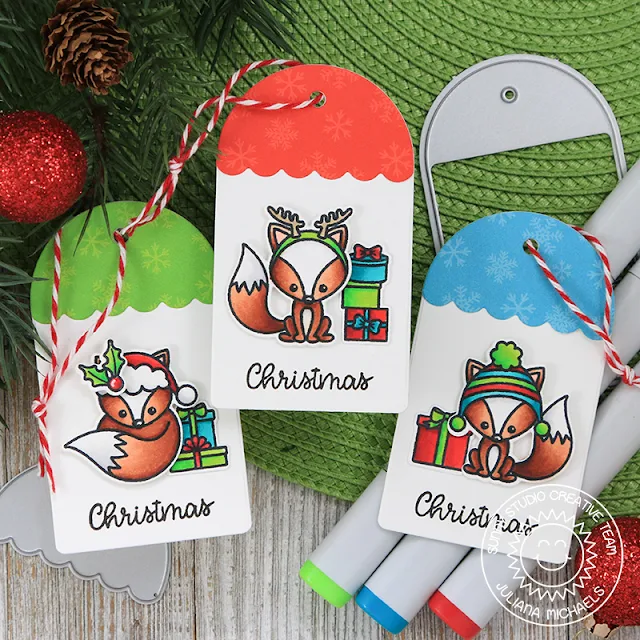
Build A Tag Foxy Christmas Tag Set with Juliana

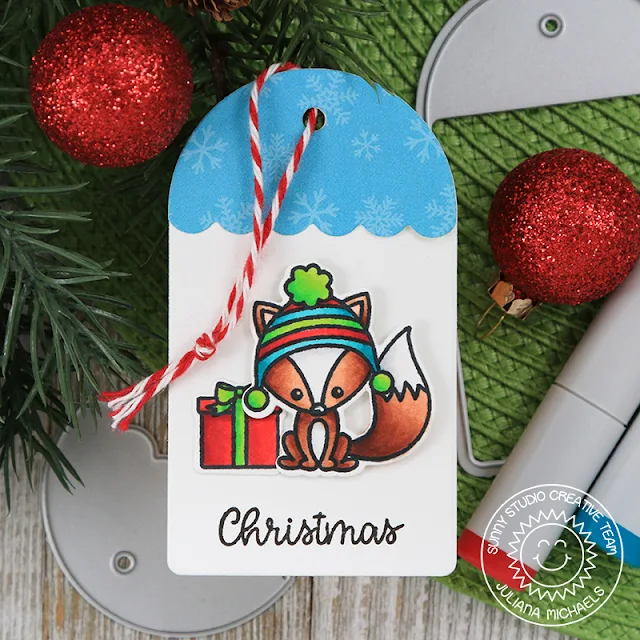
Hello friends! It's Juliana Michaels here and I'm so happy to be here today to share a trio of Christmas tags I created using the new Foxy Christmas stamp set and Build A Tag No. 1! These new tag dies make creating fun and unique gift tags a breeze when you combine them with cardstock, patterned paper, stamps, and die cuts.

Sunny Studio Stamps: Build A Tag No 1 Foxy Christmas Holiday Cheer Christmas Tag Set by Juliana Michaels

I began by stamping and coloring several of the adorable foxes and gift boxes from the Foxy Christmas stamp set. I used Copic Markers for all of the coloring and then die cut them using the coordinating die set.

Sunny Studio Stamps: Build A Tag No 1 Foxy Christmas Holiday Cheer Christmas Tag Set by Juliana Michaels

Next, I took one of the tags from the Build A Tag No. 1 and die cut it from white cardstock. I then took some of the patterned papers from the Holiday Cheer 6x6 paper pad and die cut them using one of the tag toppers from the tag die set. 


Sunny Studio Stamps: Build A Tag No 1 Foxy Christmas Holiday Cheer Christmas Tag Set by Juliana Michaels

Once I had all of the pieces die cut, I was ready to start assembling the tags. I layered the toppers and die cut images onto the tags and created a little “scene” on each one. To finish off each tag, I added a piece of red and white baker's twine.

Sunny Studio Stamps: Build A Tag No 1 Foxy Christmas Holiday Cheer Christmas Tag Set by Juliana Michaels

I hope you enjoyed this bit of Christmas gift tag inspiration using the new Build A Tag No.1 and Foxy Christmas stamp set. Thanks so much for stopping by today!

Sunny Studio Supplies Used:

Holiday Cheer 6x6 Paper
Shop at:
Sunny Studio
Foxy Christmas Stamps
Shop at:
Sunny Studio
Foxy Christmas Dies
Foxy Christmas Dies
Shop at:
Sunny Studio
Build-A-Tag #1 Dies
Build-A-Tag #1 Dies
Shop at:
Sunny Studio

Monday, October 22, 2018

Eskimo Kisses Winter Themed Watercolored Card with Eloise

Hi friends, Eloise here and today I'll be sharing a card using the Eskimo Kisses mini set along with the last year Winter release - Polar Playmates. These sets work perfectly together so I thought I would mix them today.

Sunny Studio Stamps: Eskimo Kisses Polar Playmates Winter Themed Watercolored Card by Eloise Blue

To start off, I stamped out all my images from both Eskimo Kisses and Polar Playmates. I coloured my images in with Copic Markers and die cut them out using the coordinating dies. 

(Copic Markers Used: E71, E74, E77 / Y11, Y15, Y19 / R21, R22, R24 / B0000, B000, B01 / YR20, YR12, YR15 / YG61, YG63, YG67 / E000, E00, E21 / E31, E35, E37 / YR31, YR24, YR27 / W00, W0, 0 / C00, C0 / W3, W5, W7)

For my background I took a piece of watercolour cardstock and did a quick watercolour background. I dried it off with a heat tool and adhered my images down in a slight grid. 

Sunny Studio Stamps: Eskimo Kisses Polar Playmates Winter Themed Watercolored Card by Eloise Blue

For my sentiment, I white heat embossed the 'Eskimo Kisses' sentiment onto a strip of black cardstock and adhered it down as well. To finish up I used the brand new Holiday Cheer 6x6 and added a striped piece on the side of the card base. 

Thanks so much for stopping by today and I'll see you next week. 

Sunny Studio Supplies Used:  
Polar Playmates Stamps
Shop at:
Sunny Studio
Polar Playmates Dies
Shop at:
Sunny Studio
Holiday Cheer 6x6 Paper
Shop at:
Sunny Studio
Eskimo Kisses Stamps
Shop at:
Sunny Studio
Eskimo Kisses Dies
Eskimo Kisses Dies
Shop at:
Sunny Studio