Thursday, July 20, 2023

Magical Mermaids Card with Marine

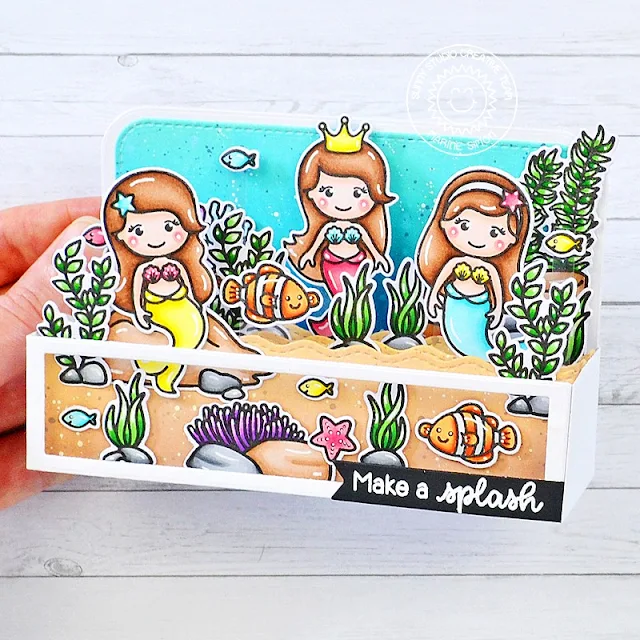
Hey crafty friends, Marine here with you today! It's been a while since my last underwater card, so I'm very happy to be back on the blog with this new 3D card showcasing three Magical Mermaids.

Sunny Studio Stamps: Magical Mermaids Summer Themed Card by Marine Simon (featuring Fintastic Friends, Best Fishes, Ocean View)

I started off by creating the card base. I cut all the pieces out of white cardstock, cut an opening in the front panel, and assembled everything together. Next I cut the back panel out of Strathmore bristol smooth cardstock, colored it using salvaged patina + peacock feathers + blueprint sketch oxide inks, and stuck it on the white panel using liquid glue. And then I cut three wavy borders out of Strathmore bristol smooth cardstock again, colored them using antique linen + vintage photo oxide inks, and attached them inside the card using double sided tape.

Sunny Studio Stamps: Magical Mermaids Summer Themed Card by Marine Simon (featuring Fintastic Friends, Best Fishes, Ocean View)

Next I stamped all my images on Transotype perfect coloring paper using an alcohol marker friendly black ink, used the coordinating dies to cut them all, and colored everything using my Graph'it Brush markers and Spectrum Noir Illustrator markers. We have:

- the three mermaids + rocks + seaweeds + starfish + small fish from Magical Mermaids
- the crab + seaweed clusters from Ocean View
- the clown fish + seaweeds from Best Fishes
- the seaweed cluster from Fintastic Friends

Sunny Studio Stamps: Magical Mermaids Summer Themed Card by Marine Simon (featuring Fintastic Friends, Best Fishes, Ocean View)

I added highlights and details to the images using a white gel pen, and attached them inside the card using glue dots. And I wanted a few fish to be swimming, so I stuck those images on the end of slim strips of acetate using 3mm glue dots, and then attached the other end of those strips of acetate on the wavy borders using the same glue dots.

Finally I created my sentiment. I cut a black banner using a die from the Notebook Photo Corners die set, white heat embossed my "Make a splash" greeting from Best Fishes on top of it, and then attached the banner on the bottom right corner of the card front.

And that's it! It was my first time coloring those beautiful mermaids, and I really enjoyed it! I loved creating this whole underwater scene, love how colorful it is, and I hope that you like it! Thanks so much for stopping by, and see you next week!

Sunny Studio Supplies Used:

Magical Mermaid Dies
Shop at:
Sunny Studio
Magical Mermaid Stamps
Shop at:
Sunny Studio
Best Fishes Stamps
Best Fishes Stamps
Shop at:
Sunny Studio
Best Fishes Dies
Best Fishes Dies
Shop at:
Sunny Studio
Fintastic Friends Stamps
Shop at:
Sunny Studio
Fintastic Friends Dies
Shop at:
Sunny Studio
Ocean View Stamps
Ocean View Stamps
Shop at:
Sunny Studio
Ocean View Dies
Ocean View Dies
Shop at:
Sunny Studio
Notebook Photo Corners Dies
Shop at:
Sunny Studio

Wednesday, July 19, 2023

Plane Awesome Card with Catherine

Hello Crafty Friends! Catherine here! Today, I am sharing an uplifting card created with the fun Plane Awesome Stamps!

Sunny Studio Stamps: Plane Awesome Card by Catherine Cohen (featuring Loopy Letter Dies, Fluffy Cloud Border Dies, Floating By, Slimline Dies)

To start, I ink blended a cloudy background on A2 white cardstock with Tumbled Glass Distress Oxide using a stencil I made from the cloud die in Slimline Nature Border Dies. I splattered the background with some blue watercolor. Next, I die cut 4 cloudy borders for the top and bottom of the card using Fluffy Clouds Border Dies. I die cut two out of vellum and two out of white cardstock.

I stamped the images from Plane Awesome Stamps and die cut with Plane Awesome Dies. I added some balloons from Floating By Stamps. I colored all the images with Copic Markers listed in my blog link below. 

Sunny Studio Stamps: Plane Awesome Card by Catherine Cohen (featuring Loopy Letter Dies, Fluffy Cloud Border Dies, Floating By, Slimline Dies)

I added the word “fly” by die cutting two sets from white cardstock with Loopy Letters Dies I ink blended one set with Festive Berries Distress Oxide and I adhered it on top of the second set for dimension. I adhered all the images onto the background. I finished off the card with a White Heat Embossed sentiment from the set.

Thank you so much for joining me today! For a list of Copic Markers used, please visit me at Crafti-Cat. Have a wonderful week!

Sunny Studio Supplies Used:

Loopy Letters Dies
Loopy Letters Dies
Shop at:
Sunny Studio
Plane Awesome Stamps
Shop at:
Sunny Studio
Plane Awesome Dies
Plane Awesome Dies
Shop at:
Sunny Studio
Fluffy Clouds Border Dies
Shop at:
Sunny Studio
Floating By Stamps
Floating By Stamps
Shop at:
Sunny Studio
Floating By Dies
Floating By Dies
Shop at:
Sunny Studio
Slimline Nature Borders
Shop at:
Sunny Studio

Tuesday, July 18, 2023

Oceans of Joy Card with Isha

Hello everyone, Isha here with you today with this fun summer theme card featuring the Oceans of Joy stamps and dies. I combined these with some other similar products to create a lovely ocean scene in a 3D box card form. I kept this card without sentiment, so to add the sentiment later as per the requirement.

Sunny Studio Stamps: Oceans Of Joy Card by Isha Gupta (featuring Fintastic Friends, Ocean View)

First I created the watercolor background using various pigment powders onto watercolor paper, spray with water and more pigment as per your liking. Let this dry and then flick some white paint layer. To create the box I used the Slim Scenescape Builder dies by Mama Elephant.

Stamp, color and die-cut the images. Add some white gel pen details.

Fishes - Oceans of Joy stamps and dies
Big Corals - Ocean View stamps and dies
Small Coral and leaves - Fintastic Friends stamps and dies

Sunny Studio Stamps: Oceans Of Joy Card by Isha Gupta (featuring Fintastic Friends, Ocean View)

Assemble the box, there are many tutorial videos available. Adhere the images to create a scene. I adhered the dolphin onto a transparent strip so as to give a feel as if it was jumping out of the water.

Hope you enjoy this card and have a nice day!

Sunny Studio Supplies Used:

Oceans of Joy Dies
Oceans of Joy Dies
Shop at:
Sunny Studio
Oceans of Joy Stamps
Shop at:
Sunny Studio
Fintastic Friends Stamps
Shop at:
Sunny Studio
Fintastic Friends Dies
Shop at:
Sunny Studio
Ocean View Stamps
Ocean View Stamps
Shop at:
Sunny Studio
Ocean View Dies
Ocean View Dies
Shop at:
Sunny Studio

Monday, July 17, 2023

Two Scoops Card with Bobbi

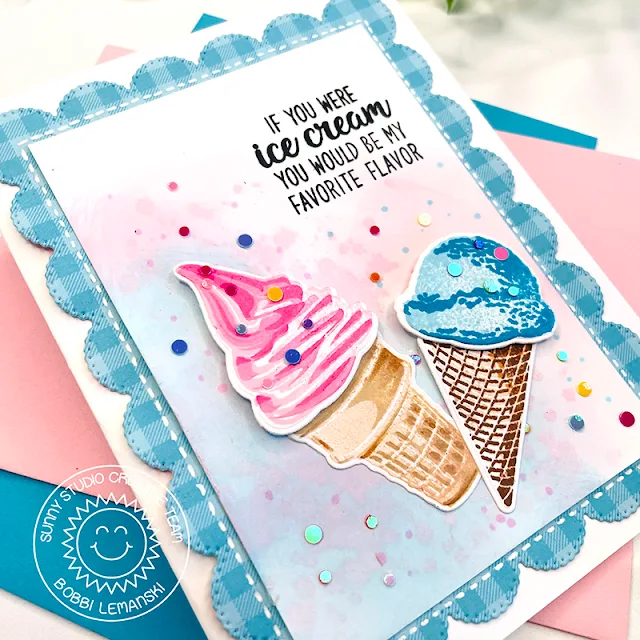
Hello crafty friends! It’s Bobbi and I have two scoops for you today! Here’s the scoop…  I used the Two Scoops stamp set and coordinating dies along with the Frilly Frames Eyelet Lace die set for this A2-size card. 

Sunny Studio Stamps: Two Scoops Card by Bobbi Lemanski (featuring Frilly Frame Dies)

I used Neenah 80lb Classic Crest cardstock for the card base and added a blue gingham frame using a pattern paper from the Joyful Holiday paper pack and the frame die I added faux white stitches to the frame to outline the interior panel.

For the interior panel, I blended Distress Oxide Inks in Tumbled Glass and Spun Sugar on white cardstock for the blue and pink background. I color blended the inks in the lower left corner. By adding splatters of water on the blue ink and then blending the pink ink over it, I got this fun splotchy blend that looks almost like ice cream drips.

Sunny Studio Stamps: Two Scoops Card by Bobbi Lemanski (featuring Frilly Frame Dies)

I stamped the cones using Distress Oxide inks in Spun Sugar, Kitsch Flamingo, Picked Raspberry, Tumbled Glass, Mermaid Lagoon, Antique Linen, Vintage Photo and Old Paper. I attached the cones using glue and the ice cream scoops using foam tabs to make them dimensional. Colorful “sprinkles” of colored sequins glued to the background and the scoops, plus a stamped sentiment at the top complete this sweet card!

Thanks for stopping by today. If you want to see more ideas and inspiration from me, subscribe to my blog, BobbiHartDesign.com. I’ll send you updates on new posts! You can also find me on Instagram as @BobbiHartDesign and on Facebook as BobbiHartDesign.

Sunny Studio Supplies Used:


Two Scoop Dies
Two Scoop Dies
Shop at:
Sunny Studio
Two Scoop Stamps
Two Scoop Stamps
Shop at:
Sunny Studio
Frilly Frames-Eyelet Lace
Shop at:
Sunny Studio
Joyful Holiday Paper
Shop at:
Sunny Studio

Sunday, July 16, 2023

A Cut Above Card with Cathy

Hey friends! Cathy here today and I’ve got a fun card to share featuring the A Cut Above Stamps. I probably need to make 100 of these to have on hand when I’ve had one of “those” kind of days!

Sunny Studio Stamps: A Cut Above Punny Card by Cathy Chapdelaine (featuring Notebook Dies, Stitched Rectangles Dies, Frilly Frame Dies)

This is an A2 card with a pretty simple design that works up quickly (just in case you might also need 100 of these on hand). I started by die-cutting a paper from the Dots & Stripes Jewel Tones Paper using the frame portion from the Frilly Frames Quatrefoil Die and adhered this to the card front. Next, I die-cut a silver metallic cardstock using the frame portion from the Frilly Frames Chevron Die. To create a frame from this piece, I die-cut the center of it using the second largest Stitched Rectangles Die. I cut a blue paper from the Dots & Stripes Jewel Tones Paper 3 1/2" x 4 3/4", adhered the silver cardstock frame to it and adhered the combined piece to the card front.

Sunny Studio Stamps: A Cut Above Punny Card by Cathy Chapdelaine (featuring Notebook Dies, Stitched Rectangles Dies, Frilly Frame Dies)

Next, I die-cut a piece of black cardstock using a Notebook Photo Corners Die and heat embossed the sentiment and white lines from the A Cut Above Stamps with white embossing powder. To add a scissor-like cut to the notebook paper, I die-cut it in multiple places using a Mini Mat & Tag 4 Die which also coordinates with the Frilly Frames Chevron Die.

To finish, I stamped the scissors from the A Cut Above Stamps and die-cut them using the coordinating dies.

I hope you enjoyed and thanks for stopping by today! For more inspiration, please visit my blog www.inkredibleadventures.com and you can also find me on Instagram as @cathy.chapdelaine.

Sunny Studio Supplies Used:

Stitched Rectangle Dies
Shop at:
Sunny Studio
Dots & Stripes Jewel Tones 6x6 Paper
Shop at:
Sunny Studio
Frilly Frames Chevron Die
Shop at:
Sunny Studio
Frilly Frames Quatrefoil
Shop at:
Sunny Studio
Mini Mat & Tag 4 Dies
Shop at:
Sunny Studio
A Cut Above Stamps
A Cut Above Stamps
Shop at:
Sunny Studio
A Cut Above Dies
A Cut Above Dies
Shop at:
Sunny Studio
Notebook Photo Corners Dies
Shop at:
Sunny Studio