Thursday, September 1, 2022

Squirrel Friends Cards with Marine and Waleska

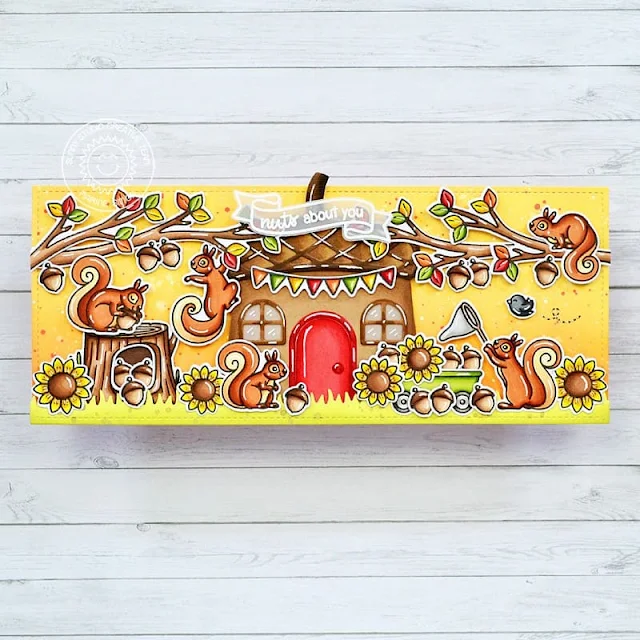
Hey crafty friends, Marine here, I'm back this week with a new super cute and busy scene featuring the lovely Squirrel Friends from the Fall & Winter 2022 collection. I love those sweet and fun little guys so much, I can't wait to showcase them on other projects!

Sunny Studio Stamps: Squirrel Friends Fall Themed Card by Marine Simon (featuring Nutty For You, Gingerbread House Dies)

So, as often happens, I started off with the coloring. I stamped the images using an alcohol marker friendly black ink, cut them all using the coordinating dies, and then colored everything using my alcohol markers. Like I said, I created a busy scene with images from different sets, so here is the supplies list: 

Squirrel Friends - tree trunk, nuts and squirrels
Seasonal Trees - small bird
Balloon Rides - banner
Happy Harvest - sunflowers
Spring Showers - butterfly net
Harvest Mice - cart
Country Scenes - swirling thing

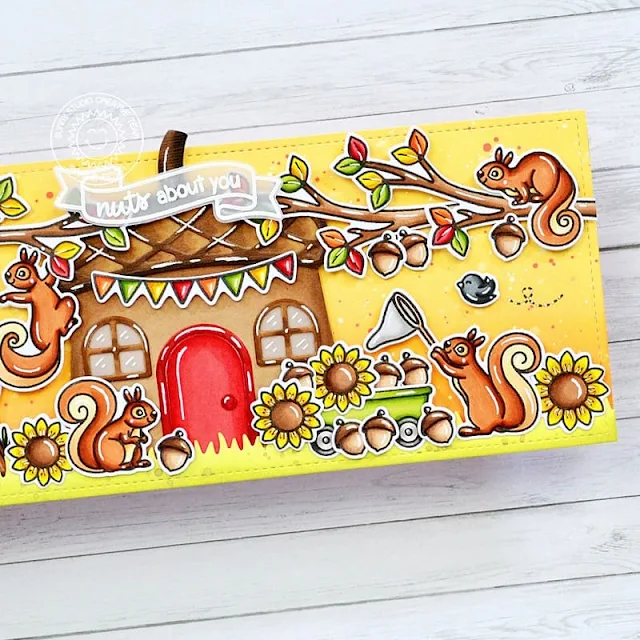
Once everything was colored, I created a house for the squirrels to live in using the Nutty for You die set for the base of the house, and the Gingerbread House die set for the door and two windows. I cut the different pieces and colored them using my alcohol markers again.

Sunny Studio Stamps: Squirrel Friends Fall Themed Card by Marine Simon (featuring Nutty For You, Gingerbread House Dies)

Next I did the background. I cut an 8,5 x 3,5" bristol panel and used scattered straw + spiced marmalade oxide inks to create a light autumn sky. And then I created a grass border to ground the scene. I cut another 8,5 x 3,5" bristol panel and cut a slim grass border out of it using a die from the Picket Fence Border die set. And I colored this border using shabby shutters and peeled paint oxide inks.

Once the background panel and grass border were dry, I started to assemble everything, starting with the nut house pieces, and then all the elements on the slimline panel using foam squares mostly to bring dimension to the scene.

And last but not least I created my sentiment. I white heat embossed the banner from Little Birdie on vellum, along with the phrase "Nuts about you" from Squirrel Friends inside of it, and I attached it at the top of the nut house using a clear foam square.

And done! This card was so fun to make, and those squirrels are really adorable, love their unique design! Please feel welcome to check the process video for more information. Thanks so much for stopping by, and see you next week!

----------------------------------------------------

Hello Friends, Waleska here!! It is starting to feel like fall and today I have the cutest card to celebrate love for the coming season!

Sunny Studio Stamps: Squirrel Friends Fall Themed Card by Waleska Galindo (featuring Stitched Rectangle Dies)

For my card today it was super easy to figure out the colors of my card because I used the new Critter Country Paper and their beautiful colors inspire me to color this cute squirrels orange.

I stamped a bunch of the Squirrel Friends Stamps and started coloring them with the following copic markers: YR18/YR07/YR04 and E43/E42/E41. They are the cutest I love putting them around different scenes because they all have different positions.

Sunny Studio Stamps: Squirrel Friends Fall Themed Card by Waleska Galindo (featuring Stitched Rectangle Dies)

This can also be a valentines card too! I then cut the front panel with the Fancy Frames Rectangle dies and started to have fun adding all the squirrels playing around. I cut a frame from kraft cardstock and added the entire front panel to a matching color paper from the same paper pad I used. To finish this card I added some little hearts to the cute couple that is sharing the acorn and I stamped the sentiment with black Versafine ink.

This colorful paper pad and squirrels are so beautiful I hope you liked this idea, thank you so much for stopping by today! Remember to stay crafty because today is only lived once, do what you love and enjoy it!!!

Sunny Studio Supplies Used:

Picket Fence Border Dies
Shop at:
Sunny Studio
Stitched Rectangle Dies
Shop at:
Sunny Studio
Gingerbread House Dies
Shop at:
Sunny Studio
Happy Harvest Stamps
Shop at:
Sunny Studio
Happy Harvest Dies
Happy Harvest Dies
Shop at:
Sunny Studio
Nutty For You Dies
Nutty For You Dies
Shop at:
Sunny Studio
Seasonal Trees Stamps
Shop at:
Sunny Studio
Seaonal Trees Dies
Seaonal Trees Dies
Shop at:
Sunny Studio
Spring Showers Stamps
Shop at:
Sunny Studio
Spring Showers Dies
Spring Showers Dies
Shop at:
Sunny Studio
Harvest Mice Stamps
Harvest Mice Stamps
Shop at:
Sunny Studio
Harvest Mice Dies
Harvest Mice Dies
Shop at:
Sunny Studio
Balloon Rides Stamps
Shop at:
Sunny Studio
Balloon Rides Dies
Balloon Rides Dies
Shop at:
Sunny Studio
Country Scenes Stamps
Shop at:
Sunny Studio
Country Scenes Dies
Country Scenes Dies
Shop at:
Sunny Studio
Little Birdie Stamps
Shop at:
Sunny Studio
Little Birdie Dies
Little Birdie Dies
Shop at:
Sunny Studio
Squirrel Friends Stamps
Shop at:
Sunny Studio
Squirrel Friends Dies
Shop at:
Sunny Studio
Critter Country Paper
Shop at:
Sunny Studio

Wednesday, August 31, 2022

Pumpkin Patch Die Focused Cards with Alma and Marie

Hi dear ones, it's Alma and I'm so happy to show you the awesome new stamps from the Pumpkin Patch Dies set from the new release on my new card.

Sunny Studio Stamps: Pumpkin Patch Die Focused Card by Alma Störk (featuring Words of Gratitude)

The punches are very versatile, you can use them as Halloween punches or simply as fall pumpkins. I chose the second option and punched the die-cut elements on white paper, glued them together and then coloured them with copics and pencils.

Sunny Studio Stamps: Pumpkin Patch Die Focused Card by Alma Störk (featuring Words of Gratitude)

I then speckled and dotted the background, tied the Doodletwine around the card, and die-cut the text from the Words of Gratitude Stamps Set. Now glue the pumpkins on, colour in a shadow with pencils under the pumpkins and you're done! 

--------------------------------------------

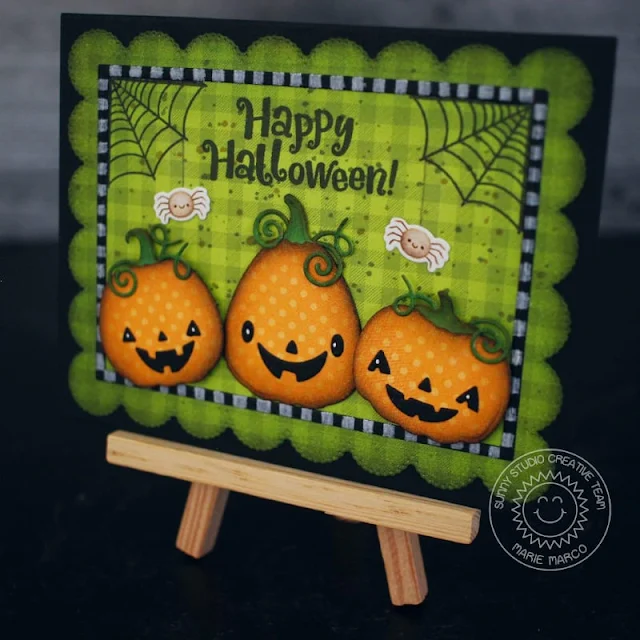
Hello Everyone! I’m Marie! Thank you so much for joining me today for my very first blog post with Sunny Studio Stamps. It’s Spooky season for some people that’s why I am so thrilled to be here to share my simple, fun, and spooktacular Halloween card featuring the new Pumpkin Patch Dies. I also used the New Too Cute To Spook stamp set. There are so many elements in this die set that will help to build all kinds of different pumpkins, from Harvest to the friendly Jack-o’-lantern. These dies are perfect for all fall themed cards.

Sunny Studio Stamps: Pumpkin Patch Die Focused Card by Marie Marco (featuring Frilly Frame Dies, Too Cute To Spook)

To create this card, I first started by die cutting an A2 sized panel from 110 lb black card stock as my card base.  Using the Frilly Frames Eyelet Lace Die, I cut out my green pattern paper from the Critter Country Paper Pack. I then inked the scalloped edges of my pattern paper with Distress Ink in “Black Soot”. Afterwards, I adhered my pattern paper to the black card base. 

Setting my background panel aside, I die cut  my 3 adorable pumpkins  from Orange polka dot paper also from the Critter Country Paper pack. I also die cut another set of pumpkins using 110 lb. Neenah Solar white cardstock. I attach my orange pattern paper pumpkins to the solid white card stock  to create sturdy pumpkins. I die cut the pumpkin stems and vines and used a copic marker in the color G17 Forest Green to color the vines and stem. I then distress the edges of the stems and vines and entire pumpkins using Ground Espresso Distress Oxide Inks. After Inking, I die cut some cute jack-o-lantern faces and glued them to my pumpkins and highlighted their eyes with a white gel pen. 

For some added spookiness, I decided to water color 2 tiny spiders from the Too Cute To Spook stamp set, and die cut them them using their corresponding dies 

Sunny Studio Stamps: Pumpkin Patch Die Focused Card by Marie Marco (featuring Frilly Frame Dies, Too Cute To Spook)

To build my card, I created a frame from black card stock and used a white color pencil to create spooky black and white stripes around the border. I adhered it to my background panel and I stamped out some spider webs  as well as the Happy Halloween Sentiment both from the Too Cute To Spook stamp set. I adhered my happy little pumpkins using foam tape to add dimension to the 2 outer pumpkins and finally  I added my super cute spiders. 

And there you have it! A cute and fun Halloween card! Thank you so much for stop! I can’t wait to create more fun and spooky cards to share with you all during this spooky season! Until Next time, Happy Crafting!

Sunny Studio Supplies Used:

Words of Gratitude Stamps
Shop at:
Sunny Studio
Frilly Frames-Eyelet Lace
Shop at:
Sunny Studio
Too Cute To Spook Stamps
Shop at:
Sunny Studio
Too Cute To Spook Dies
Shop at:
Sunny Studio
Pumpkin Patch Dies
Pumpkin Patch Dies
Shop at:
Sunny Studio
Critter Country Paper
Shop at:
Sunny Studio

Tuesday, August 30, 2022

Too Cute To Spook Cards with Isha and Kavya

Hello everyone! Isha here today sharing the Too Cute To Spook stamps and dies from the new release. I hope you might have enjoyed all the lovely cards Mendy shared last week.

Sunny Studio Stamps: Too Cute to Spook Card by Isha Gupta (featuring Stitched Semi-Circle Dies, Picket Fence Border Dies)

To start, I sponged clouds in the background using various distress inks. Die-cut this panel using the outline die of the Frilly Frame Quatrefoil. Now die-cut this panel using the Stitched Semi-Circle die. Adhere the positive to the white card base. Stamp the trees from the Too Cute To Spook stamp set using black ink to this semi-circle. Adhere vellum to this piece. Adhere the negative piece to the card base using 3d foam.

Sunny Studio Stamps: Too Cute to Spook Card by Isha Gupta (featuring Stitched Semi-Circle Dies, Picket Fence Border Dies)

Die-cut the grass from the Picket Fence Border die. Sponge distress inks in blue, teal and purple. Stamp the images, colour using copic markers. Die-cut using the coordinating dies. Adhere the images to the card. I did not stamp any sentiment, so I could stamp on the inside of the card.

Thanks for stopping by and have a nice day.

------------------------------------------------

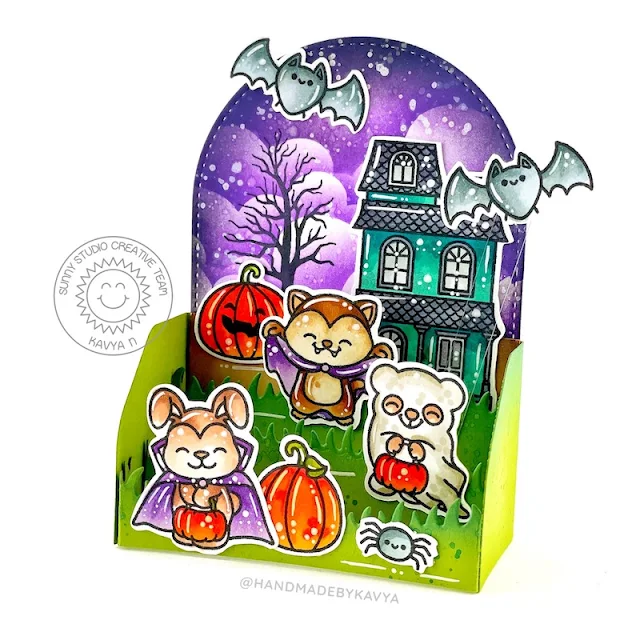
Hi folks, Kavya here. I am back on the blog with another fun project using one of my favorite stamps from the release! This is something unusual for me because I used just one stamp set! Can you believe that? I have also been hooked to interactive cards so I have been trying to find ways to repurpose existing dies in my stash to create 3D cards. 

Sunny Studio Stamps: Too Cute to Spook Card by Kavya (featuring Slimline Dies, Stitched Arch Dies)

Today’s card is a 3D box card that I made using the Stitched Arch dies. The side pieces were measured and hand cut while the grass was cut using Slimline Nature Border dies. 

Sunny Studio Stamps: Too Cute to Spook Card by Kavya (featuring Slimline Dies, Stitched Arch Dies)

For the background, I used the die cut clouds as a stencil and ink blended using shaded of purple dye ink. 

Sunny Studio Stamps: Too Cute to Spook Card by Kavya (featuring Slimline Dies, Stitched Arch Dies)

Then, I stamped and colored a bunch of images from Too Cute To Spook and added them to the card base. I also used some acetate to make a ‘floating’ bat! 

That’s it folks! I hope you liked this fun project :) Happy Crafting!

Sunny Studio Supplies Used:

Picket Fence Border Dies
Shop at:
Sunny Studio
Stitched Arch Dies
Stitched Arch Dies
Shop at:
Sunny Studio
Stitched Semi-Circle Dies
Shop at:
Sunny Studio
Frilly Frames Quatrefoil
Shop at:
Sunny Studio
Slimline Nature Borders
Shop at:
Sunny Studio
Too Cute To Spook Stamps
Shop at:
Sunny Studio
Too Cute To Spook Dies
Shop at:
Sunny Studio

Monday, August 29, 2022

Autumn Greenery Cards with Bobbi and Cathy

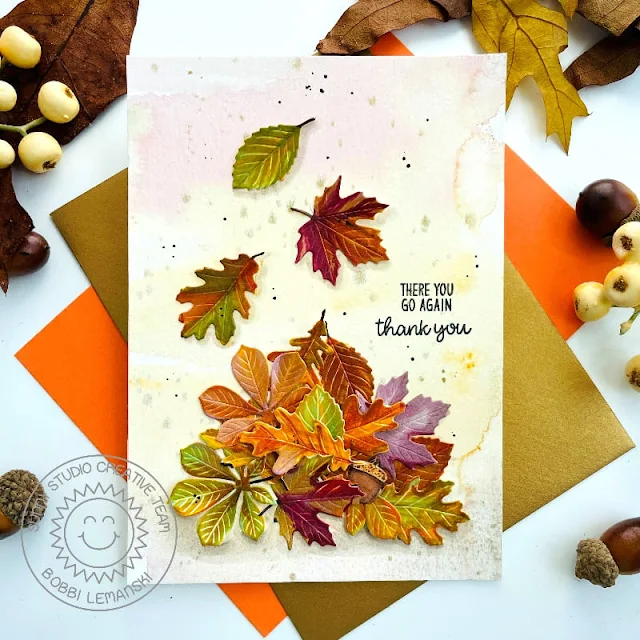
Hello Sunny Studio friend! It’s Bobbi here sharing a new die set that is part of the NEW Fall and Holiday 2022 release. It’s called Autumn Greenery dies and it includes a number of distinctive leaves of common trees. I decided to color them for the autumn season and create a leaf pile on this 5″ X 7″ greeting card.

Sunny Studio Stamps: Autumn Greenery Card by Bobbi Lemanski (featuring Words of Gratitude)

To make the leaves, I die cut them from 80lb Neenah Solar White cardstock. I used white so that I could color each one with Copics. I used a mixture of greens, golds, yellows, yellow-reds, deep reds and browns to create the fall look. I attached them to my muted watercolor background for high contrast. Three falling leaves were glued above the pile, too.

Sunny Studio Stamps: Autumn Greenery Card by Bobbi Lemanski (featuring Words of Gratitude)

For the background, I painted a muted, watercolor wash and flicked a gold metallic color over the wash using my fan brush. I used watercolors in mauves, golds and greens. Simple black flecks were added over the wash like small specks in the fall air. Lastly, I stamped a couple phrases from the Words of Gratitude stamp set and attached the card front to a white, A7 card base.

Sunny Studio Stamps: Autumn Greenery Card by Bobbi Lemanski (featuring Words of Gratitude)

Thanks for stopping by today. You can shop the entire Sunny Studio Stamps release here. If you want to see more ideas and inspiration from me, subscribe to my blog, BobbiHartDesign.com. I’ll send you updates on new posts! You can also find me on Instagram as @BobbiHartDesign and on Facebook as BobbiHartDesign.

-----------------------------------------------

Hey friends! Cathy here with my first post on the blog today and I’m so happy to be joining the Sunny Studio design team! Fall is right around the corner and today I’m sharing a card featuring the new Autumn Greenery dies.

Sunny Studio Stamps: Autumn Greenery Card by Cathy Chapdelaine (featuring Snowflake Circle Frame Dies, Woodgrain Embossing Folder)

I used the beautiful assortment of leaves and acorns to create a fall wreath welcoming in the season. To start, I die-cut a paper from the new Country Critter paper pack and a piece of light gray cardstock using a Stitched Rectangle die. I embossed the gray cardstock using the Woodgrain embossing folder and adhered the pieces slightly overlapping to an A2 white card base.


Next, I die-cut the Snowflake Circle Frame from dark gray cardstock and adhered the frame portion to the card front. I die-cut the Snowflake Circle Frame again from white cardstock, inked the center portion with Speckled Egg distress ink and adhered it inside the frame.


Sunny Studio Stamps: Autumn Greenery Card by Cathy Chapdelaine (featuring Snowflake Circle Frame Dies, Woodgrain Embossing Folder)


For the Autumn Greenery, I die-cut the leaves from white cardstock and inked them using a combination of Fossilized Amber, Wild Honey, Rusty Hinge, Spiced Marmalade and Ripe Persimmon distress inks. I also inked a few with Iced Spruce to balance the central Speckled Egg color. I sprinkled a little water on the leaves to add a little texture. I die-cut the acorns from Neenah 80lb Classic Crest solar white cardstock and colored them with Copics. I also die-cut a portion of the Pristine Poinsettia die from dark brown cardstock to give the look of a branch tucked in amongst the leaves. For added dimension, I only applied adhesive to half of each leaf so the edges of the leaves stick up a bit and I adhered the acorns using dimensional foam tape.


Sunny Studio Stamps: Autumn Greenery Card by Cathy Chapdelaine (featuring Snowflake Circle Frame Dies, Woodgrain Embossing Folder)

To finish, I heat embossed a sentiment from the Autumn Greetings stamp set on dark teal cardstock, fussy cut it out and added a few jewels from the Pastel Jewels mix around the sentiment for a little sparkle.


I hope you enjoyed and thanks for stopping by today! For more inspiration, please visit my blog www.inkredibleadventures.com and you can also find me on Instagram as @cathy.chapdelaine.


Sunny Studio Supplies Used:

Stitched Rectangle Dies
Shop at:
Sunny Studio
Words of Gratitude Stamps
Shop at:
Sunny Studio
Woodgrain Embossing
Woodgrain Embossing
Shop at:
Sunny Studio
Snowflake Circle Frame
Shop at:
Sunny Studio
Pristine Poinsettia Dies
Shop at:
Sunny Studio
Autumn Greenery Dies
Shop at:
Sunny Studio
Critter Country Paper
Shop at:
Sunny Studio

Saturday, August 27, 2022

Introducing New Design Team Members + New Release Video


You may have noticed some new faces on our birthday blog hop yesterday. I'm super excited to have the these four talented ladies joining our Sunny Studio team who will begin sharing more winter cards starting on Monday. Yay!  I've received a little sneak peek and they are really going to inspire you!


With new faces it sadly means we have to say goodbye to several designers who we have come to love and adore. Thank you Catherine, Gladys, Marieke and Audrey for all your inspiring cards and friendship. You mean the world to me and I'm hoping we can work together again in the near future. ❤

For those who might have missed it yesterday with my mile long blog post, I have created a special video sharing a closer look at each of the new products, along with the nearly 50 cards and tags I created with it. I hope you will grab a cup of coffee, sit back and join me. 


You can also view it on our YouTube Channel HERE.  

If you haven't had a chance to hop along with our birthday blog hop, you can visit our post HERE. There is a $25 prize to our online store up for grabs at every stop for a total in $375 in prizes. All contests close on August 31st. 

Thanks so much for your sweet support of our little company. ❤