Tuesday, December 14, 2021

Gingerbread House Bookmark & Card with Kavya and Isha

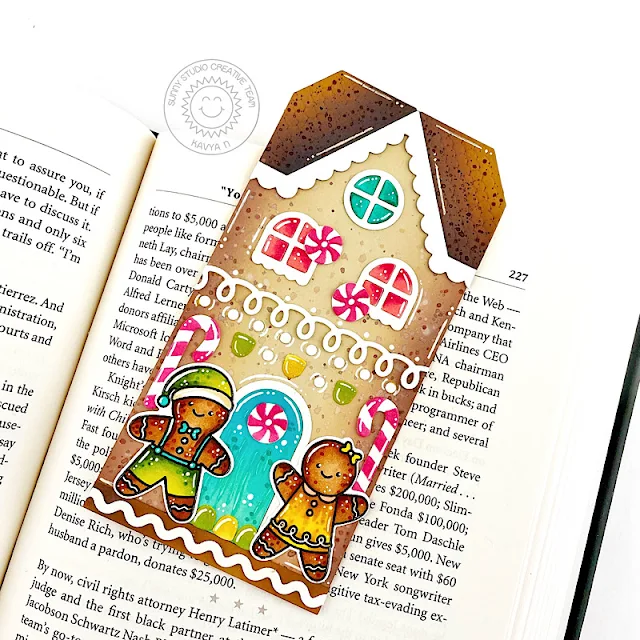
Hi folks, Kavya here. I am back on the blog with another fun project! I absolutely love the new Gingerbread House die this release and it’s just perfect for so many projects - tags, cards, gift bags and even bookmarks. I created this fun bookmark for a friend who loves the holidays. I hope they love it! 

Sunny Studio Stamps: Gingerbread House Christmas Holiday Bookmark by Kavya (featuring Icing Border Dies, Christmas Cookies)

My bookmark is sized 2.75”x 5.5”. I decided to make it a bit wider so that I can add some gingerbread critters at the end. I first started off by die cutting various components for the house using Gingerbread House die and linen, brown, cream, red, blue, green and yellow cardstock. For the house, I ink blended the edges using distress oxide inks and splattered some paint to make it a bit more realistic. I also used the Icing Border dies to add some fun! 

Sunny Studio Stamps: Gingerbread House Christmas Holiday Bookmark by Kavya (featuring Icing Border Dies, Christmas Cookies)

I added some more details using a white gel pen and finished it off using two gingerbread friends from Christmas Cookie stamp set.

That’s it! Wasn’t that a fun project! Hope you liked it! Happy Crafting!

---------------------------------------------

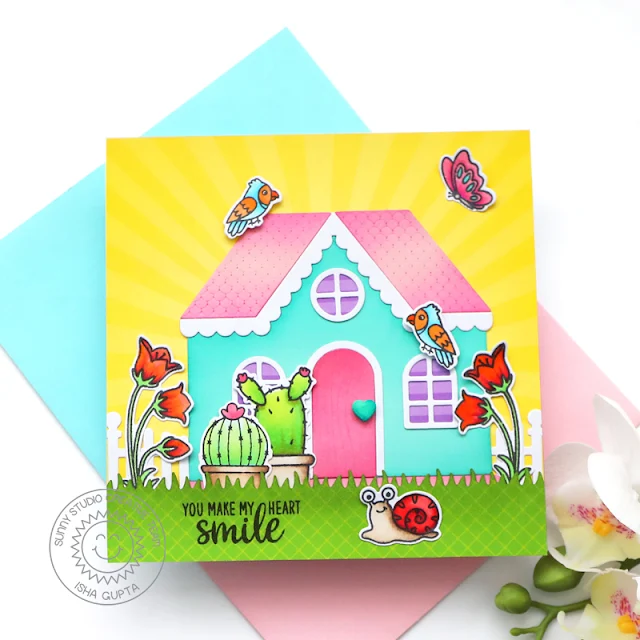
Hello everyone! Isha here sharing a fun card featuring our Gingerbread House dies. I was tempted to do a Christmas theme card but then decided to play with this fun die and created a summer theme card.

Sunny Studio Stamps: Gingerbread House Everyday Card by Isha Gupta (featuring Looking Sharp, Picket Fence Dies, Outback Critters, Scalloped Fence Dies)

I started by taking a white square card base. Add the yellow sunburst pattern paper from the Classic Sunburst Paper pack. I then die-cut the Gingerbread House pieces in various colors, sponged some distress inks to give some more depth. Adhere to the card. Adhere the stripe paper from the Sleek Stripes paper pad behind the windows.

I then die-cut the fence using the Scalloped Fence die. Adhere to both the sides of the house. Stamp the images, color using Copic markers and die-cut using the coordinating dies. Adhere them to the card to create the scene.

Cactus - Looking Sharp stamp and dies
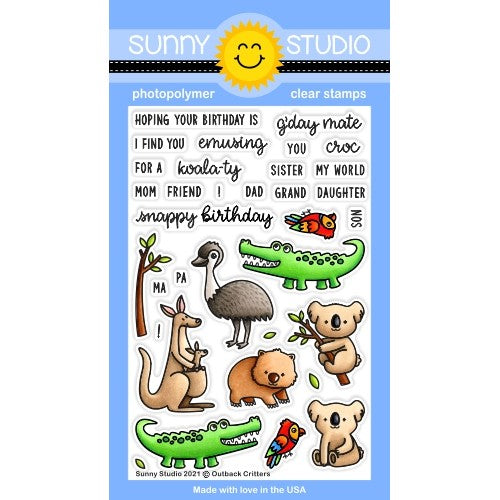
Birds - Outback Critters stamp and dies
Flowers, snail, butterfly - Garden Fairy stamp and dies
Sentiment - Snail Mail

Sunny Studio Stamps: Gingerbread House Everyday Card by Isha Gupta (featuring Looking Sharp, Picket Fence Dies, Outback Critters, Scalloped Fence Dies)

Die-cut the grass using the Picket Fence dies from the pattern paper, sponge peeled paint distress ink. Stamp the sentiment and adhere to the card.

Have a nice day and thank you for dropping by

Sunny Studio Supplies Used:

Looking Sharp Stamps
Shop at:
Sunny Studio
Looking Sharp Dies
Looking Sharp Dies
Shop at:
Sunny Studio
Outback Critters Stamps
Shop at:
Sunny Studio
Outback Critters Dies
Shop at:
Sunny Studio
Picket Fence Border Dies
Shop at:
Sunny Studio
Scalloped Fence Die
Scalloped Fence Die
Shop at:
Sunny Studio
Christmas Cookies Stamps
Shop at:
Sunny Studio
Christmas Cookies Dies
Shop at:
Sunny Studio
Gingerbread House Dies
Shop at:
Sunny Studio
Icing Border DIes
Icing Border DIes
Shop at:
Sunny Studio
Classic Sunburst Paper
Shop at:
Sunny Studio
Sleek Stripes Paper
Sleek Stripes Paper
Shop at:
Sunny Studio
Snail Mail Stamps
Snail Mail Stamps
Shop at:
Sunny Studio
Garden Fairy Stamps
Garden Fairy Stamps
Shop at:
Sunny Studio
Garden Fairy Dies
Garden Fairy Dies
Shop at:
Sunny Studio

Monday, December 13, 2021

Lacy Snowflake Cards with Mayra and Ashley

Happy Monday everyone, Mayra here. I am sharing this card with you today using the lovely Lacy Snowflake die set. 

Sunny Studio Stamps: Lacy Snowflake Dies Winter Themed Holiday Card by Mayra Duran-Hernandez (featuring Frilly Frame Dies, Stitched Rectangle Dies)

I began by die-cutting the base layer of the card using the smaller of the stitched rectangles from the Stitched Rectangles die set. I layered that rectangle onto the scalloped layer that was die-cut using the Frilly Frames Eyelet Lace die set. I then die-cut the snowflakes several times to create 3 layers for each one using the  Lacy Snowflake die set.  

Sunny Studio Stamps: Lacy Snowflake Dies Winter Themed Holiday Card by Mayra Duran-Hernandez (featuring Frilly Frame Dies, Stitched Rectangle Dies)

Next, I stamped the sentiment onto the banner that was die-cut from the Stitched Rectangles die set. I then added a couple of jewels to the center of the snowflakes using the Crystal Clear Jewels

I hope you enjoy the card I created to share with you today. Thank you so much for taking the time to stop by. I hope you have a wonderful and blessed day. 

-------------------------------------------------

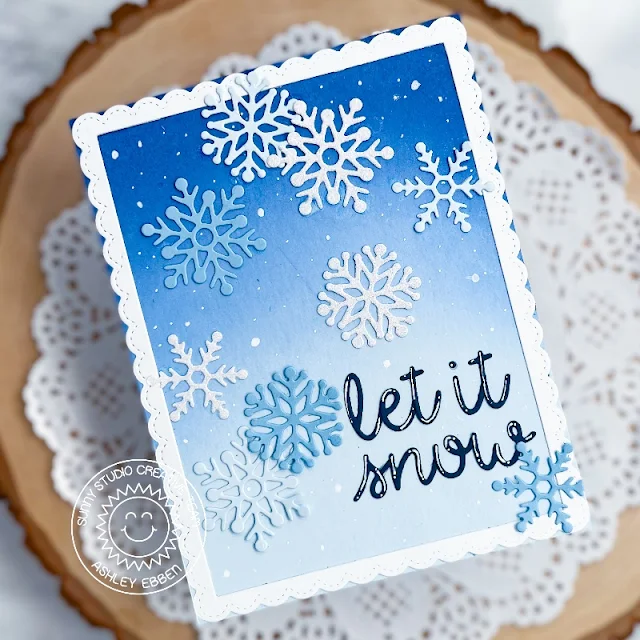
Hello friends! It's Ashley with a pretty holiday card for you with no coloring or stamping required! That's right, I made this whole card using only dies! The finished result reminds me of a peaceful winter day.

Sunny Studio Stamps: Lacy Snowflake Dies Winter Themed Holiday Card by Ashely Ebben (featuring Fancy Frame Dies, Loopy Letter Dies)

I started by taking some light blue cardstock and blending Distress Oxides in Prize Ribbon and Chipped Sapphire on top of it. I used the largest Fancy Frames Rectangle die to add a pretty frame. Then I used my favorite Loopy Letters dies to create a custom sentiment from dark blue cardstock and glued them in the bottom corner.

Sunny Studio Stamps: Lacy Snowflake Dies Winter Themed Holiday Card by Ashely Ebben (featuring Fancy Frame Dies, Loopy Letter Dies)

I cut the Lacy Snowflakes dies several times from light blue, medium blue, and glittery white cardstock. I scattered them around the card, layering them over each other, the frame, and the sentiment to create a bit of depth. I finished by using a white gel pen to add dots of snow and a bit of detail to the sentiment. 

Thank you so much for stopping by! Have a wonderful day!

Sunny Studio Supplies Used:

Stitched Rectangle Dies
Shop at:
Sunny Studio
Lacy Snowflakes Die
Lacy Snowflakes Die
Shop at:
Sunny Studio
Fancy Frames- Rectangles
Shop at:
Sunny Studio
Loopy Letters Dies
Loopy Letters Dies
Shop at:
Sunny Studio
Frilly Frames-Eyelet Lace
Shop at:
Sunny Studio

Saturday, December 11, 2021

Guest Designer Spotlight: Holiday Treat Bags with Leanne West

Hello everyone! Leanne here and I have some fun and festive treat bags to share with you all. Every holiday season I look forward to making lots of sweet treats to give to family and friends. I also love to take gift giving to the next level and make cute customized packaging. 

Sunny Studio Stamps: Christmas Cookies & Christmas Critters Holiday Treat Bags by Leanne West (featuring Scalloped Circle Mat Dies, Sweet Word Die)

For this project, I've used some 5x7 inch glassine bakery bags. I wanted to dress up the outside to coordinate with little gingerbread cookies. First I added a panel of patterned paper. These super cute papers are from the All is Bright 6x6 paper pad. I cut each 6x6 paper exactly in half. That gave me 3x6 inch panels. I adhered one panel to each and folded the extra around the back of the bag. 

Sunny Studio Stamps: Christmas Cookies & Christmas Critters Holiday Treat Bags by Leanne West (featuring Scalloped Circle Mat Dies, Sweet Word Die)

Next I added a scalloped circle right to the center of the patterned paper panel. I used to largest die from Scalloped Circle Mats 3 die set to make these. I then brushed on just a touch of Festive Berries Distress Oxide Ink to the center of each circle.  

Sunny Studio Stamps: Christmas Cookies & Christmas Critters Holiday Treat Bags by Leanne West (featuring Scalloped Circle Mat Dies, Sweet Word Die)

Next I created a different little gingerbread scene for each circle. I combined images from two stamp sets - Christmas Critters and Christmas Cookies - to create these scenes. These images are so fun and easy to color. I used Copics markers in the following colors: brown - E23, E25, E27; green - YG11, YG05, YG17; pale red - R00, R20, R22; bright red - R14, R24, R39.

Sunny Studio Stamps: Christmas Cookies & Christmas Critters Holiday Treat Bags by Leanne West (featuring Scalloped Circle Mat Dies, Sweet Word Die)

After I had all my colored images in place, I still had enough space underneath for a combination die cut/stamped greeting. I used the Sweet Word die for the die cut part. For the stamped part I used words included in the Christmas Cookies stamp set. Now all that's left to do is with fill the bags with yummy treats! You could use these bags for cookies, candies, or hot cocoa packs. These fun treats bags are sure sweeten anyone's Christmas.

Have a happy holiday season everyone!

Sunny Studio Supplies Used:

Sweet Word Die
Sweet Word Die
Shop at:
Sunny Studio
Christmas Cookies Stamps
Shop at:
Sunny Studio
Christmas Cookies Dies
Shop at:
Sunny Studio
Christmas Critters Stamps
Shop at:
Sunny Studio
Christmas Critters DIes
Shop at:
Sunny Studio
Scalloped Circle Mat 3 Dies
Shop at:
Sunny Studio
All Is Bright Paper
All Is Bright Paper
Shop at:
Sunny Studio

Friday, December 10, 2021

Lazy Christmas Cards with Tammy and Audrey

Hello there! Tammy here sharing a card featuring the adorable set, Lazy Christmas. How adorable are those sloths lazily celebrating the holiday season? And that pun is just the best!!

Sunny Studio Stamps: Lazy Christmas Holiday Card by Tammy Stark (featuring Christmas Critters, Slimline Dies)

To create this slimline card, I first began by stamping the images from Lazy Christmas and Christmas Critters. I colored them with Copic makers, added white gel pen highlights, and die cut with the coordinating Lazy Christmas Dies and Christmas Critters Dies

Next, I cut a white scalloped card base using the Slimline Scalloped Frame Dies. I then used the smaller slimline stitched mat to cut a piece of navy cardstock, ink blending the edges with Chipped Sapphire and Black Soot Distress Oxide inks. I splattered some white acrylic paint onto the background and white heat embossed snowflakes from Christmas Critters to create a snowy backdrop for the sloths.

Sunny Studio Stamps: Lazy Christmas Holiday Card by Tammy Stark (featuring Christmas Critters, Slimline Dies)

I white heat embossed the sentiment from Lazy Christmas onto the bottom of the navy background, then matted it with green cardstock before attaching it to the white scalloped rectangle.

Lastly, I attached the die cut images to my card, using foam tape for dimension. I added a few Pure White Jewels to my card and attached my card front to a white slimline card base to complete my card.

Thanks so much for stopping by! I hope everyone has a wonderful and relaxing holiday!

----------------------------------------------

Hello friends! Audrey here with a fun Christmas card to share with you today!

Sunny Studio Stamps: Lazy Christmas Holiday Card by Audrey Tokach (featuring Scalloped Oval Mat Dies, Stitched Oval Dies)

To create my card, I started off by adding a piece of Sweater Weather paper to an A2 card base. Then, I die cut a piece of snowflake paper from the All is Bright paper pad using the Stitched Oval 2 Dies. I also cut a piece of pink plaid paper from the All is Bright paper pad to act as the ground for my scene. Then, I stamped and colored the stack of presents, one of the sloths, the branch and a few of the ornaments from Lazy Christmas, and die cut them with the coordinating Lazy Christmas Dies. I arranged all of the pieces to create a scene, adhering some with a glue pen and some pieces with foam tape for extra dimension.

Sunny Studio Stamps: Lazy Christmas Holiday Card by Audrey Tokach (featuring Scalloped Oval Mat Dies, Stitched Oval Dies)

I stamped a sentiment from the set onto dark teal cardstock and heat embossed it with white embossing powder, then popped it up under the stack of presents. I matted the oval with the largest Scalloped Oval Mat 1, die cut from dark teal cardstock, and then adhered the oval to an A2 card base. To finish off my card, I added some white gel pen accents.

Sunny Studio Supplies Used:

Christmas Critters Stamps
Shop at:
Sunny Studio
Christmas Critters DIes
Shop at:
Sunny Studio
Lazy Christmas Stamps
Shop at:
Sunny Studio
Lazy Christmas Dies
Lazy Christmas Dies
Shop at:
Sunny Studio
Slimline Nature Borders
Shop at:
Sunny Studio
Scalloped Oval Mat 1 Dies
Shop at:
Sunny Studio
Stitched Oval 2 Dies
Shop at:
Sunny Studio
All Is Bright Paper
All Is Bright Paper
Shop at:
Sunny Studio
Sweater Weather Paper
Shop at:
Sunny Studio

Thursday, December 9, 2021

Pristine Poinsettias & Winter Greenery Cards with Marine and Anja

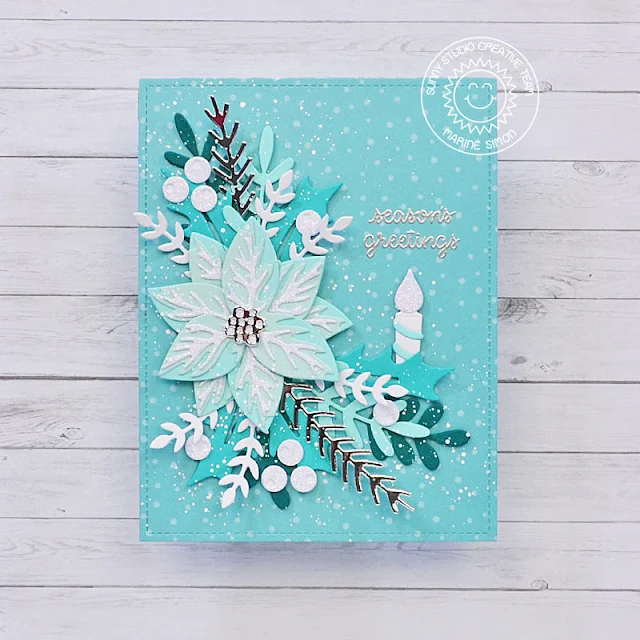
Hello crafty friends, Marine here with a very pretty poinsettia arrangement showcasing the Pristine Poinsettia die set and the Winter Greenery die set.

Sunny Studio Stamps: Pristine Poinsettias & Winter Greenery Christmas Card by Marine Simon

I cut a 5,5 x 4,25" panel out of a blue pattern paper from the All Is Bright 6x6 paper pack, as well as all the greenery and berry elements, and went with a turquoise color palette, with silver mirror and white glitter accents. But I think that this design would look gorgeous with a pink poinsettia + violet shades for the greenery + some silver glitter accents, or maybe something more traditional with a red poinsettia + green shades for the greenery + gold glitter accents. The possibilities are endless!

The first thing I did was to assemble the poinsettia and to do this, I referred to the guide on the Pristine Poinsettia page to help me build it the right way.

Sunny Studio Stamps: Pristine Poinsettias & Winter Greenery Christmas Card by Marine Simon

And once my poinsettia was done, I placed my panel in my Misti tool with everything (poinsettia + greenery) on top of it, just to get a general idea of the design, and I placed my sentiment stamps from Holiday Express on the right side. I removed the poinsettia and die cut pieces, and silver heat embossed my sentiment.

Next I stuck my panel on a blue card base, and I stuck all my elements, starting with the poinsettia using glue dots. And next the other pieces including the candle from the Cupcake Shape Dies using liquid glue and as well as foam squares to bring dimension.

Sunny Studio Stamps: Pristine Poinsettias & Winter Greenery Christmas Card by Marine Simon

Once everything was attached, I felt like it needed a final touch but I didn't want to add highlights using my white gel pen like I usually do, so I just mixed a few drops of Copic opaque white ink with water and splattered a few drops on top of the poinsettia and greenery to bring some kind of a frosty/snowy look.

Sunny Studio Stamps: Pristine Poinsettias & Winter Greenery Christmas Card by Marine Simon

And that's it! Click on the image above to watch my video tutorial! I hope that this card will inspire you to create your own floral arrangement, maybe a wreath would look great as well! Like I said: the possibilities are endless! Thanks for stopping by, and see you next week.

--------------------------------------------

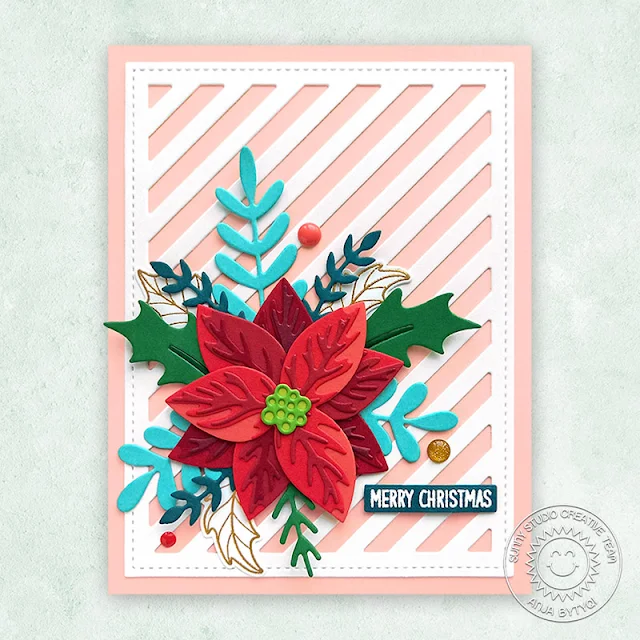
Hi everyone, Anja here and today's holiday card features the beautiful Pristine Poinsettia and Winter Greenery Dies that go perfectly together.

Sunny Studio Stamps: Pristine Poinsettias & Winter Greenery Christmas Card by Anja Bytyqi (featuring Frilly Frame Dies)

First, I created an A2 top-folding card base from light peachy pink cardstock. For the striped background, I combined the stitched rectangle mat (Frilly Frames Retro Petals Dies) with the diagonal stripes (Frilly Frames Stripes Dies) and cut it from white cardstock. I adhered it directly to the card base.

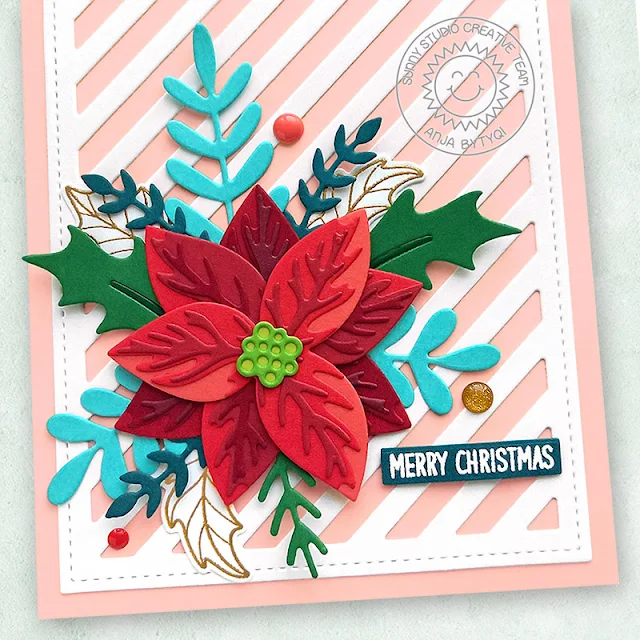
Next, I die cut the individual poinsettia layers three times from several tones of red cardstock. I assembled the sets and stacked them on top of each other. By rotating them a bit each time, I created a perfect multi-dimensional poinsettia. Finally, I die cut the center pieces from two shades of green cardstock and adhered them as well.

Sunny Studio Stamps: Pristine Poinsettias & Winter Greenery Christmas Card by Anja Bytyqi (featuring Frilly Frame Dies)

The greenery was die cut from aqua, dark teal and green cardstock. To build a pretty bouquet, I tucked the die cuts behind the poinsettia. I also added three gold heat embossed leaves from the Classy Christmas set. The Bear Hugs sentiment was stamped in VersaMark Ink onto a small cardstock strip and I heat embossed it in white. I popped it up with foam tape and adhered three enamel dots to finish off my card.

Thank you so much for stopping by! Wishing you a wonderful day!

Sunny Studio Supplies Used:

Bear Hugs Stamps
Bear Hugs Stamps
Shop at:
Sunny Studio
Holiday Express Stamps
Shop at:
Sunny Studio
Frilly Frames Stripes Die
Shop at:
Sunny Studio
Frilly Frames Retro Petals Dies
Shop at:
Sunny Studio
Classy Christmas Stamps
Shop at:
Sunny Studio
Classy Christmas Dies
Shop at:
Sunny Studio
Pristine Poinsettia Dies
Shop at:
Sunny Studio
Winter Greenery DIes
Shop at:
Sunny Studio
All Is Bright Paper
All Is Bright Paper
Shop at:
Sunny Studio