Tuesday, November 16, 2021

Christmas Critters Cards with Kavya and Isha

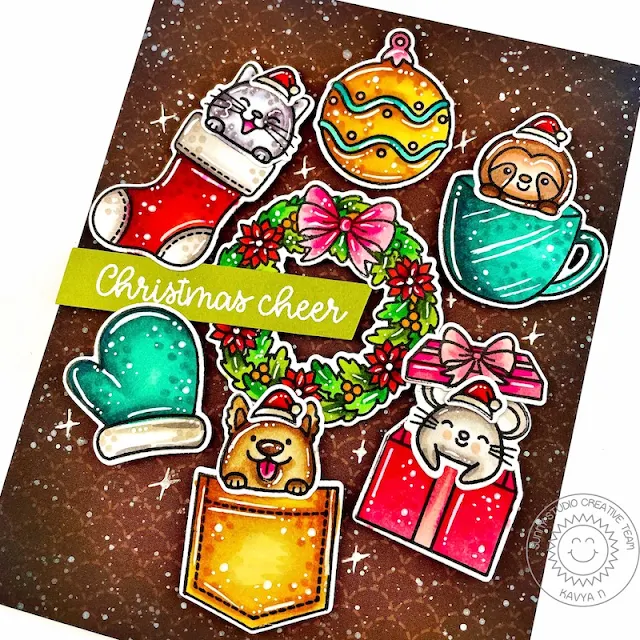
Hi folks, Kavya here. I am back on the blog with another fun project to share with you all! I have been making many Christmas cards this year and I am quite bored of using blues, reds and greens. So, I decided to try out a vintage Christmas palette - Brown, Teal, Yellow, Pink and a bit of red and green. I absolutely love how this turned out. I might try some more unique color combos in the next few weeks! 

Sunny Studio Stamps: Christmas Critters Christmas Card by Kavya

I first started of by ink blending the edges of brown scalloped patterned paper from All is Bright using black and brown dye ink and splattered somewhat paint. I then stamped a bunch of images from Christmas Critters stamp set and colored them using the color combo I mentioned earlier. 

Sunny Studio Stamps: Christmas Critters Christmas Card by Kavya

Then, I added some extra details using a white gel pen including some sparkles! Later, I heat embossed a sentiment from North Pole stamp set to finish off my card!

Wasn’t that simple? I love how this tuned out! Happy Crafting!

---------------------------------------------

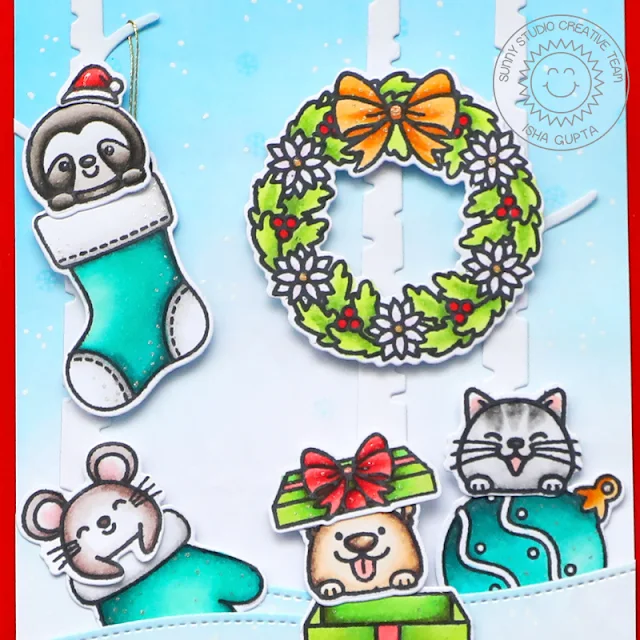
Hello everyone! Isha here with a Christmas card featuring our Christmas Critters stamps and dies. This stamp has so many adorable images, that I wanted to feature them all and hence a scene card.

Sunny Studio Stamps: Christmas Critters Rustic Winter Dies Slimline Dies Christmas Card by Isha Gupta

To start, I sponged tumbled glass and salty ocean distress oxide ink to create the sky to a white layer. I then stamped  the snowflakes from the Christmas Critters stamp set to it. Die-cut the tree trunk from the Rustic Winter dies, adhere to the mat layer. Die-cut snow banks from the Slimline Nature Border dies, sponge tumbled glass ink and adhere to the mat layer. Adhere this to the red card base. 

Sunny Studio Stamps: Christmas Critters Rustic Winter Dies Slimline Dies Christmas Card by Isha Gupta

Stamp the images using memento black ink, color using Copic markers, die-cut using the coordinating dies. Adhere to the card. To finish, add white snow using a gel pen.

Sunny Studio Supplies Used:

Christmas Critters Stamps
Shop at:
Sunny Studio
Christmas Critters DIes
Shop at:
Sunny Studio
Rustic Winter Dies
Rustic Winter Dies
Shop at:
Sunny Studio
Slimline Nature Borders
Shop at:
Sunny Studio
North Pole Stamps
North Pole Stamps
Shop at:
Sunny Studio
North Pole Dies
North Pole Dies
Shop at:
Sunny Studio
All Is Bright Paper
All Is Bright Paper
Shop at:
Sunny Studio

Monday, November 15, 2021

Holiday Express Cards with Mayra and Ashley

Hello and happy Monday everyone!! Mayra here to share this card using the adorable Holiday Express stamp set. I made it into a gingerbread-themed train. 

Sunny Studio Stamps: Holiday Express Christmas Cookies Frilly Frame Dies Christmas Card by Mayra Duran-Hernandez

I started by coloring all of the images using Copic markers. Along with the Holiday Express stamp set, I used the Christmas Cookies, and the lollipop from the Candy Shoppe set. I then die-cut the base panel for the card using the larger rectangle from the Stitched Rectangles dies set.  Next, I used the beautiful Frilly Frames Eyelet Lace die set to add the detail to the base panel and to create a frame for the card. I really love that die set. I then die-cut the candy cane from the Gingerbread House setand a couple of borders using the Icing Borders set. 

Sunny Studio Stamps: Holiday Express Christmas Cookies Frilly Frame Dies Christmas Card by Mayra Duran-Hernandez

Next, I die-cut the poinsettia from the Window Quad Circle dies set to add to the card. I also used my favorite tag from the Window Quad Square dies set. 

I hope you enjoy the card I created to share with you today. Thank you so much for taking the time to stop by. I hope you each have a wonderful and blessed day.

-----------------------------------------------

Hello friends! It's Ashley with a super cute Christmas card to share with you today! The little penguins are getting ready for the holidays and loading a train up with gifts for everyone! 

Sunny Studio Stamps: Holiday Express Frilly Frame Dies Penguin Pals Christmas Card by Ashley Ebben

I started by stamping the trees from Bear Hugs several times in VersaMark ink onto light blue cardstock. I blended a bit of Blueprint Sketch Distress Oxide ink onto the top portion for a bit of contrast. I cut a scalloped oval frame from the center of an A2 sized piece of white cardstock using the Scalloped Oval Mat 1 dies and placed my trees behind it. Then I added the stitched detail to the outside edge with the frame from Frilly Frames - Quatrefoil.

Sunny Studio Stamps: Holiday Express Frilly Frame Dies Penguin Pals Christmas Card by Ashley Ebben

I stamped my images from Holiday Express and Penguin Pals onto Bristol smooth cardstock with waterproof ink and colored with my Zig Clean Color markers. I fussy cut the images out this time, but matching dies are available and super fast! Sometimes you just need a "zone out" activity, you know? I added the images to my card, popping the penguins up with foam tape for dimension. I finished with a sentiment from Penguin Pals stamped in VersaFine Onyx Black and embossed with clear.

Thank you so much for stopping by! Have a wonderful day!

Sunny Studio Supplies Used:

Candy Shoppe Stamps
Candy Shoppe Stamps
Shop at:
Sunny Studio
Candy Shoppe Dies
Candy Shoppe Dies
Shop at:
Sunny Studio
Stitched Rectangle Dies
Shop at:
Sunny Studio
Bear Hugs Stamps
Bear Hugs Stamps
Shop at:
Sunny Studio
Bear Hugs Dies
Bear Hugs Dies
Shop at:
Sunny Studio
Christmas Cookies Stamps
Shop at:
Sunny Studio
Christmas Cookies Dies
Shop at:
Sunny Studio
Holiday Express Stamps
Shop at:
Sunny Studio
Holiday Express DIes
Shop at:
Sunny Studio
Gingerbread House Dies
Shop at:
Sunny Studio
Icing Border DIes
Icing Border DIes
Shop at:
Sunny Studio
Frilly Frames-Eyelet Lace
Shop at:
Sunny Studio
Frilly Frames Quatrefoil
Shop at:
Sunny Studio
Window Quad Circle Die
Shop at:
Sunny Studio
Window Quad Square Die
Shop at:
Sunny Studio
Penguin Pals Stamps
Penguin Pals Stamps
Shop at:
Sunny Studio
Penguin Pals Dies
Penguin Pals Dies
Shop at:
Sunny Studio
Scalloped Oval Mat 1 Dies
Shop at:
Sunny Studio

Saturday, November 13, 2021

Guest Designer Spotlight: Tags & Cards with Anni Lerche

Hey stampers, Anni Lerche here! I am so happy and proud to be a guest designer for Sunny Studio! I got to play with the two new sets Lazy Christmas and Bear Hugs – so so cute. I had so much fun.

Sunny Studio Stamps: Bear Hugs Slimline Dies Thank You Word Dies Tags by Anni Lerche

I made three tags using the set Bear Hugs because I couldn’t decide for an image. They are all so adorable. And I love to make tags. They make every gift more special and – if needed – you can quickly turn them into a card.

Sunny Studio Stamps: Bear Hugs Slimline Dies Tags by Anni Lerche

I started by stamping the bears with a waterproof ink and coloured them with Distress Reinkers. To darken up the shadows I used some coloured pencils. This is my favourite way of colouring.

For the backgrounds I added ink blending with Distress Oxides. The grounds I created by die cutting the Slimline Nature Borders from cardstock.

Sunny Studio Stamps: Bear Hugs Slimline Dies Thank You Word Dies Tags by Anni Lerche

For the starry background I also sprinkled water and watered down white gesso on the cardstock. The sentiment is the Thank You Word die.

Sunny Studio Stamps: Bear Hugs Slimline Dies Tags by Anni Lerche

For this autumn tag I stamped a few leaves I could find in my stash and cut them out. I coloured them loosely with the Distress reinkers and added them randomly to the birch trees.

Sunny Studio Stamps: Lazy Christmas Merry Word Die Holiday Card by Anni Lerche

And I also created this Christmas card with the super cute sloth set. I chose some untraditional colours for the card. The images I coloured the same way as the bears. For the sentiment I used an older die called Merry Word. I love to stack up word die cuts for more dimension.

Sunny Studio Stamps: Lazy Christmas Merry Word Die Holiday Card by Anni Lerche

On the bottom I used the gifts from the sets. I turned them in different directions. This way it seems as if I am using a few stamps.

Thank you so much for stopping by and have a crafty day.

Sunny Studio Supplies Used:

Merry Word Die
Merry Word Die
Shop at:
Sunny Studio
Bear Hugs Stamps
Bear Hugs Stamps
Shop at:
Sunny Studio
Bear Hugs Dies
Bear Hugs Dies
Shop at:
Sunny Studio
Lazy Christmas Stamps
Shop at:
Sunny Studio
Lazy Christmas Dies
Lazy Christmas Dies
Shop at:
Sunny Studio
Thank You Words Die
Thank You Words Die
Shop at:
Sunny Studio
Slimline Nature Borders
Shop at:
Sunny Studio

Friday, November 12, 2021

Gingerbread House Die Focused Tag & Card with Tammy and Audrey

Hello friends! Tammy here with this sweet gift tag, that can also be repurposed as an ornament, featuring the adorable Gingerbread House Dies.

Sunny Studio Stamps: Gingerbread House Dies Icing Border Dies Christmas Cookies Holiday Tag by Tammy Stark

To begin, I die cut kraft cardstock using the Gingerbread House Dies, then ink blended the edges with Vintage Photo Distress Oxide ink to darken the edges. Next, I die cut the other elements using various colors of cardstock. I added glitter to the white scalloped pieces and the candies to give the look of sugared candy.

Next, I stamped the images from Christmas Cookies, colored with Copic markers, and die cut with the Christmas Cookies Dies. Copic Colors Used: Gingerbread: E37, E55, E31, E51, E50; Red: R39, R37, R35, R05; Green: YG17, YG03, YG01; Pink: R22, R20, RV10; White: N2, C1, C00

Sunny Studio Stamps: Gingerbread House Dies Icing Border Dies Christmas Cookies Holiday Tag by Tammy Stark

I cut a white base using the larger Gingerbread House shadow, placed my decorated gingerbread house on top and lightly traced it, then cut it. This gives the back a nice, clean look and makes the tag super sturdy. Next, I stamped the sentiment onto a white cardstock strip, punched a hole and attached it to a piece of red and white bakers twine. I covered the back of the house with heavy duty tape adhesive, then attached the two pieces, sandwiching the twine between them to create a little loop...perfect for adding to a gift or the Christmas tree!

Thanks so much for stopping by! I hope you are inspired to create your own tags or ornaments for gifting! Happy Crafting!

---------------------------------------------

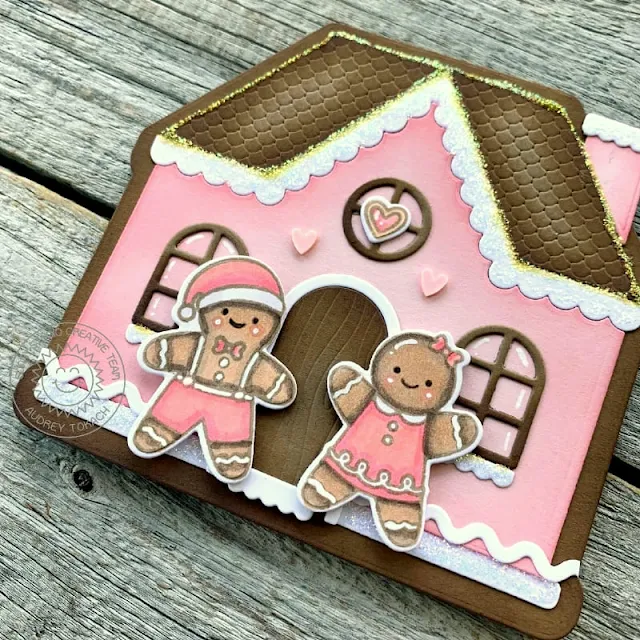
Hello friends! Audrey here with some sweet holiday wishes! I used the new Gingerbread House die to make a shaped card!  This die is a large size and nearly fills an A2 card front. It's perfect for creating shaped cards. 

Sunny Studio Stamps: Gingerbread House Dies Icing Border Dies Christmas Cookies Holiday Card by Audrey Tokach

I started off by die cutting two of the largest house dies from medium  brown cardstock, along with all of the windows, the door, and the roof. I used Vintage Photo Distress Oxide to ink the edges of each piece for more contrast. Then, I cut the window, door and roof trim from white cardstock, and the body of the house from light pink cardstock. If you have followed me for any length of time a pink gingerbread house should not surprise you at all! ;) 

The edges of the main part of the house were inked with Worn Lipstick Distress Oxide. Then, I die cut one of the Icing Borders from white cardstock glued that near the bottom of the house. I adhered all of the other pieces with liquid glue, and added Diamond Stickles to nearly everything. LOL!  I forgot that ink will make the Stickles change color slightly, and that is why my roof looks a bit gold. I think it is a fun contrast to the white. 

Sunny Studio Stamps: Gingerbread House Dies Icing Border Dies Christmas Cookies Holiday Card by Audrey Tokach

Next, I stamped the two gingerbread from the Christmas Cookies stamp set in brown ink and colored them with Copic markers. They were die cut with the coordinating Christmas Cookies dies. The brown ink makes they look a but like I did no-line coloring. I added their little faces back ink with a brown pen, and enhanced their icing stripes with a white gel pen, then popped them up with foam tape. I adhered the front of the house to a second house die cut that I scored about 1/2" front the top so the card would open properly. Finally, I added white gel pen accents to the rest of the card, and a few tiny clay hearts to finish off my card.

Sunny Studio Supplies Used:

Christmas Cookies Stamps
Shop at:
Sunny Studio
Christmas Cookies Dies
Shop at:
Sunny Studio
Gingerbread House Dies
Shop at:
Sunny Studio
Icing Border DIes
Icing Border DIes
Shop at:
Sunny Studio