Tuesday, August 8, 2023

Purrfect Birthday Card with Isha

Hello everyone, I am Isha with a clean and simple card featuring the adorable cat image from the Purrfect Birthday stamp set. Even if this is a birthday stamp, I decided to create a fun and happy non-birthday card for a friend just to let her know that she makes me happy :)

Sunny Studio Stamps: Purrfect Birthday Card by Isha Gupta (featuring Slimline Dies, Home Sweet Gnome, Lovey Dovey, Garden Fairy)

I started by sponging a white card for the sky using kitsch flamingo, wilted violet and scattered straw distress oxide inks. Flick some water for some texture. Die-cut the front panel using the cloud die from the Slimline Nature Border dies. Adhere both the pieces to a white card base. Stamp the sentiment from the Lovey Dovey stamp using grey inks by Altenew to give an ombrè effect. 

Sponge the grass area by masking it using a post-it. Stamp the images, color using copic markers and die-cut using the coordinating dies. Adhere to the card using 3d foam and liquid glue.

Sunny Studio Stamps: Purrfect Birthday Card by Isha Gupta (featuring Slimline Dies, Home Sweet Gnome, Lovey Dovey, Garden Fairy)

Cat - Purrfect Birthday stamp and dies
Heart - Lovey Dovey stamp
Mushroom house - Garden Fairy stamps and dies
Mushroom - Home Sweet Gnome stamp and dies

To finish I added some Nuvo drops onto the mushroom. Thank you for dropping by and have a nice day!

Sunny Studio Supplies Used:

Purrfect Birthday Stamps
Shop at:
Sunny Studio
Purrfect Birthday Dies
Shop at:
Sunny Studio
Home Sweet Gnome Stamps
Shop at:
Sunny Studio
Home Sweet Gnome Dies
Shop at:
Sunny Studio
Slimline Nature Borders
Shop at:
Sunny Studio
Garden Fairy Stamps
Garden Fairy Stamps
Shop at:
Sunny Studio
Garden Fairy Dies
Garden Fairy Dies
Shop at:
Sunny Studio
Lovey Dovey Stamps
Lovey Dovey Stamps
Shop at:
Sunny Studio

Monday, August 7, 2023

City Streets Card with Bobbi

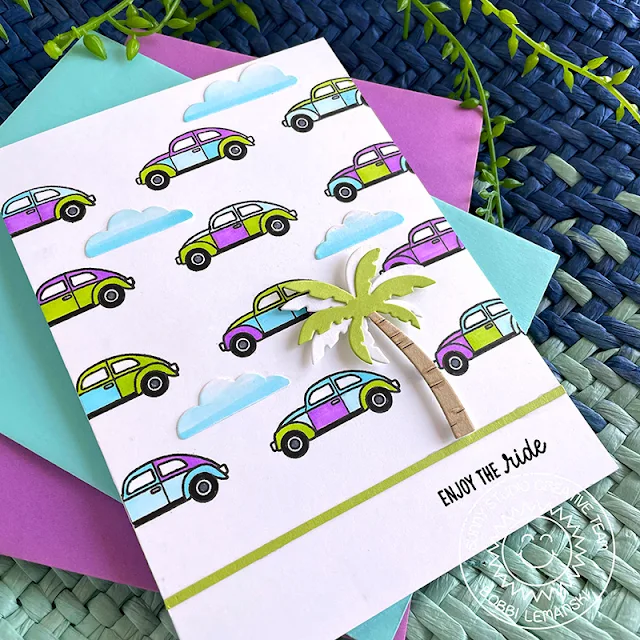
Hello Sunny friends, Bobbi here! Today I’m sharing a fun card using just one image from the City Streets stamp setI love the look of a retro VW bug or van. I have never owned one, but I just think they are interesting and scream summer-fun vibes! Whenever I see one in a stamp set, I’m immediately drawn to that particular image. No surprise, it happened again. I focused right in on the car included in this city-inspired set and made this card. It’s okay not to use every image in a set every time. Sometimes a card can be fun using just one design.

Sunny Studio Stamps: City Streets card by Bobbi Lemanski (featuring Tropical Trees Backdrop Dies, Inside Greetings)

For this card, I’m using the following products:

City Street stamp set (There is also a coordinating die set available for this set that I did not use.)

Tropical Trees background set

Country Carnival stamp set for the front panel sentiment (There is also a coordinating die set available for this set that I did not use.)

Inside Greetings Congrats stamp set for the inside sentiment


Sunny Studio Stamps: City Streets card by Bobbi Lemanski (featuring Tropical Trees Backdrop Dies, Inside Greetings)


To make this 5″ X 7″ card, I stamped the 
automobile repeatedly over a 5″ X  7″ front panel cut from white cardstock. I used my MISTI stamping tool to line up the bottom of the image to ensure a clean grid of cars. I kept some space at the bottom of the card front for a sentiment.  I colored the cars using four Copic colors: B01, B00, V04, YG23. I color-blocked the cars to make each one different. How cute are these cars?! This was a new color combo for me, too.

Using the Tropical Trees background set, I die cut a palm tree and four clouds in varying sizes. I used the two shades of blue to color the clouds and cut the tree from colored cardstock. The elements were added to the front panel. I used foam dots to attach the palm tree so that it stood out from the background. A thin green 1/8″ strip of cardstock was glued right under the tree to ground it. I stamped the sentiment, “enjoy the ride” underneath the strip.

Sunny Studio Stamps: City Streets card by Bobbi Lemanski (featuring Tropical Trees Backdrop Dies, Inside Greetings)

Inside the card, I stamped a phrase from the set, Inside Greetings Congrats stamp set. This card could be used for  many life changing adventures such as a retirement, change of job, graduation, wedding, and/or travel adventure. It’s just a fun summer card with a little unexpected twist! I’m gonna say it…. “Way to go, Bobbi!” Haha!

Thanks for stopping by today. If you want to see more ideas and inspiration from me, subscribe to my blog, BobbiHartDesign.com. I’ll send you updates on new posts! You can also find me on Instagram as @BobbiHartDesign and on Facebook as BobbiHartDesign.

Sunny Studio Supplies Used:

City Streets Dies
City Streets Dies
Shop at:
Sunny Studio
City Streets Stamps
City Streets Stamps
Shop at:
Sunny Studio
Country Carnival Stamps
Shop at:
Sunny Studio
Inside Greetings Congrats
Shop at:
Sunny Studio
Tropical Trees Backdrop
Shop at:
Sunny Studio

Sunday, August 6, 2023

Hawaiian Hibiscus Card with Cathy

Hey friends! Cathy here today sharing a card that has me dreaming of a tropical vacation featuring the gorgeous Hawaiian Hibiscus Stamps!

Sunny Studio Stamps: Hawaiian Hibiscus Card by Cathy Chapdelaine (featuring Summery Greenery Dies, Stitched Rectangle Dies, Radiant Plumeria)

I started this A2 card by using a fun technique with die-cuts to create an embossed look for the background panel. While I have a bunch of embossing folders and use them all the time in crafting, I love to use this tone-on-tone technique with dies to create unique patterns. I first cut a piece of kraft cardstock 4 1/4" x 5 1/2" and die-cut 10 fronds from kraft cardstock using the Summer Greenery Dies. I adhered these along the outside edges of the cardstock and then die-cut the cardstock piece with a Stitched Rectangle Die. I love the subtle tropical embossed look this gave it! I matted it on black cardstock and adhered it to a peach card front.

For my tropical scene, I cut a piece of white cardstock 2 1/4" x 3 1/2" and cut masks from post-it notes for the sand and horizon. I also punched a circle from Eclipse masking tape for the sun. The Distress inks I used are Brushed Corduroy for the sand, Dried Marigold and Speckled Egg for the ocean/sky and Scattered Straw for the sun. I stamped small palm trees in dark green ink using stamps from the Beach Babies Stamps and the Surfing Santa Stamps. I heat embossed the sentiment from the Tiki Time Stamps with black embossing powder.

Sunny Studio Stamps: Hawaiian Hibiscus Card by Cathy Chapdelaine (featuring Summery Greenery Dies, Stitched Rectangle Dies, Radiant Plumeria)

Next, I die-cut a piece of black cardstock using the smallest Stitched Rectangle Die as a mat for the tropical scene and adhered the combined piece to the card front. I also die-cut a photo corner from brown cardstock using the Notebook Photo Corners Dies to give it a photo or postcard look.

To finish, I stamped the hibiscus and leaves from the Hawaiian Hibiscus Stamps and die-cut them using the coordinating dies. I also heat embossed a flower from the Radiant Plumeria Stamps with white embossing powder, water colored a bit of the center with yellow ink and die-cut it using the coordinating dies.

I hope you enjoyed and thanks for stopping by! For more inspiration, please visit my blog www.inkredibleadventures.com and you can also find me on Instagram as @cathy.chapdelaine.

Sunny Studio Supplies Used:

Tiki Time Stamps
Tiki Time Stamps
Shop at:
Sunny Studio
Stitched Rectangle Dies
Shop at:
Sunny Studio
Beach Babies Stamps
Beach Babies Stamps
Shop at:
Sunny Studio
Hawaiian Hibiscus Stamps
Shop at:
Sunny Studio
Hawaiian Hibiscus  Dies
Hawaiian Hibiscus Dies
Shop at:
Sunny Studio
Radiant Plumeria Stamps
Shop at:
Sunny Studio
Radiant Plumeria Dies
Shop at:
Sunny Studio
Surfing Santa Stamps
Shop at:
Sunny Studio
Summer Greenery Die
Summer Greenery Die
Shop at:
Sunny Studio
Notebook Photo Corners Dies
Shop at:
Sunny Studio

Saturday, August 5, 2023

Guest Designer Spotlight: Cards with Marie Marco

Hello Crafty Friends!! It's Marie back on the blog with two birthday cards featuring the lovely Special Day Stamp. This stamp set features two super adorable layered cake images and number candles perfect for celebrating all the special occasions from birthdays to weddings and everything in between! 

Sunny Studio Stamps: Special Day Wedding Themed Card by Marie Marco

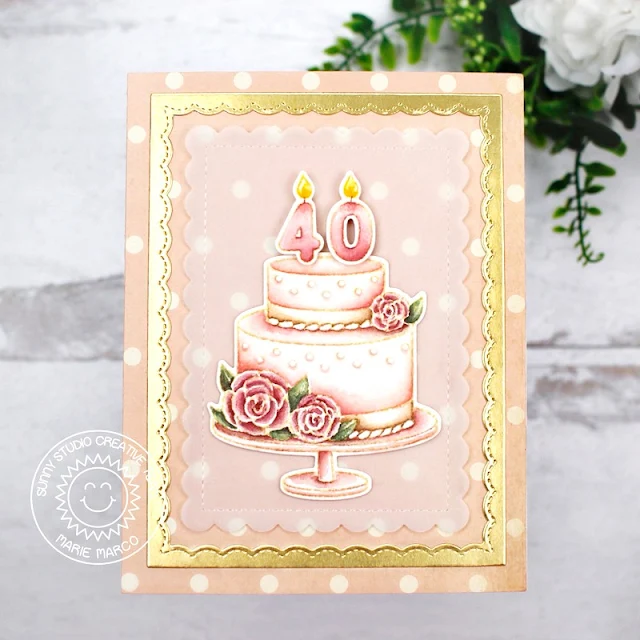
My first card features the gorgeous two tiered floral cake from the set. This design made me want to create a vintage inspired color palette for a friend's 40th birthday. To create this card, I first stamped my images onto watercolor paper using Antique Linen Distress Ink. All my images were colored using Faber- Castell Watercolor pencils. I cut out the images using the corresponding Special Day Dies. To construct my card front, I first die cut an A2 sized base panel from 110 lb Neenah Solar White cardstock paper. I also, cut an A2 sized polka dot pink pattern paper panel which I adhered to the base panel. For a simple elegant touch, I created a gold frame with the Fancy Frames Rectangle Die

I really wanted to keep my pattern paper visible while keeping the birthday cake the focal point so I cut out a scalloped panel from vellum paper using the Mini Mat & Tag 1 Dies. Taking my cake image, I used double sided tape to adhere it to the vellum paper. Before adhering the vellum to the pattern paper, I apply double sided tape adhesive to the back of the vellum hidden behind the cake so no tape adhesive is visible on the translucent vellum. To finish off this card, I applied foam strips to the back of the number candles to create some dimension and adhered it to the top of the cake. Finally, I used some Nuvo Crystal Drops on the decorative dots of the cake to create dimension. 

Sunny Studio Stamps: Special Day Birthday Card by Marie Marco (featuring Birthday Cat, Panda Party)

My second card features both the Special Day Stamp and the Birthday Cat Stamp. The Birthday Cat Stamp set is too cute for words! The adorable cats in this set inspired me to create a fun a playful pop up box card purrfect for my cat loving friend. To start off, I cut out all my box card elements from Bristol Smooth Cardstock and inked all the edges using Kitsch Flamingo Distress Ink. For all the decorative panels and inside panels, I used the double sided Sunny Studio Dots & Stripes Pastels Paper in the beautiful shade of pink. 

Sunny Studio Stamps: Special Day Birthday Card by Marie Marco (featuring Birthday Cat, Panda Party)

After assembling the box card, I stamped all my images onto watercolor paper and colored them with Faber-Castell Watercolor pencils. I also used party banner images from the Panda Party Stamp. I used the corresponding Birthday Cat DiesSpecial Day Dies, as well as the banner dies from Panda Party Dies to cut all my images. I adhered the birthday cake and cats using a strip of cardstock on the backs of all my images so they remain sturdy inside the box. Finally, I stamped my sentiment using VersaFine Onyx Black Ink to the pattern paper and adhered it to the front of the card. I absolutely love how cute this box card turned out that I'm tempted to keep it for myself! 

These two cards were super fun and simple to create! Thank you for stopping by and joining me today! Until next time, Happy Crafting friends!!!

Sunny Studio Supplies Used:

Fancy Frames- Rectangles
Shop at:
Sunny Studio
Dots & Stripes Pastels 6x6 Paper
Shop at:
Sunny Studio
Mini Mat & Tag 1 Dies
Shop at:
Sunny Studio
Panda Party Stamps
Panda Party Stamps
Shop at:
Sunny Studio
Panda Party Dies
Panda Party Dies
Shop at:
Sunny Studio
Birthday Cat Stamps
Birthday Cat Stamps
Shop at:
Sunny Studio
Birthday Cat Dies
Birthday Cat Dies
Shop at:
Sunny Studio
Special Day Stamps
Special Day Stamps
Shop at:
Sunny Studio
Special Day Dies
Special Day Dies
Shop at:
Sunny Studio

Friday, August 4, 2023

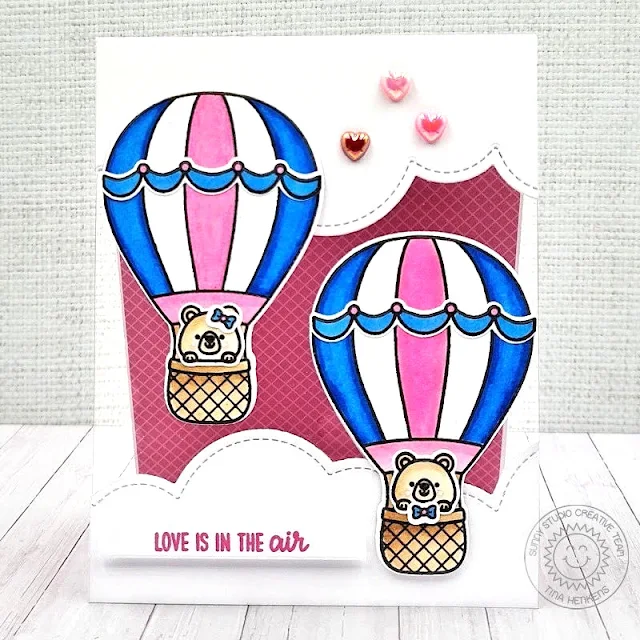
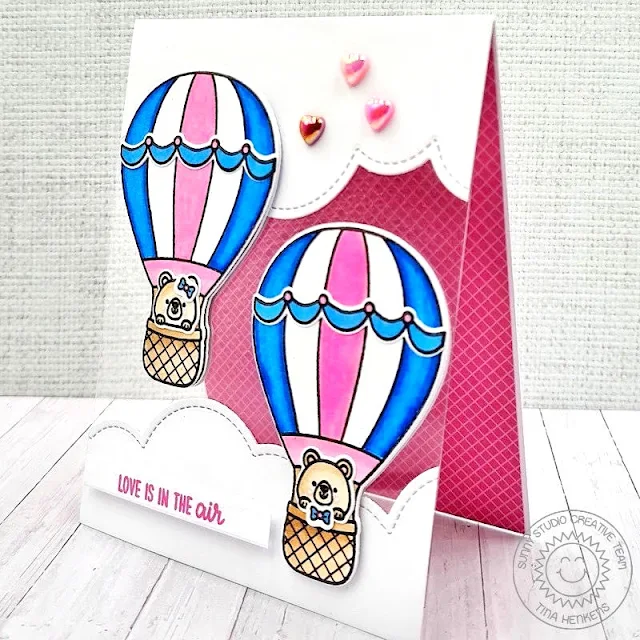
Balloon Rides with Tina

Hello crafty friends, it’s Tina with a sweet wedding card featuring the adorable Balloon Rides stamp and die set! I love that the sentiments in this set are so versatile, allowing you to create cards for many occasions.

Sunny Studio Stamps: Balloon Rides Card by Tina Henkens

Let’s start by making a white A2 card base from heavy weight card stock. It’s very unusual for me to begin this way, but I wanted to get the design part of this project done first.

After folding the base, I selected a cloud die from my stash and used it to cut the front of my base. After creating this cloudy border, I used the rest of that white sheet to cut a similar border for the bottom of the design. With the remaining part of the card stock, I cut two slightly smaller rectangles.

Next, I took a piece of heavy weight acetate and cut it to A2 size. Now I was able to sandwich the acetate between the cloud borders and the two rectangle pieces at the back. Since we have a see through front panel, I glued a pretty pink paper from Gingham Pastels to the inside of my card. Leaving you with the back of your project to write a message!

Sunny Studio Stamps: Balloon Rides Card by Tina Henkens

With the base of the card finished, I stamped and die cut 4 balloons, two decoration ribbons and two cute bears from the Balloon Rides stamp. All the coloring was done with Copic Markers, I left two balloon dies white since they will be glued at the back to give the inside of the card a clean look. To make the bears extra adorable, I added two little bows from the Spring Showers set.

The sentiment from the Balloon Rides stamp was stamped onto a small white strip with pink dye ink from my stash. To assemble the card, I placed both balloons left and right onto the front panel, showing as much as the cloud borders as possible. I glued the blank dies on the back as mentioned before. Next, I added the sweet bears with their bows and finally the sentiment strip.

Since this is a love themed card, I added three shiny hearts from the Heart Shaped Pearls embellishments.

And that finishes this project, I am wishing you lots of crafty fun making your own scene with these beautiful stamps and dies! Thank you for joining me and happy crafting!

Sunny Studio Supplies Used:

Gingham Pastels 6x6 Paper
Shop at:
Sunny Studio
Spring Showers Stamps
Shop at:
Sunny Studio
Spring Showers Dies
Spring Showers Dies
Shop at:
Sunny Studio
Balloon Rides Stamps
Shop at:
Sunny Studio
Balloon Rides Dies
Balloon Rides Dies
Shop at:
Sunny Studio