Thursday, April 1, 2021

Lovable Llama Cards with Vanessa and Anja

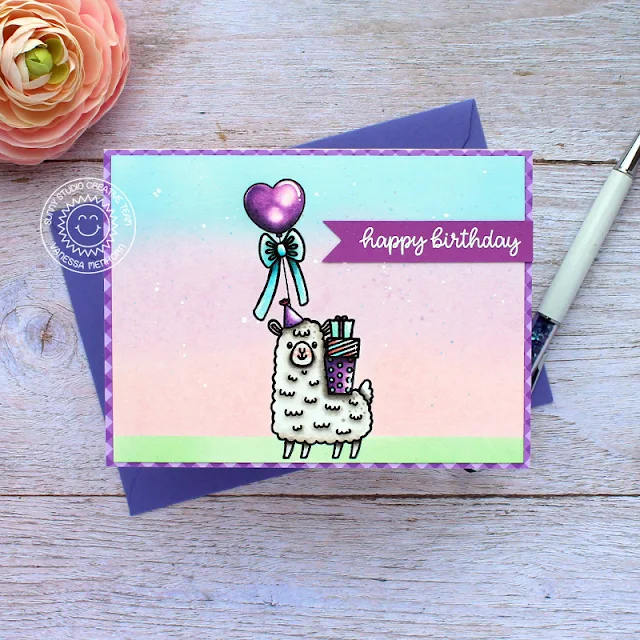
Hello to you! Vanessa here with a birthday card using the Lovable Llama set. This llama is the cutest!

Sunny Studio Stamps: Lovable Llama Inside Greetings Llama Themed Birthday Card by Vanessa Menhorn

I started with a panel of white cardstock that I trimmed slightly smaller than my card base. Now I stamped the images and masked them. I applied Cracked Pistachio, Spun Sugar, Milled Lavender and Tumbled Glass Distress Oxide Inks to the background and added ink splatters. After I had removed the masks, I colored the images with Copic markers. 

Supplies used:
Lovable Llama stamps (llama, bow, hat, presents)
Inside Greetings Birthday stamps (sentiment)
Penguin Pals stamps (heart balloon)
Gingham Pastels Paper

Sunny Studio Stamps: Lovable Llama Inside Greetings Llama Themed Birthday Card by Vanessa Menhorn

Then I covered the card front with the checked patterned paper and adhered the panel to the card. Finally, I stamped and heat-embossed the sentiment onto a strip of violet cardstock, trimmed it and added it to the card.

I would love to party with this cutie! How about you? Have a lovely day everybody!

------------------------------------------------

Hi everyone, Anja here with you today. I always need to create birthday cards for my stash ;-) The Lovable Llama with its party hat and stack of gifts is just perfect for this occasion. I went with bright colors as well as black and white to make them pop even more.

Sunny Studio Stamps: Lovable Llama Inside Greetings Slimline Dies Llama Themed Birthday Card by Anja Bytyqi

I started off with a white card base and trimmed the black patterned paper (Heroic Halftones Paper) about 1/8 inch smaller. Next, I die cut the pierced scalloped border from the Slimline Pennants Dies set from aqua, yellow and pink cardstock. I layered the die-cuts on top of each other to build a colorful and decorative element.

I also cut the largest of the Scalloped Circle Mat 1 Dies from white cardstock and stamped the tiny confetti-like images in matching colors. The llama, hat and gifts were stamped in Memento Tuxedo Black Ink and I colored them with Copic Markers. I used the coordinating dies to cut out the images which I adhered with foam tape.

Sunny Studio Stamps: Lovable Llama Inside Greetings Slimline Dies Llama Themed Birthday Card by Anja Bytyqi

Finally, I stamped the birthday sentiment from the Inside Greetings Birthday set in VersaMark Ink onto a black cardstock strip and heat embossed in white.

Thank you so much for stopping by! Have a wonderful rest of the week!

Sunny Studio Supplies Used:

Gingham Pastels 6x6 Paper
Shop at:
Sunny Studio
Heroic Halftones 6x6 Paper
Shop at:
Sunny Studio
Penguin Pals Stamps
Penguin Pals Stamps
Shop at:
Sunny Studio
Inside Greetings Birthday
Shop at:
Sunny Studio
Lovable Llama Stamps
Shop at:
Sunny Studio
Lovable Llama Dies
Lovable Llama Dies
Shop at:
Sunny Studio
Scalloped Circle Mat 1 Dies
Shop at:
Sunny Studio
Slimline Pennant Dies
Shop at:
Sunny Studio

Wednesday, March 31, 2021

My Otter Half Cards with Julia and Franci

Hey crafty friends! It’s Julia here with an otterly cute scene card! Ha!

Sunny Studio Stamps: My Otter Half Country Scenes Rustic Winter Dies Fluffy Clouds Otter Themed Cards by Julia Englich and Franci Vignoli

I started by stamping out my images from the My Otter Half, Country Scenes and Spring Scenes stamp sets. I colored all the images with Copic Markers. I wanted to add butterflies, but I needed one of them to face the other direction, so I used mirror stamping. If you want to see how I like to do mirror stamping, you can check out a video on it over on the Sunny Studio Youtube channel here.

I really wanted to achieve the look of my otters being in the water, so I ink blended the sky and pond directly onto a piece of vellum. Additionally, I die cut trees and tree tops using the Rustic Winter and Fluffy Clouds Border dies. I cut slits into the vellum so that I can tuck my otters in and attached the vellum to a card base by adding adhesive around the edge. To hide the glue marks, I added a decorative, white scalloped frame using the largest of the Fancy Frames Rectangles.

Sunny Studio Stamps: My Otter Half Country Scenes Rustic Winter Dies Fluffy Clouds Otter Themed Cards by Julia Englich and Franci Vignoli

For my sentiment I stamped the word "you're" from Garden Fairy, "otterly" from My Otter Half and "awesome" from Plane Awesome and then heat embossed it in white onto black cardstock. 

Then, I added all my die cuts and images to the card using liquid glue. I made sure to tuck the adorable otters into the vellum to give the effect of them being partially under water. To finish my card, I added lots of shimmer pen and Stardust Stickles. I really hope you like it!

Inks used: Spun Sugar, Worn Lipstick, Scattered Straw, Cracked Pistachio, Peacock Feathers, Gathered Twigs Distress Oxide Copic Markers used: 0; E50, E51, E53, E55, E57, E59, E49, E21; RV10, RV11, RV13, RV15, RV19; G20, G21, G24, G17, BG78.

Thank you so much for stopping by! Have an amazing day!

---------------------------------------------

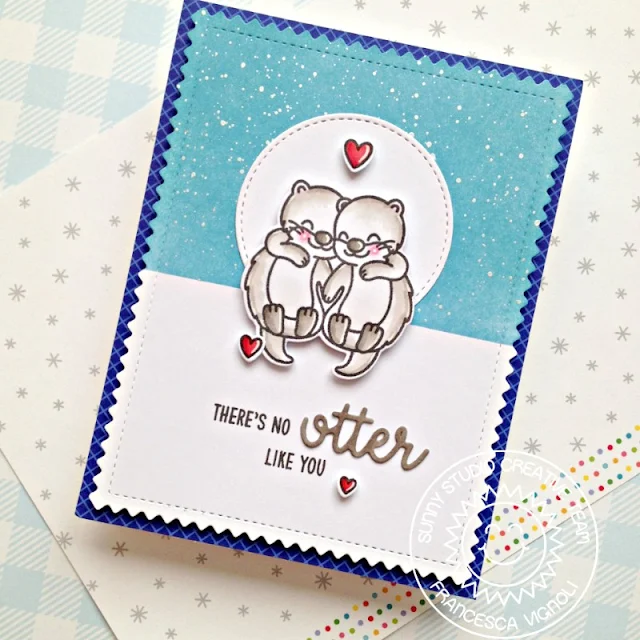
Hi there and happy Wednesday! It's Franci here with you today with an otterly adorable card! Haha! Oh these little otters are soooo super cute! 

Sunny Studio: There's No Otter Like You Card by Franci (using My Otter Half Stamps, Frilly Frames Chevron Dies, Stitched Circle Dies & Gingham Jewel Tones Paper)

First of all I stamped these cuties form the My Otter Half set, colored them with my copics and cut them out with their coordinated dies. Then I created my card base out of white cardstock and covered the front with this lovely blue patterned paper from the Gingham Jewel Tones 6x6 paper set.

I die cut my white panel using the Frilly Frames Chevron Dies set, masked the bottom and inked the top with the Broken China Distress ink Oxide. Then I added some little sparkle watercolor splatters and a Stitched circle in the center.


Sunny Studio: There's No Otter Like You Card by Franci (using My Otter Half Stamps, Frilly Frames Chevron Dies, Stitched Circle Dies & Gingham Jewel Tones Paper)

I glued down my images with foam adhesive (I also added some little hearts from the Meow & Furever set!), I stamped my sentiment at the bottom and I also included the otter die cut words that makes it super special and added some details with a white gel pen.

This clean and simple card turned out so super cute! Hope you like it and thank you so much for stopping by today!

Sunny Studio Supplies Used:

Fancy Frames- Rectangles
Shop at:
Sunny Studio
Gingham Jewel Tones 6x6 Paper
Shop at:
Sunny Studio
Rustic Winter Dies
Rustic Winter Dies
Shop at:
Sunny Studio
Frilly Frames Chevron Die
Shop at:
Sunny Studio
Plane Awesome Stamps
Shop at:
Sunny Studio
Fluffy Clouds Border Dies
Shop at:
Sunny Studio
Spring Scenes Stamps
Shop at:
Sunny Studio
Spring Scenes Dies
Spring Scenes Dies
Shop at:
Sunny Studio
Country Scenes Stamps
Shop at:
Sunny Studio
Country Scenes Dies
Country Scenes Dies
Shop at:
Sunny Studio
Garden Fairy Stamps
Garden Fairy Stamps
Shop at:
Sunny Studio
Meow & Furever Stamps
Shop at:
Sunny Studio
Meow & Furever Dies
Meow & Furever Dies
Shop at:
Sunny Studio
My Otter Half Stamps
Shop at:
Sunny Studio
My Otter Half Dies
My Otter Half Dies
Shop at:
Sunny Studio
Stitched Circle Small Dies
Shop at:
Sunny Studio

Tuesday, March 30, 2021

Captivating Camellias Cards with Isha and Kavya

Hello everyone, Isha here today with a floral card featuring our Captivating Camellias stamps and dies. This is such a pretty layering stamp to achieve beautiful floral.

Sunny Studio Stamps: Captivating Camellias Snowflake Circle Frame Dies Inside Greetings Birthday Card by Isha Gupt

I started by stamping the flower from the Captivating Camellias stamp set using Altenew Rose Petal ink set. Stamp the leaves using Altenew Green Fields ink set. Die-cut using the coordinating dies.

Die-cut the circle frame from the Snowflake Circle Frame die. Apply versamark ink to it. Sprinkle WOW! Metallic Gold Rich embossing powder. Heat set.

Sunny Studio Stamps: Captivating Camellias Snowflake Circle Frame Dies Inside Greetings Birthday Card by Isha Gupt

Take a white mat layer, flick some gold ink to it. Adhere the circle frame to the panel. Make the floral cluster and adhere using liquid glue and 3d foam for various depths. 

Stamp the sentiment using Inside Greetings - Birthday. To finish, adhere Purple Sapphire Jewels and Lavender Quartz jewels.

Thank you for dropping by! Have a nice day.

---------------------------------------------------

Hi folks, Kavya here. I am back on the blog with another fun way to stretch your supplies and get the most of your stamps! Today’s spotlight is on the new Captivating Camellias stamp set. I love coloring my own images but sometimes having layered stamps makes it easier to create quick and easy cards that look equally gorgeous! I was inspired by illustrations and clear stamps with floral elements peeking out of an envelope. When I looked at the camellias, I knew right away that they would be perfect for creating a similar card! 

Sunny Studio Stamps: Captivating Camellias Frilly Frame Dies Inside Greetings Card by Kavya

I started off by taking two different shades of blue cardstock. I ink blended the edges with matching dye ink and added some paint splatters to make the background a bit more dramatic. For me, the background looks ‘flat’ and likes dimension if I don’t ink blend or add some subtle splatters. I then die cut the lighter blue cardstock using the inner portion of the Frilly Frames Quatrefoil dies.  

Later, I created an envelope using linen cardstock. The envelope was designed to fit a card of size 2”x1”. If you have an envelope maker, this is super easy to recreate! If not, just find a template online that shows you how to make one! I then lined the inner flap with Kraft cardstock for some contrast. I also ink blended the edges and added highlights using a white gel pen. 

Sunny Studio Stamps: Captivating Camellias Frilly Frame Dies Inside Greetings Card by Kavya

Then, stamp the camellias using your preferred colors. I stamped mine using 4 different shades of pink. I then placed all the leaves and flowers inside the element. Feel free to use some foam for the flowers on the top for more dimension. Later, I heat embossed a sentiment from Inside Greetings Birthday on the smallest Slimline Pennant die. Finally, I added some bling using the new Iridescent Jewels… Aren’t these gorgeous?

That’s it for today! Happy Crafting! 

Sunny Studio Supplies Used:

Snowflake Circle Frame
Shop at:
Sunny Studio
Frilly Frames Quatrefoil
Shop at:
Sunny Studio
Captivating Camellias Stamps
Shop at:
Sunny Studio
Captivating Camellias Dies
Shop at:
Sunny Studio
Inside Greetings Birthday
Shop at:
Sunny Studio
Slimline Pennant Dies
Shop at:
Sunny Studio

Monday, March 29, 2021

Country Scenes Cards with Ashley and Mayra

Hi friends! It's Ashley today with a cute spring hello featuring the Country Scenes and Balloon Rides sets! Last week, I used the Balloon Rides cuties to create a fun night scene, so I decided to add them to a day scene this time!

Sunny Studio Stamps: Country Scenes Balloon Rides Everyday Card by Ashley Ebben

I started by blending some Lawn Fawn inks in Merman and Minty Fresh onto white cardstock. I stamped one of the scenes from Country Scenes on another piece of white cardstock and colored with Copics. I cut the landscape out with the matching die and added it to my ink blended piece. I then cut the whole thing out with the frame from Frilly Frames Chevron and added it to a piece of patterned gingham paper from the Gingham Pastels pack.

Sunny Studio Stamps: Country Scenes Balloon Rides Everyday Card by Ashley Ebben

I stamped my images from Balloon Rides onto white cardstock and colored with Copics. I couldn't get quite the blend I wanted on the rainbow balloon, so I turned it into a sparkly balloon by adding some dots which helped blend those lines a bit more. I used the matching dies to cut everything out and added the images to the card, popping a few up with foam tape, including the balloon. I finished by stamping the sentiment from Balloon Rides in VersaMark Onyx Black ink.

Thank you so much for stopping by! Have a wonderful day!

---------------------------------------

Hello everyone, happy Monday. Mayra here with you today. I am sharing a card using the new Country Scenes stamp and die set. I paired the lovely pond scene with the adorable Feeling Froggy and Home Sweet Gnome stamp sets. 

Sunny Studio Stamps: Country Scenes Feeling Froggy Home Sweet Gnome Everyday Card by Mayra Duran-Hernandez

I began my card by coloring the images from the sets that I would be using. For the pink areas, I used RV52, RV17, RV04, and RV55. For the yellow, I used Y11, Y08, Y19, and YR24. For the light turquoise, I used G00, BG23, BG11, and BG10. 

Next, I die-cut the layers I would use to create the scene on the inside of the card and the peekaboo window on the front of the card. I used the stitched rectangle from the Frilly Frames Quatrefoil dies set, the grass and hill from the Slimline Nature Borders die set, the largest oval and frame from the Stitched Oval and Fancy Frames Oval die sets. 

Sunny Studio Stamps: Country Scenes Feeling Froggy Home Sweet Gnome Everyday Card by Mayra Duran-Hernandez

I then added color to the base panel using Distress Oxide inks. I used Cracked Pistacchio and Peacock Feathers for the sky. For the grass, I used Twisted Citron, Mowed Lawn, and Pine Needles. To finish the card I stamped the hello sentiment from the cute Chubby Bunny stamp set onto the front of the card and the sentiment from the Feeling Froggy set on the inside of the card. 

I hope you enjoy the card I created to share with you today. Thank you so much for taking the time to stop by. I hope you each have a wonderful and blessed day. 

Sunny Studio Supplies Used:

Fancy Frames- Ovals
Fancy Frames- Ovals
Shop at:
Sunny Studio
Home Sweet Gnome Stamps
Shop at:
Sunny Studio
Home Sweet Gnome Dies
Shop at:
Sunny Studio
Stitched Oval Dies
Stitched Oval Dies
Shop at:
Sunny Studio
Gingham Pastels 6x6 Paper
Shop at:
Sunny Studio
Chubby Bunny Stamps
Chubby Bunny Stamps
Shop at:
Sunny Studio
Frilly Frames Chevron Die
Shop at:
Sunny Studio
Frilly Frames Quatrefoil
Shop at:
Sunny Studio
Slimline Nature Borders
Shop at:
Sunny Studio
Balloon Rides Stamps
Shop at:
Sunny Studio
Balloon Rides Dies
Balloon Rides Dies
Shop at:
Sunny Studio
Country Scenes Stamps
Shop at:
Sunny Studio
Country Scenes Dies
Country Scenes Dies
Shop at:
Sunny Studio
Feeling Froggy Stamps
Shop at:
Sunny Studio
Feeling Froggy Dies
Feeling Froggy Dies
Shop at:
Sunny Studio