Saturday, February 22, 2020

Guest Designer Spotlight: Cards with Karin Akesdotter

Hi everyone! I'm Karin Ã…kesdotter from Peppermint Patty’s Papercraft and I am so excited to be here to share some cards that I've created using the new Sunny Studio stamps. 

Sunny Studio Stamps: Pink Peonies Frilly Frame Dies Love Monkey Wishes Word Die Birthday Card by Karin Akesdotter

For my first card I started by making a card base from white cardstock and then cut a scalloped panel using the Frilly Frames Eyelet Lace dies. Next I die cut the beautiful "quilt" pattern through a rectangle piece of white cardstock, which I then adhered to the center of my card. This made a beautiful, textured background for the wonderful Pink Peonies

Sunny Studio Stamps: Pink Peonies Frilly Frame Dies Love Monkey Wishes Word Die Birthday Card by Karin Akesdotter

The peonies were first stamped in Antique Linen Distress ink, then colored with Copic markers before re-stamping and embossing the flowers again with gold embossing. I then made a little flag - with an embossed sentiment from Love Monkey and the Wishes Word die.  

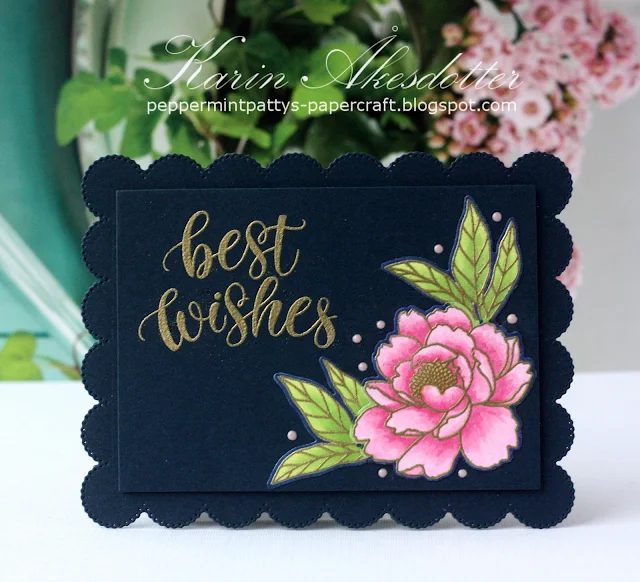
Sunny Studio Stamps: Pink Peonies Frilly Frame Dies Best Wishes Card by Karin Akesdotter

My second card was made in a very similar way, I just used dark colored cardstock instead to get a totally different look. So many possibilities with these wonderful sets!

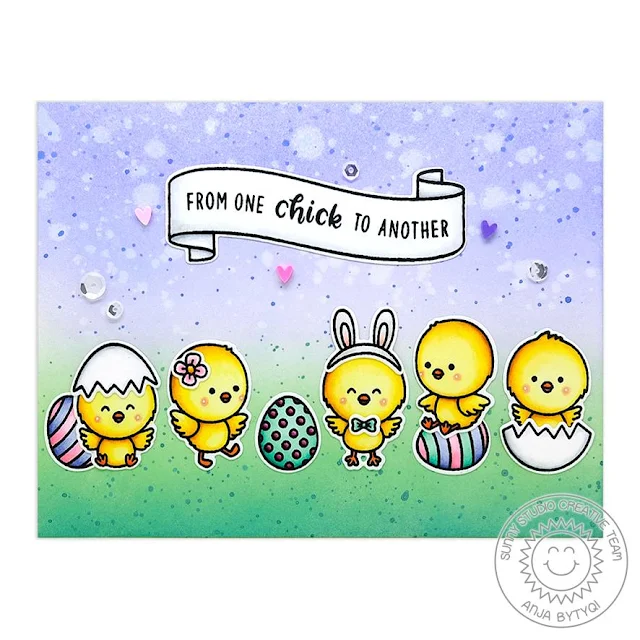
Sunny Studio Stamps: Chickie Baby Easter Card by Karin Akesdotter

My last card is a fun and simple design where I stamped a row of adorable chicks, using the Chickie Baby stamp set. I then masked them off and inked the background with Distress ink. Before removing the masking I spattered the background with gold watercolor from Daniel Smith.

Sunny Studio Stamps: Chickie Baby Easter Card by Karin Akesdotter


Thank you so much for joining me here today! 

Sunny Studio Supplies Used:

Wishes Word Die
Wishes Word Die
Shop at:
Sunny Studio
Love Monkey Stamps
Love Monkey Stamps
Shop at:
Sunny Studio
Chickie Baby Stamps
Chickie Baby Stamps
Shop at:
Sunny Studio
Chickie Baby Dies
Chickie Baby Dies
Shop at:
Sunny Studio
Pink Peonies Stamps
Pink Peonies Stamps
Shop at:
Sunny Studio
Pink Peonies Dies
Pink Peonies Dies
Shop at:
Sunny Studio
Frilly Frames-Eyelet Lace
Shop at:
Sunny Studio

Friday, February 21, 2020

Spring Scenes Cards with Juliana and Candice

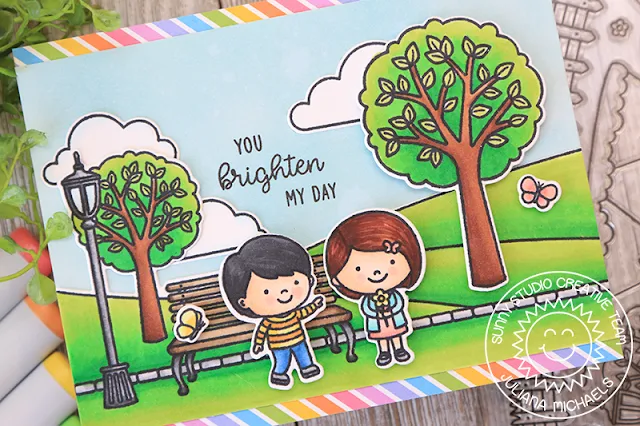
Hello friends! It's Juliana here and today I'll be sharing a card featuring the Spring Scenes Stamp Set. I couldn't resist combining it with the Spring Showers Stamp Set to create a spring themed card.

Sunny Studio Stamps: Spring Scenes Spring Showers Seasonal Trees Everyday Cards by Juliana Michaels

I began by stamping and coloring all the images from the Spring Scenes Stamp Set and Spring Showers Stamp Set with Copic Markers. I also added a tree image from the Seasonal Tree Stamp Set. I then die cut them using the coordinating dies and began arranging them to create a cute spring theme.

Sunny Studio Stamps: Spring Scenes Spring Showers Seasonal Trees Everyday Cards by Juliana Michaels

For the background, I ink blended a piece of White Bristol Paper with Tumbled Glass Distress Oxide. I then adhered the scene and added some stamped and die cut clouds. As I added the clouds, I made sure to leave room for the sentiment which is from the Spring Showers Stamp Set. For the final touch, I added some strips of patterned paper from the Spring Sunburst Paper.

I hope you enjoyed this bit of spring inspiration using the Spring Scenes Stamp Set. Isn't it great how wonderfully it coordinates with so many of the stamps from the spring release? Thanks so much for stopping by today!

-----------------------------------------------------

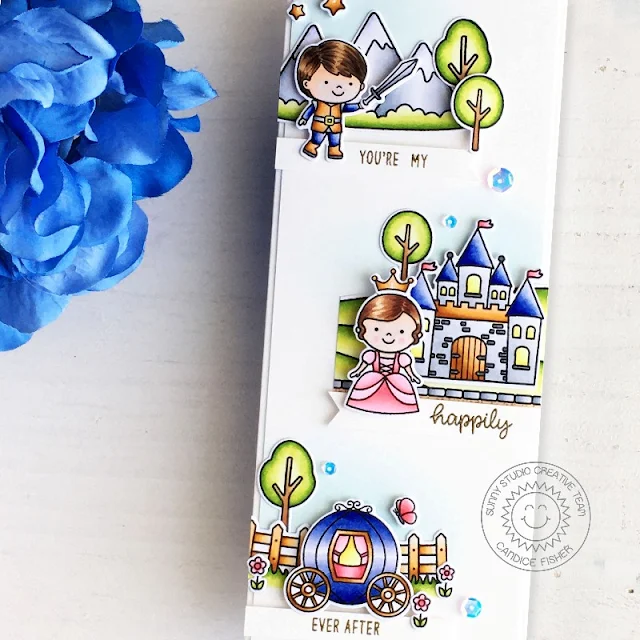
Hello, Candice with you today with this sweet little story on my slimline card using the awesome new Spring Scenes stamps to create the backgrounds for each scene!

Sunny Studio Stamps: Spring Scenes Enchanted Everyday Card by Candice Fisher

I used two sets from the new release:

I began by creating an 8 1/2 x 3 1/2 card base which is the perfect size for your standard envelopes. I first stamped all the images from Spring Scenes & Enchanted stamp sets, colored them with copic markers, and used the coordinating dies listed above to cut them out. I then created three banners using the sentiments from the Enchanted set and heat embossed them in gold.

Sunny Studio Stamps: Spring Scenes Enchanted Everyday Card by Candice Fisher

Before adhering each scene, I lined them up and inked lightly with tumbled glass for the sky and then glued the backgrounds down and used foam tape to add dimension to the front images. I kept the embellishments simple by adding a few sequins to let the story be the center of attention on my card.

Thank you for stopping by!

Sunny Studio Supplies Used:

Spring Sunburst 6x6 Paper
Shop at:
Sunny Studio
Seasonal Trees Stamps
Shop at:
Sunny Studio
Seaonal Trees Dies
Seaonal Trees Dies
Shop at:
Sunny Studio
Enchanted Stamps
Enchanted Stamps
Shop at:
Sunny Studio
Enchanted Dies
Enchanted Dies
Shop at:
Sunny Studio
Spring Scenes Stamps
Shop at:
Sunny Studio
Spring Scenes Dies
Spring Scenes Dies
Shop at:
Sunny Studio
Spring Showers Stamps
Shop at:
Sunny Studio
Spring Showers Dies
Spring Showers Dies
Shop at:
Sunny Studio

Thursday, February 20, 2020

Chickie Baby Cards with Vanessa and Anja

Hello to you! Vanessa here with a new card using the adorable Chickie Baby Stamps. These chicks are hilarious. Today, they are celebrating a birthday party:

Sunny Studio Stamps: Chickie Baby Blooming Frame Dies Birthday Card by Vanessa Menhorn

I first inked a panel of white cardstock with Distress Oxide Inks and adhered it to the card base. Now I stamped the images, colored them with Copics, die-cut everything with the matching dies and adhered the elements to the card with foam tape.

Sunny Studio Stamps: Chickie Baby Blooming Frame Dies Birthday Card by Vanessa Menhorn

Finally, I die-cut the "Happy Birthday", using the Blooming Frame Dies from pink and white cardstock, layered the pieces and adhered them. Stamps used in addition: Oceans of Joy (balloon)Purrfect Birthday (hats)

I hope these cuties made you smile today! Thanks for visiting!

-------------------------------------------------------

Hello everyone, Anja here and today the spotlight is on the Chickie Baby Stamps. Aren't they the cutest?!

Sunny Studio Stamps: Chickie Baby Banner Basics Friendship Card by Anja Bytyqi

For the Distress Oxide Ink background, I blended together Shaded Lilac, Cracked Pistachio and Evergreen Bough. I also added water droplets and ink splatters.

I stamped the chickens, eggs and little accessories in Memento Tuxedo Black Ink and did some Copic coloring. I used the coordinating dies to cut out the images. To fit the sentiment inside one of the Banner Basics Stamps, I slightly curved it. I did a bit of shading with grey Copics and used the matching die to cut it out.

Sunny Studio Stamps: Chickie Baby Banner Basics Friendship Card by Anja Bytyqi

I arranged the chickens in a row and placed the banner above them. To finish off my card, I adhered Pink & Purple Heart Confetti clay embellishments and sparkling clear sequins.

Thank you so much for stopping by! Wishing you a lovely day!

Sunny Studio Supplies Used:

Oceans of Joy Dies
Oceans of Joy Dies
Shop at:
Sunny Studio
Oceans of Joy Stamps
Shop at:
Sunny Studio
Purrfect Birthday Stamps
Shop at:
Sunny Studio
Purrfect Birthday Dies
Shop at:
Sunny Studio
Banner Basics Stamps
Shop at:
Sunny Studio
Banner Basics Dies
Banner Basics Dies
Shop at:
Sunny Studio
Chickie Baby Stamps
Chickie Baby Stamps
Shop at:
Sunny Studio
Chickie Baby Dies
Chickie Baby Dies
Shop at:
Sunny Studio
Blooming Frame Die
Blooming Frame Die
Shop at:
Sunny Studio

Wednesday, February 19, 2020

Prancing Pegasus Cards with Franci and Ana

Happy Wednesday friends! Franci here with you and today I have a magical card to share.
Time to put the new Prancing Pegasus set on the spotlight! 

Sunny Studio Stamps: Prancing Pegasus Frilly Frame Dies Hello Card by Franci Vignoli

First of all I die cut this scalloped square out of white cardstock using the Frilly Frames Eyelet Lace set and the partial die cutting technique. I created a matching card base out of the same cardstock and covered the front with this fun stripy rainbow paper from the Spring Fling set.

I stamped the Pegasus and all the stars (multiple times!), colored them all with Copics and die cut them with their coordinated dies. I stamped my "Hello" sentiment from the Cheerful Daisies set on the bottom and glued all the images in the center with foam adhesive.

Sunny Studio Stamps: Prancing Pegasus Frilly Frame Dies Hello Card by Franci Vignoli

I mounted my decorated panel on to my card with foam adhesive and finally added some details with a white gel pen and some sparkling clear sequins to finish my design.

Hope you like my card and thank you so much for stopping by today! Have a lovely day!

-------------------------------------------------------

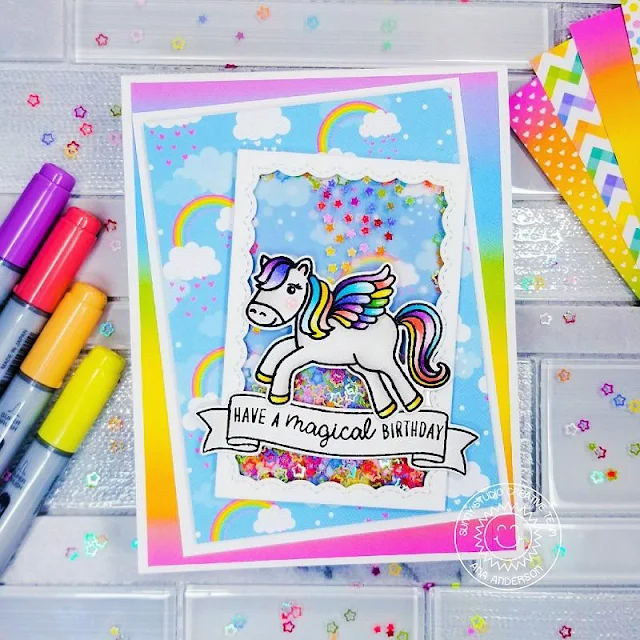
Hello crafty friends! It’s Ana here today with a birthday card featuring Prancing Pegasus stampscoordinating dies and Spring Fling paper pack.

Sunny Studio Stamps: Prancing Pegasus Banner Basics Fancy Frame Dies Birthday Shaker Card by Ana Anderson

I started with stamping Prancing Pegasus with Copic friendly ink and coloring him with Copic markers in rainbow colors. I stamped the sentiment (from Prancing Pegasus set) on a banner (from Banner Basics) and added some shading with warm gray marker. Once my images were colored, I cut them with coordinating Prancing Pegasus and Banner Basics dies.

For the background, I choose rainbow and blue rainbow sky papers from Spring Fling paper pack, trimmed the rainbow piece slightly smaller than A2 size card base, then trimmed a piece of blue rainbow paper to 3 x 4 1/4 and matted it with white cardstock.

Sunny Studio Stamps: Prancing Pegasus Banner Basics Fancy Frame Dies Birthday Shaker Card by Ana Anderson

For the shaker part of the card, I used the smallest Fancy Frames Rectangles die to cut the white frame, added acetate, foam tape and filled the shaker with Rainbow Star Confetti. I backed the shaker with a piece of vellum, to mute the background a bit so the shaker stars can stand out more.

I adhered the sentiment banner with liquid glue and added Prancing Pegasus with foam tape. To embellish the shaker, I adhered the stars (from Rainbow Star Confetti) to the front of the shaker in rainbow order, then added Wink of Stella to the Pegasus’ mane and hooves.

I just love how happy and colorful this card turned out! I really hope I have inspired you today and until next week I wish you happy crafting!

Sunny Studio Supplies Used:

Fancy Frames- Rectangles
Shop at:
Sunny Studio
Banner Basics Stamps
Shop at:
Sunny Studio
Banner Basics Dies
Banner Basics Dies
Shop at:
Sunny Studio
Prancing Pegasus Stamps
Shop at:
Sunny Studio
Prancing Pegasus Dies
Shop at:
Sunny Studio
Frilly Frames-Eyelet Lace
Shop at:
Sunny Studio
Spring Fling Paper
Spring Fling Paper
Shop at:
Sunny Studio

Tuesday, February 18, 2020

Blooming Frame Die Focused Cards with Angelica and Mindy

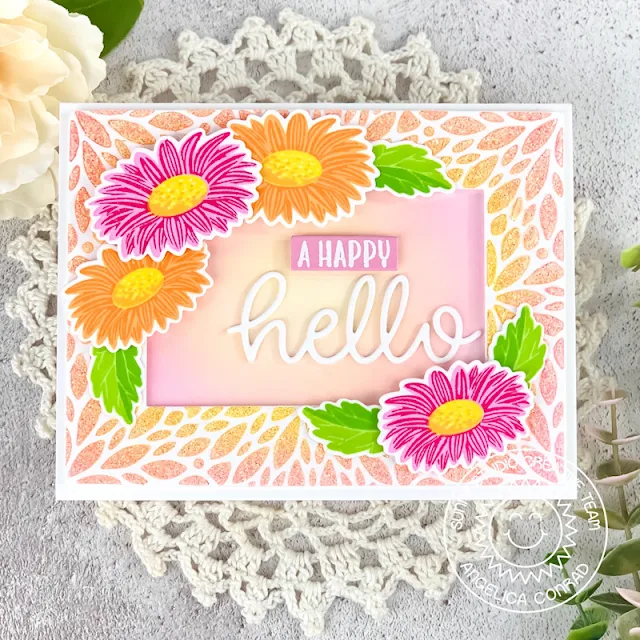
Hi friends! Angelica here, and I have a card to share with you today featuring the Blooming Frame Die.

Sunny Studio Stamps: Blooming Frame Dies Cheerful Daisies Hello Word Die Hello Card by Angelica Conrad

I die-cut a white card stock panel with the Blooming Frame Die, and used the panel as a stencil. I blended yellow and pink ink over the "stencil", finishing up with a thin layer of Gina K Designs White Glitter Gel. Once dry, I trimmed the glittery panel into a frame, and made coordinating Cheerful Daisies to decorate the frame. 

Sunny Studio Stamps: Blooming Frame Dies Cheerful Daisies Hello Word Die Hello Card by Angelica Conrad

I white heat-embossed a partial Cheerful Daisies sentiment onto pink card stock, trimmed it, and attached it to the card with foam squares. I finished the card with a die-cut Hello

Thanks so much for joining me today. I hope I have given you an idea or two on how to stretch your supplies!

---------------------------------------------------------

Hello! It’s Mindy from My Creative Scoop. Today I’m sharing a fun Birthday Card using the Blooming Frame Die and Prancing Pegasus Stamp and die set. I’m also using the new Spring Fling Paper behind my Blooming Frame Die

Sunny Studio Stamps: Blooming Frame Dies Prancing Pegasus Fancy Frame Dies Birthday Card by Mindy Baxter

I love how the white pattern pops against the rainbow paper. The Scalloped border around the ‘Happy Birthday’ is from the Fancy Frame Rectangle Dies. I actually cut 2 out in black and then one in white to give the frame a little bit of a shadow.

Sunny Studio Stamps: Blooming Frame Dies Prancing Pegasus Fancy Frame Dies Birthday Card by Mindy Baxter

I colored my Prancing Pegasus Stamp with my Copic Markers. Here’s a list of the colors I used. Body – N3, N1, N0, R32, R30. Rainbow hair and Wings – R32, Y35, Y02, YG13, B14, V12, N3.

Thank you so much stopping by. Have a great day!

Sunny Studio Supplies Used:

Fancy Frames- Rectangles
Shop at:
Sunny Studio
Hello Word Die
Hello Word Die
Shop at:
Sunny Studio
Cheerful Daisies Stamps
Shop at:
Sunny Studio
Cheerful Daisies Dies
Shop at:
Sunny Studio
Prancing Pegasus Stamps
Shop at:
Sunny Studio
Prancing Pegasus Dies
Shop at:
Sunny Studio
Blooming Frame Die
Blooming Frame Die
Shop at:
Sunny Studio
Spring Fling Paper
Spring Fling Paper
Shop at:
Sunny Studio