Wednesday, October 21, 2015

Furever Friends Sending Warm Fuzzies Card with Audrey

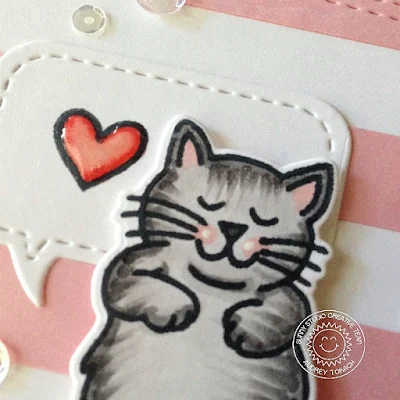
Hello there!  Audrey here!  Today, I'm sending warm fuzzies with the new Furever Friends stamp set!  This set is full of adorable little kitties, and all different positions, and my favorite is the sleeping kitty.  I am a crazy cat lady, with four cats of my own, and 3 of the 4 love sleeping this way!  


I started off by creating a striped background.  I began with a white panel and then cut 1/2 inch strips of pink cardstock.  I used the lines on my grid mat to adhere them 1/2 inch apart to create this wide striped pattern.  Then I ran it through my die cut machine to add a stitched border and also really press down the adhesive and make sure the glued pieces stay put.  

I colored my cat with Copic markers, die-cut him with the coordinating Furever Friends dies, and popped him up on a speech bubble "pillow".  His dreams are filled with love!  Then I added a sentiment from the same stamp set.  To finish things off,  I added some clear sequins with a few tiny hearts and then popped the panel up on a white card base with foam tape.


Thanks all for me today!  Thanks for stopping by! :)

Sunny Studio Supplies Used:

Furever Friends Dies
Shop at:
Sunny Studio
Furever Friends Stamps
Shop at:
Sunny Studio

Tuesday, October 20, 2015

"Friends Furever" Friendship Cat Card With Heidi

Hello everybody, Heidi here, welcome back to the Sunny Studio Stamps blog. This week we are introducing the “Furever Friends” stamp set and its coordinated die set.  If you are a cat lover or you have friends or family who love cats, or if you simply want to send friendly greetings to any of your friends, this is the perfect set for you. I had lots of fun coloring these kittens, they are adorable!


I created this adorable night scene with these two kittens, by blending a night sky with distress inks and then I sprinkled with white ink to create the appearance of starry sky. I adhered the die cut pieces using foam adhesive. I heat embossed the sentiment using white embossing powder and finally I adhered the panel to a white card base.


I hoped you enjoyed this card using the “Furever Friends” stamp set, come back tomorrow for more inspiration using this adorable stamp set. Don’t forget to share all your projects on social media using the #SunnyStudioStamps so you could be feature on our Sunny Saturday Share.

Thanks so much for stopping by.  Have a lovely day!


Sunny Studio Supplies Used:
Furever Friends Dies
Shop at:
Sunny Studio
Furever Friends Stamps
Shop at:
Sunny Studio


Monday, October 19, 2015

Furever Friends Purrfect Birthday Cat Card with Melissa

Hello Everyone, Melissa here. Today I have a card to share with you featuring the Furever Friends stamp set. I think this set is so cute! It is super hard to find cute cat stamps so these are amazing! 


I decided to make a simple and fun little scene by combining the Forever Friends set with the Birthday Smiles set. To create this card I first started with a strip of white card, this panel is one layer so I laid out the stamps how I wanted and proceeded to stamp and mask them until complete. I then colored the images using Copic markers. 

To finish the card I mounted it onto of some black card and then on top of some patterned paper. I think this card is super fun and easy to make and would be a great Birthday card for any cat lover!


I hope you like it.  Be sure to check back this week for more inspiration using Furvever Friends! Thanks for stopping by!

Supply List:

Friday, October 16, 2015

Harvest Happiness Thankful for You Tags with Marion

It's Marion here with three tags using the Harvest Happiness stamp set and coordinating dies.


To create the wreath tags, I began by creating a water colour panel using three colours of distress ink - Mustard Seed, Ripe Persimmon and Barn Door. When the panel was dry, I used the 5 small leaf dies from the Harvest Happiness die set and ran it through my die cutting machine several times.

To position the leaves into a wreath, I drew a small circle to act as a guide. I stamped my sentiment before adhering the leaves into position. For the blue wreath tag, I water coloured around the drawn circle with Tumbled Glass and Peacock Feathers before adhering the leaves.


I didn't want to waste any of my lovely water coloured panel, so I used the negative piece from all that leaf die cutting and made the following tag. I just had to die cut a whole lot of white leaves, to piece back into the negative spaces to create an inlaid effect.


And here they are all together.


Sunny Studio Products used: 
I hope that you have found some inspiration from me today. I appreciate you stopping by.

Marion

Thursday, October 15, 2015

Harvest Happiness Thankful for You Card with Elise

Hi everyone! It's Elise today to share a fun thank you card that features the Harvest Happiness stamp and die set! I go through a ton of thank you cards, so this card is perfect to create for this fall season!


I started by inking the card base with some blue and green inks to create the ground and sky. I then stamped the two different sized pumpkins and leaves onto various patterned papers and used the coordinating dies to cut the images. Cutting the images with the coordinating dies makes it very easy, and using patterned paper means that I don't need to spend a lot of time coloring the small images! I did add a little bit of brown to the pumpkin stems to give it some detail.


Then I attached the pumpkins with some foam tape and the leaves with some liquid glue. I finished the card by stamping the sentiment in black ink and adding the ribbon to the top! This card came together pretty quickly and it's perfect to give to a friend this fall! 

Thanks for stopping by to check out my card using the Harvest Happiness stamp set and dies! Don't forget to stop by tomorrow for some more inspiration! :)