Thursday, May 27, 2021

Teacher Appreciation Cards with Anja and Vanessa

Hello everyone, Anja here today. The school year is coming to an end soon and I love the idea of creating Thank You cards for teachers, especially during this pandemic. The Teacher Appreciation set is full of wonderful sentiments which will work for other occasions and people as well. I combined it with the Color My World Stamps, one of the cute Beach Buddies and the gorgeous Chloe Alphabet Dies.

Sunny Studio Stamps: Teacher Appreciation Color My World Beach Buddies Chloe Alphabet Dies Teacher Card by Anja Bytyqi

I started off with a light aqua A2 card base and die cut a mat from white cardstock using the stitched rectangle included in the Frilly Frames Retro Petals Die set. I stamped five colored pencils using dye inks (you can find the ink colors below) and cut them out with the coordinating die.

Dye Inks used for all pencils:
Wood: MFT In the Buff and Biscotti, Altenew Caramel Toffee; Metal Piece: SSS Fog, Lawn Fawn Manatee; Eraser: Altenew Cotton Candy and Coral Berry

Pencils (Altenew Dye Inks):
Purple: Soft Lilac, Lavender Fields, Deep Iris; Pink: Pink Diamond, Pinkalicious, Rubellite; Yellow: Buttercream, Warm Sunshine, Sunkissed; Green: Bamboo, Parrot, Olive; Aqua: Dew Drop, Aqualicious, Teal Cave

With the help of masking, I gave the little bunny some glasses. I used Memento Tuxedo Black Ink and did some coloring with Copic Markers. I cut him out with the matching die.

Sunny Studio Stamps: Teacher Appreciation Color My World Beach Buddies Chloe Alphabet Dies Teacher Card by Anja Bytyqi

Next, I stamped the sentiment at the bottom of the card with VersaMark Ink and heat embossed it in silver. I spelled out the word 'thanks' by die cutting the individual letters from shiny rainbow mirror cardstock. I adhered them over the heat embossed sentiment and added a couple of silver paperclips below.

Finally, I popped up the colored pencils and the bunny with foam tape for a bit of dimension.

Thank you so much for stopping by! Wishing you a wonderful day!

-------------------------------------------------

Hello to you! Vanessa here with a card using the Teacher Appreciation set. 

Sunny Studio Stamps: Teacher Appreciation Color My World School Time Teacher Card by Vanessa Menhorn

I first trimmed a panel of striped patterned paper from the Sleek Stripes Paper pad slightly smaller than my card base and adhered it. Now I stamped the images from Teacher AppreciationColor My World and School Time, colored the apple and the pin with Copic markers, fussy-cut the elements and adhered everything to the card, raising some parts with foam tape. Finally, I added stars from the Primary Star Confetti.

Sunny Studio Stamps: Teacher Appreciation Color My World School Time Teacher Card by Vanessa Menhorn

I hope you got inspired today! Thanks for visiting, have a wonderful day!

Sunny Studio Supplies Used:

School Time Dies
School Time Dies
Shop at:
Sunny Studio
School Time Stamps
School Time Stamps
Shop at:
Sunny Studio
Beach Buddies Stamps
Shop at:
Sunny Studio
Beach Buddies Dies
Beach Buddies Dies
Shop at:
Sunny Studio
Color My World Stamps
Shop at:
Sunny Studio
Color My World Dies
Color My World Dies
Shop at:
Sunny Studio
Teacher Appreciation Stamps
Shop at:
Sunny Studio
Chloe Alphabet Dies
Chloe Alphabet Dies
Shop at:
Sunny Studio
Frilly Frames Retro Petals Dies
Shop at:
Sunny Studio
Sleek Stripes Paper
Sleek Stripes Paper
Shop at:
Sunny Studio

Wednesday, May 26, 2021

Scalloped Fence Cards with Julia and Franci

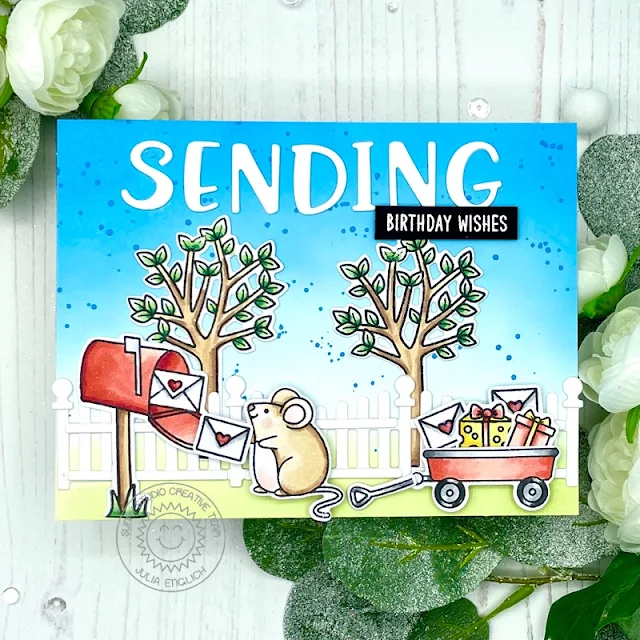
Hey crafty friends! It’s Julia here with a fun birthday card!

Sunny Studio Stamps: Scalloped Fence Dies Seasonal Trees Snail Mail Harvest Mice Everyday Card by Julia Englich

For this one, I stamped out my images from Harvest MiceSnail MailMerry MiceSeasonal Trees and Santa Clause Lane onto Transotype Perfect Coloring Paper and colored them in using Copic Markers. 

Copic Markers used: 0; N0, N1, N3, N5, N7; R11, R14, R18. R29; Y11, Y13, Y15, Y17; E30, E21, E23, E25, E27; G40, G43, G17

After that, I ink blended the background using Tumbled Glass, Salty Ocean and Shabby Shutters Distress Oxide Ink and added some splatters for more interest. Then, I die cut the Scalloped Fence three times out of white cardstock. 

Sunny Studio Stamps: Scalloped Fence Dies Seasonal Trees Snail Mail Harvest Mice Everyday Card by Julia Englich


I adhered my background panel to a card base and added all my images as well as my fence on top! For my sentiment, I die cut the word "sending" with the Chloe Alphabet dies and heat embossed "birthday wishes" from Candy Shoppe in white onto black cardstock. I adhered both parts of the sentiment to the background. Finally, I added shimmer pen and and crystal glaze for more sparkle! I really hope you like it!

Thank you so much for stopping by! Have a wonderful day!

--------------------------------------------

Hello there! Franci here with a darling slimline card. Aww look at these little succulents, they're my favorites!!

Sunny Studio Stamps: Scalloped Fence Dies Looking Sharp Everyday Card by Franci Vignoli

First of all I die cut my Stitched Rectangle slimline panel using the partial die cutting technique and I created a matching card base out of light grey cardstock. Then I stamped, colored with copics and die cut these little plants from the Looking Sharp set and I die cut the Scalloped Fence out of white cardstock multiple times.

I masked the bottom of my white stitched panel and inked the top using some pink, green and yellow Distress inks. I removed the mask, stamped my sentiment at the bottom and assembled and glued down my fence with liquid glue.

Sunny Studio Stamps: Scalloped Fence Dies Looking Sharp Everyday Card by Franci Vignoli

Finally I added the succulents with foam adhesive and a couple of hearts from the Happy Hamster set. I glued down the panel to my card base with more foam adhesive and added little dots with a white gel pen onto the background.

This card turned out so super cute! Thanks a lot for stopping by! 

Sunny Studio Supplies Used:

Candy Shoppe Stamps
Candy Shoppe Stamps
Shop at:
Sunny Studio
Happy Hamsters Stamps
Shop at:
Sunny Studio
Happy Hamsters Dies
Happy Hamsters Dies
Shop at:
Sunny Studio
Looking Sharp Stamps
Shop at:
Sunny Studio
Looking Sharp Dies
Looking Sharp Dies
Shop at:
Sunny Studio
Chloe Alphabet Dies
Chloe Alphabet Dies
Shop at:
Sunny Studio
Scalloped Fence Die
Scalloped Fence Die
Shop at:
Sunny Studio
Stitched Rectangle Dies
Shop at:
Sunny Studio
Seasonal Trees Stamps
Shop at:
Sunny Studio
Seaonal Trees Dies
Seaonal Trees Dies
Shop at:
Sunny Studio
Santa Claus Lane Stamps
Shop at:
Sunny Studio
Santa Claus Lane Dies
Shop at:
Sunny Studio
Merry Mice Stamps
Merry Mice Stamps
Shop at:
Sunny Studio
Merry Mice Dies
Merry Mice Dies
Shop at:
Sunny Studio
Harvest Mice Stamps
Harvest Mice Stamps
Shop at:
Sunny Studio
Harvest Mice Dies
Harvest Mice Dies
Shop at:
Sunny Studio
Snail Mail Stamps
Snail Mail Stamps
Shop at:
Sunny Studio
Snail Mail Dies
Snail Mail Dies
Shop at:
Sunny Studio

Tuesday, May 25, 2021

Picket Fence Cards with Kavya and Isha

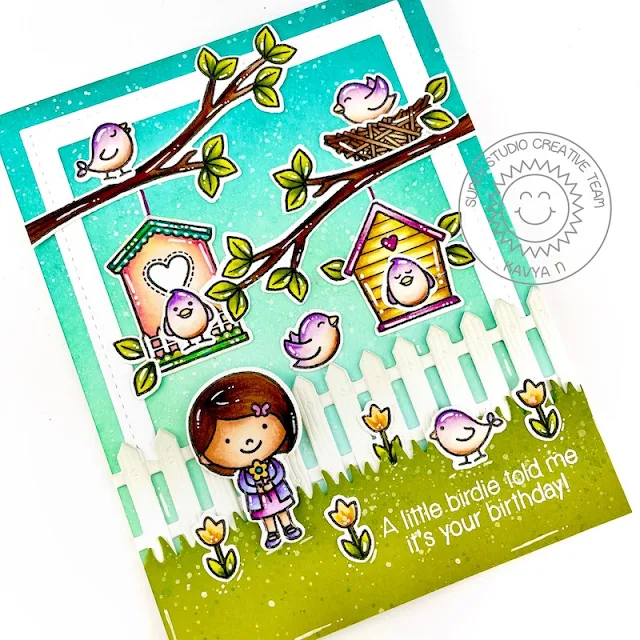
Hi folks, Kavya here. I am back on the blog with another fun card using the new Picket Fence die! As always, I am here to show you a fun way to combine some older stamps to create an adorable card :)

Sunny Studio Stamps: Picket Fence Border Dies A Bird's Life Spring Showers Birthday Card by Kavya

I first created my background by ink blending the top half of a light blue panel with teal and mint dye inks and used the grass die in the Picket Fence die set with some green cardstock. I then splattered some white paint as always :) I created the white border using the largest two dies in the new Stitched Rectangle Dies. Later, I used the picket fence die to create a fence. I felt that the fence was a bit too white so I ink blended the top half of the fence using a soft gray dye ink to make it a bit more realistic. 

Sunny Studio Stamps: Picket Fence Border Dies A Bird's Life Spring Showers Birthday Card by Kavya

I then stamped and colored various images from A Bird’s Life and Spring Showers using colored pencils and alcohol markers. Once I finished coloring, I adored the images as shown below and heat embossed a sentiment from A Bird’s Life using white embossing powder :)

That’s it folks! I hope this card inspires you to combine older stamps with the newer release to create some totally new cards! 

-----------------------------------------------

Hello Everyone! Isha here with a fun fold card featuring the Picket Fence die. I felt this kind of card was perfect to showcase this beautiful die and how it matches perfectly with the previously released products.

Sunny Studio Stamps: Picket Fence Border Dies Garden Fairy Home Sweet Gnome Card by Isha Gupta

To start, I made the base of my side step card. Take a 5.5 by 8.5 inch white cardstock. Mark 2.5 inch from the left edge, along the length. Now on the 3 inch side, score at 6.25, 4.25, 3.25, 2.25 and 1.25 inches. Cut vertically along the marked line from the 6.25 score point to 1.25 score point. Fold the card onto the score lines and the card base is ready.

Sunny Studio Stamps Step Up Style Card Tutorial Template Guide by Isha Gupta

Sponge the sky on the left longer panel using pinks and yellow inks. Die-cut the fence three times with white cardstock, using the Picket Fence die. Die-cut the grass from the Gingham Jewel Tone pattern paper using the same die.

Emboss a white scrap using the Woodgrain embossing folder. Sponge Vintage Photo, Fossilized Amber and Ground Espresso Distress inks. Cut using a pair of scissors to create the tree trunk.

Sunny Studio Stamps: Picket Fence Border Dies Garden Fairy Home Sweet Gnome Card by Isha Gupta

Stamp images, color using Copics and die-cut using coordinating dies:
Fairies, Butterfly, Flowers, Mushroom House: Garden Fairy Stamp and coordinating dies
Gnome, Mushroom: Home Sweet Gnome stamp and dies
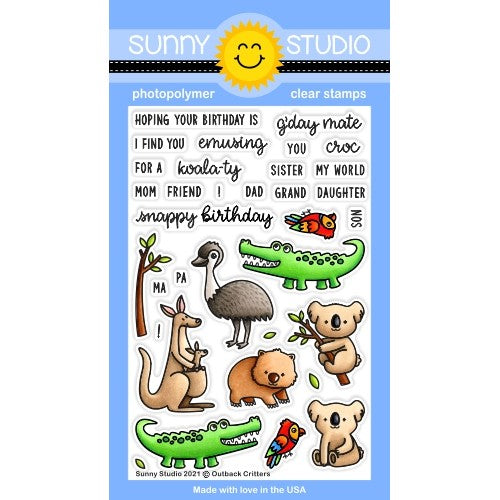
Tree Leaves: Outback Critters stamp and dies
Mountains: Country Scenes Stamp and dies

Sunny Studio Stamps: Picket Fence Border Dies Garden Fairy Home Sweet Gnome Card by Isha Gupta

Adhere all the dies and images as per the card photo and the card is ready. To finish, add some sparkles to the fairy wings, dots to the gnome hat and some clear sparkle pen to some flowers, fairy dress.

Hope you enjoyed the card. If you get inspired, don't forget to tag us on instagram @sunnystudiostamps. We would love to see your beautiful creations. Thanks for dropping by!

Sunny Studio Supplies Used:

A Bird's Life Stamps
Shop at:
Sunny Studio
A Bird's Life Dies
A Bird's Life Dies
Shop at:
Sunny Studio
Outback Critters Stamps
Shop at:
Sunny Studio
Outback Critters Dies
Shop at:
Sunny Studio
Picket Fence Border Dies
Shop at:
Sunny Studio
Stitched Rectangle Dies
Shop at:
Sunny Studio
Gingham Jewel Tones 6x6 Paper
Shop at:
Sunny Studio
Home Sweet Gnome Stamps
Shop at:
Sunny Studio
Home Sweet Gnome Dies
Shop at:
Sunny Studio
Woodgrain Embossing
Woodgrain Embossing
Shop at:
Sunny Studio
Spring Showers Stamps
Shop at:
Sunny Studio
Spring Showers Dies
Spring Showers Dies
Shop at:
Sunny Studio
Country Scenes Stamps
Shop at:
Sunny Studio
Country Scenes Dies
Country Scenes Dies
Shop at:
Sunny Studio
Garden Fairy Stamps
Garden Fairy Stamps
Shop at:
Sunny Studio
Garden Fairy Dies
Garden Fairy Dies
Shop at:
Sunny Studio