Thursday, February 9, 2023

Wonderful Windows Cards with Marine and Waleska

Hey crafty friends! Marine here with you today, I'm thrilled to be back on the blog with this adorable interactive card showcasing the beautiful Wonderful Windows die set that I immediately pictured with a brick wall and a kitty when I first saw it.

Sunny Studio Stamps: Wonderful Window Die Focused Card by Marine Simon (featuring Little Birdie, Purrfect Birthday)

I first started by stamping a kitty from Purrfect Birthday as well as several branches from Little Birdie on white cardstock using an alcohol marker friendly black ink. As always I used the coordinating dies to cut them all, and then colored everything using my alcohol markers.

Next I cut the main panel out of bristol cardstock, added details using a brick stencil along with salvaged patina and peacock feathers oxide inks, and then I built the interactive feature, using vellum to create the window, and a Spring Fever pink floral pattern paper + a small piece of woodgrain cardstock to make the inside of the room.

Sunny Studio Stamps: Wonderful Window Die Focused Card by Marine Simon (featuring Little Birdie, Purrfect Birthday)

And then I cut the different pieces to build the window + window box. I used white woodgrain cardstock for the window itself, and plain colored cardstock for the other pieces, but used a Spring Fever green dotted pattern paper to make the curtains. I attached them all on the brick panel, and then stamped my "Hoping your day is pawsome" greeting from Garden Fairy + Purrfect Birthday below the window.

Sunny Studio Stamps: Wonderful Window Die Focused Card by Marine Simon (featuring Little Birdie, Purrfect Birthday)

Finally I attached my interactive panel on a simple textured yellow panel, and then on a Dots & Stripes Pastels polka dotted purple panel, and as always I finished my card by adding highlights on the images using a white gel pen. And that's it! I hope you like this super cute and fun card! Thanks so much for stopping by, and see you next week!

----------------------------------------

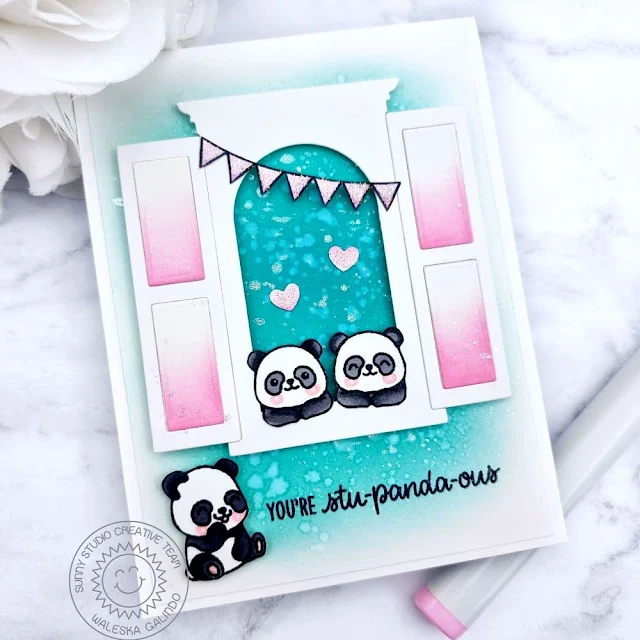
Hello Friends, Waleska here! Thanks for joining me today for more inspiration using the latest release! Today I will be using the Wonderful Windows Dies and the adorable Panda Party stamp set.

Sunny Studio Stamps: Wonderful Window Die Focused Card by Waleska Galindo (featuring Panda Party)

I started this card by inking a white card panel with Oxide Ink Peacock Feathers, I wanted a sky like background, I then cut the pieces from the Wonderful Windows Dies to create a window and I inked some of the window panel doors with Oxide Ink Kitsch Flamingo. I wanted to put the a cute panda couple inside the window so I stamped and color two pandas and I did an extra panda to be sitting under the window. This cute pandas are so versatile you can use them for all kinds of occasions and cards. I adhered everything and stamped the fun sentiment with Versamark ink.

Sunny Studio Stamps: Wonderful Window Die Focused Card by Waleska Galindo (featuring Panda Party)

I was almost finished, but I thought I was missing some details, so I decided to add a pink banner to the window and some pink hearts above the cute couple. I love this pandas they are so adorable! I hope you have a wonderful rest of your day and a lovely season!

Sunny Studio Supplies Used:

Purrfect Birthday Stamps
Shop at:
Sunny Studio
Purrfect Birthday Dies
Shop at:
Sunny Studio
Dots & Stripes Pastels 6x6 Paper
Shop at:
Sunny Studio
Garden Fairy Stamps
Garden Fairy Stamps
Shop at:
Sunny Studio
Little Birdie Stamps
Shop at:
Sunny Studio
Little Birdie Dies
Little Birdie Dies
Shop at:
Sunny Studio
Panda Party Stamps
Panda Party Stamps
Shop at:
Sunny Studio
Panda Party Dies
Panda Party Dies
Shop at:
Sunny Studio
Wonderful Windows Dies
Shop at:
Sunny Studio
Spring Fever Paper
Spring Fever Paper
Shop at:
Sunny Studio

Wednesday, February 8, 2023

Panda Party Cards with Marie and Catherine

Hello Crafty Friends, Marie here! Today I am sharing a playful birthday card featuring the adorable stamp set called Panda Party from Sunny Studio Stamps' most recent release! I love all the super cute panda images in this set! So perfect for crafting all year round.

Sunny Studio Stamps: Panda Party Birthday Card by Marie Marco (featuring Hayley Alphabet Dies)

My first step to creating this card was to die cut an A2 sized panel from a sturdy cardstock. I always use Neenah Solar White 110 lb cardstock for all my card bases so that my cards never warp. I then cut out an A2 sized pattern paper panel from the new Spring Fever Paper. I then attach this to the sturdy cardstock. I die cut 2 half circle shaped pieces from bristol smooth cardstock for easy ink blending. I ink blended the half circle background using Salvaged Patina distress ink . Taking the same ink, I splattered some watered down ink for a subtle texture. For the grass, I used a grass die to cut the bottom portion of the other half circle so it would match the background perfectly. I inked the grass using some Twisted Citron and Mowed Lawn Distress Ink.

To create the happy birthday sentiment, I combined the new Hayley Uppercase Alphabet Die with the Hayley Lowercase Alphabet Dies. I cut them out using a bright seafoam cardstock paper. 

Sunny Studio Stamps: Panda Party Birthday Card by Marie Marco (featuring Hayley Alphabet Dies)

On to creating my scene! I stamped out all my images from the Panda Party Stamps using Antique Linen Distress Ink onto watercolor paper. I then used Faber - Castell Watercolor Pencils to color my images in the noline coloring style. I die cut all my images using the corresponding Panda Party Dies

Assembling my card is always the fun part! To do this, I play around with placement first before gluing anything. After finalizing the perfect scene, I used a combination of double sided tape adhesive, Bearly Art Precision Craft Glue, and Foam tape to adhere all my elements.

Finally, I added some fun little sparkle detailing with Stickles Glitter Glue on the bunting banner. And I used a white gel pen to create some very subtle white highlights on my letters. 

And that does it for my birthday card inspiration for today!! Thank you so much for joining me! I will see you next time, but until then HAPPY CRAFTING!!! 

----------------------------------------

Hello Crafty Friends! Catherine here, sharing a cheery Let’s Party card created with the adorable pandas from Panda Party Stamps!

Sunny Studio Stamps: Panda Party Birthday Card by Catherine Cohen (featuring Bold Balloons, Chloe Alphabet Dies)

To start, I trimmed a piece of ribbon patterned paper from the Spring Fever Paper pack into size 4.25” x 5.5.” Next, I die cut a frame using Fancy Frames Rectangle Dies. I trimmed a piece of vellum with my paper trimmer and adhered it onto the back of the frame.  I placed some Rainbow Dot Confetti onto the center of the card and adhered the frame onto the card with foam tape.

Using Bold Balloons Stamps and Bold Balloons Dies, I stamped and die cut the star balloons and confetti streamers (I used the streamers as the balloon string ends). I used the following Altenew ink colors:

Pink: Pink Diamond, Pinkalicious
Orange: Autumn Blaze, Sunkissed
Yellow: Fresh Lemon, Citrus Burst
Green: Grass Field, Firefly
Blue: Persian Blue, Iceberg

Sunny Studio Stamps: Panda Party Birthday Card by Catherine Cohen (featuring Bold Balloons, Chloe Alphabet Dies)

I added “PARTY” with Chloe Alphabet Dies die cut out of white cardstock onto the balloons. I stamped the pandas and party hats from Panda Party Stamps and die cut the images with Panda Party Dies.

I added the word “Let’s” from Silly Sloths. There is a large selection of colored envelopes A2 Rainbow Envelopes to coordinate with the card. As all the colors are so pretty, I couldn’t decide which one to use so I included an assortment in the photo.

Thanks so much for stopping by today!  For more inspiration, please feel free to visit me at Crafti-Cat.

Sunny Studio Supplies Used:

Chloe Alphabet Dies
Chloe Alphabet Dies
Shop at:
Sunny Studio
Bold Balloons Stamps
Shop at:
Sunny Studio
Bold Balloons Dies
Bold Balloons Dies
Shop at:
Sunny Studio
Fancy Frames- Rectangles
Shop at:
Sunny Studio
Silly Sloths Stamps
Silly Sloths Stamps
Shop at:
Sunny Studio
Panda Party Stamps
Panda Party Stamps
Shop at:
Sunny Studio
Panda Party Dies
Panda Party Dies
Shop at:
Sunny Studio
Hayley Lowercase Alphabet Dies
Shop at:
Sunny Studio
Hayley Uppercase Alphabet Dies
Shop at:
Sunny Studio
Spring Fever Paper
Spring Fever Paper
Shop at:
Sunny Studio

Tuesday, February 7, 2023

Tranquil Tulips Cards with Isha and Lien

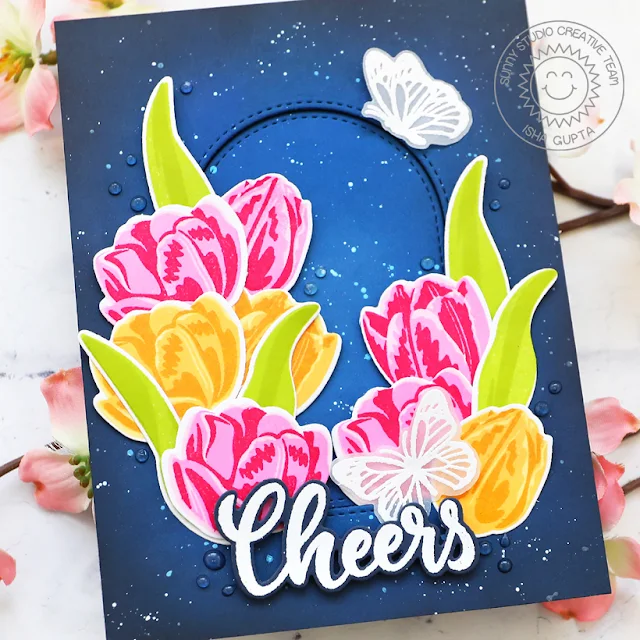
Hello everyone! Isha here with a floral card featuring the Tranquil Tulips stamps and dies. I love the layering stamp as it creates dimension without spending much time coloring.

Sunny Studio Stamps: Tranquil Tulips Card by Isha Gupta (featuring Stitched Arch Dies, Big Bold Greetings, Watering Can)

I started by sponging various blue and black soot distress inks to create the ombré background. Die-cut the window using the Stitched Arch dies. Adhere the center arc to a blue card base. Now adhere the negative part using 3d foam to the card base. Flick white paint.

Sunny Studio Stamps: Tranquil Tulips Card by Isha Gupta (featuring Stitched Arch Dies, Big Bold Greetings, Watering Can)

Stamp the images using pinks and yellows for the tulips and greens for the leaves, die-cut using the coordinating dies. Adhere to the card. Stamp the word "CHEERS" from the Big Bold Greetings stamp, using versamark ink onto a dark blue card, sprinkle WOW! opaque white embossing powder and heat set. Die-cut using the coordinating dies. Stamp and emboss the butterflies onto vellum from the Watering Can stamp, die-cut using the dies

Assemble all the images to the card. To finish I added some nuvo jewel drops in grey mist.

Thank you for dropping by and have a nice day.
________________________________________

Hi crafty friends! It's Lien here back with a fun field of tulips!

Sunny Studio Stamps Tranquil Tulips Spring Flower Field Hello Card by Lien Leysen
For this card I started out by stamping out the Tranquil Tulips quite a few times.  I wasn't entirely sure what I wanted to make yet, and mass producing some images to use later on is a great way to clear my head and get into a crafty zone. 

To mass produce layered stamped images like this, I die cut a bunch of blank pieces first with the coordinating dies. I also saved a piece of paper with all the negative spaces of the flowers in it. On the back of that, I put a bit of purple tape so the sticky side would peak through to the front. I put that piece of cardstock in my Misti and puzzled in the blank die cuts. I line up the first layer of the stamps and stamp it on all of my blanks first in different colors. I used purples, pinks, oranges and yellows. 

After the first layer is stamped on all of the blank die cuts, I puzzle them back into the guide paper and line up the second layer of the stamps. I do this for all the layers of these beautiful tulips. This saves you time because you don't have to line up the dies for every single image. 

Sunny Studio Stamps Tranquil Tulips Spring Flower Field Hello Card by Lien Leysen

For my background I used Distress Spray Stains on watercolor cardstock for a quick watercolor look. You can also do this by adding a lot of water to your ink smooshing.

I propped all of the tulips up on foam tape at the bottom of the card and finished it by die cutting a sentiment using the Hayley alphabet die sets, I used both the uppercase alphabet and the lowercase alphabet. Before die cutting the letters, I actually put a piece of foam tape on the back of my colored cardstock. It's easy to die cut through thin foam tape and make your own puffy stickers.

Sunny Studio Supplies Used:

Stitched Arch Dies
Stitched Arch Dies
Shop at:
Sunny Studio
Watering Can Stamps
Watering Can Stamps
Shop at:
Sunny Studio
Watering Can Dies
Watering Can Dies
Shop at:
Sunny Studio
Big Bold Greetings Stamps
Shop at:
Sunny Studio
Big Bold Greetings Dies
Shop at:
Sunny Studio
Tranquil Tulips Stamps
Shop at:
Sunny Studio
Tranquil Tulips Dies
Shop at:
Sunny Studio
Hayley Lowercase Alphabet Dies
Shop at:
Sunny Studio
Hayley Uppercase Alphabet Dies
Shop at:
Sunny Studio

Monday, February 6, 2023

Hayley Alphabet Focused Cards with Bobbi and Cathy

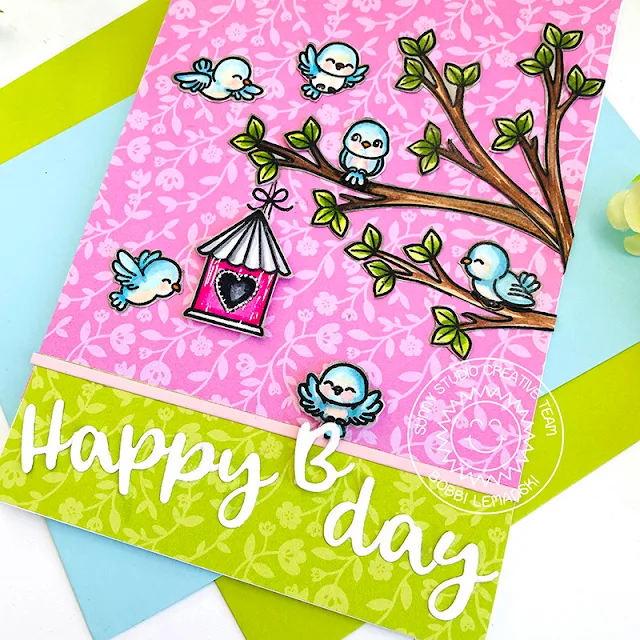
Hi crafters, Bobbi here! I’m sharing a card featuring the new and beautiful Sunny Studio's Hayley Alphabet dies. The letters come in uppercase and lowercase and fit together to create cursive-style words and sentiments. With the help of one sweet bird from the Little Birdie stamp set, I’ve turned a “Happy Day” into a “Happy B-Day,” with one simple letter, B! This feathered friend just swooped in to turn the day into an even more special birthday!

Sunny Studio Stamps: Haley Alphabet Die Focused Birthday Card by Bobbi Lemanski (featuring Little Birdie)

To make this 5″ X 7″ card, I stamped and cut out six different birds, the birdhouse, and four tree limbs. I colored them using the following Copic markers:

Birds: B04, B02, B00 E53, E51 and R81
Birdhouse: RV17, RV09, RV02, 100, C7, C5, and C3
Limbs: E59, E57, E55, E47, E43
Leaves: YG67, YG23, YG03

Sunny Studio Stamps: Haley Alphabet Die Focused Birthday Card by Bobbi Lemanski (featuring Little Birdie)

For the card base, I used two pattern papers from the Spring Fever pattern paper pad. The pink is 5-1/2″ long X 5″ wide and the green paper is 1-1/2″ long X 5″ wide. I attached a light pink cardstock strip measuring 1/8″ thick to the seam for a more finished look.

I cut out the Hayley letters from white cardstock and attached the letters in the green band area. I added the “B”  letter to the bird’s feet and attached the bird and letter using foam dots to make it stand out. This happy day is now a Happy B-day!

Thanks for stopping by today. If you want to see more ideas and inspiration from me, subscribe to my blog, BobbiHartDesign.com. I’ll send you updates on new posts! You can also find me on Instagram as @BobbiHartDesign and on Facebook as BobbiHartDesign

-----------------------------------------------

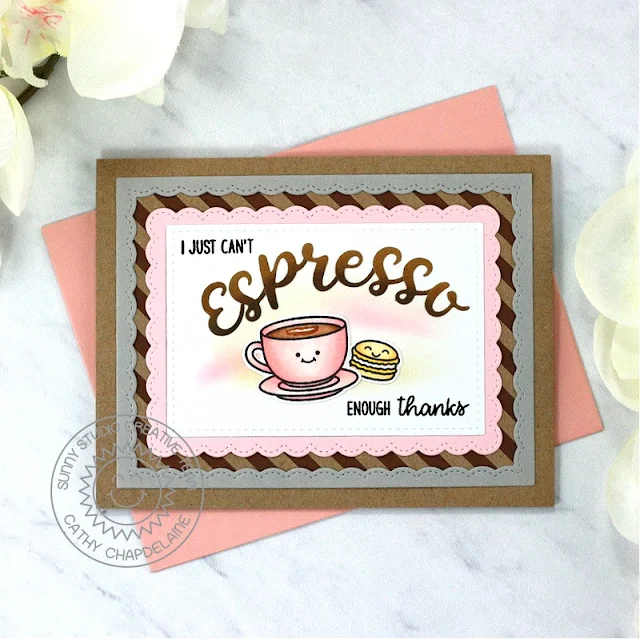
Hey friends! Cathy here today with a card espresso-ing a little thanks! I just love the scripty font of the Hayley Uppercase and Lowercase Alphabet Dies and how much of a statement they can make on a card front!

Sunny Studio Stamps: Haley Alphabet Die Focused Card by Cathy Chapdelaine (featuring Fancy Frame Dies, Stitched Rectangle Dies, Frilly Frame Dies, Paris Afternoon)

I went with a clean and simple design on this A2 card to really let the alphabet dies take center stage. I started by cutting a piece of kraft cardstock 4 1/4" x 5 1/2” and centered a Frilly Frames Stripes Die on the panel. After die-cutting the piece, I cut a piece of dark brown cardstock 3 3/4" x 5 1/4” and adhered it to the back of the kraft cardstock. I then adhered this to an A2 card base.


Next, I die-cut a piece of gray cardstock with a Fancy Frames Rectangles Die and adhered the frame surrounding the stripes. For the focal point of my card, I die-cut a piece of white cardstock with a Stitched Rectangles Die and heat embossed sentiments from the Words of Gratitude Stamps in the corners. I then softly inked the center of the rectangle with Antique Linen and Spun Sugar Distress inks. I die-cut a piece of pink cardstock with a Fancy Frames Rectangle Die for a mat and adhered these pieces to the center of the card.


Sunny Studio Stamps: Haley Alphabet Die Focused Card by Cathy Chapdelaine (featuring Fancy Frame Dies, Stitched Rectangle Dies, Frilly Frame Dies, Paris Afternoon)
 

For the Espresso sentiment, I inked a piece of white cardstock with Brushed Corduroy, Walnut Stain and Ground Espresso Distress inks in a gradient and die-cut the piece with the Hayley Uppercase and Hayley Lowercase Alphabet Dies. I love how these letters look in a slightly rounded form. They wrap so nicely!


To finish, I stamped the cup and macaron from the Paris Afternoon Stamps on Neenah Classic Crest 80lb solar white cardstock, colored them with Copics, and die-cut them using the coordinating dies. I added sweet smiley faces to them using the Summer Sweets Stamps.


I hope you enjoyed and thanks for stopping by today! For more inspiration, please visit my blog www.inkredibleadventures.com and you can also find me on Instagram as @cathy.chapdelaine.


Sunny Studio Supplies Used:


Stitched Rectangle Dies
Shop at:
Sunny Studio
Words of Gratitude Stamps
Shop at:
Sunny Studio
Fancy Frames- Rectangles
Shop at:
Sunny Studio
Frilly Frames Stripes Die
Shop at:
Sunny Studio
Summer Sweets Stamps
Shop at:
Sunny Studio
Little Birdie Stamps
Shop at:
Sunny Studio
Little Birdie Dies
Little Birdie Dies
Shop at:
Sunny Studio
Paris Afternoon Stamps
Shop at:
Sunny Studio
Paris Afternoon Dies
Shop at:
Sunny Studio
Hayley Lowercase Alphabet Dies
Shop at:
Sunny Studio
Hayley Uppercase Alphabet Dies
Shop at:
Sunny Studio
Spring Fever Paper
Spring Fever Paper
Shop at:
Sunny Studio