Thursday, September 15, 2022

Too Cute To Spook Cards with Alma and Waleska

Boooooo, this is Alma and I'm totally in Halloween craft fever. When I first saw the Too Cute to Spook stamps set, I was blown away! How cute is that? I love the characters and the scene elements are especially great! The Haunted House and the tree! So beautiful.


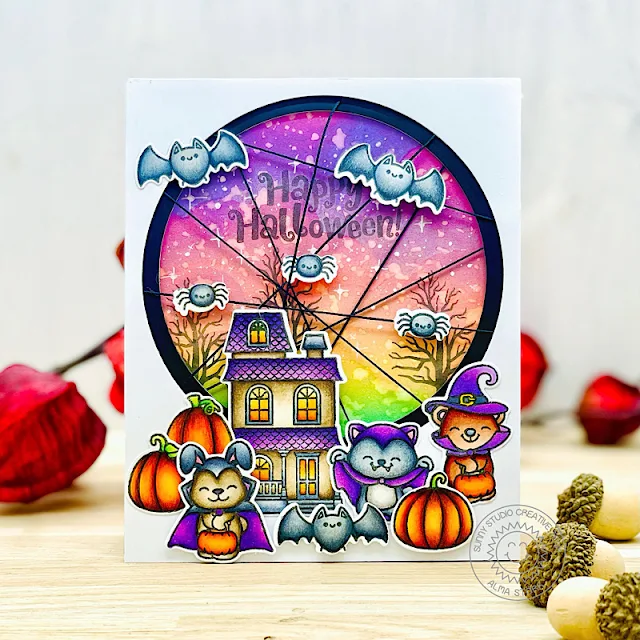
Sunny Studio Stamps: Too Cute to Spook Halloween Card by Alma Störk (featuring Slimline Dies)

First I coloured all the images with the Copics and punched them out with the corresponding Too Cute to Spook diesThen I cut out two rectangles as a base for the card and cut out a round hole (one in white and one in black). I punched a larger hole in the white cardstock and a smaller hole in the black one.


Sunny Studio Stamps: Too Cute to Spook Halloween Card by Alma Störk (featuring Slimline Dies)
 
Then I wiped a rectangle with the distress colours "Twisted Citron", "Carved Pumpkin", "Crackling Campfire" and "Wilted Violet". Afterwards I punched out the clouds of the Slimline Nature Borders Dies as a stencil and applied a second layer of colour with clouds. Then I stamped Happy Halloween and added highlights with the white gel pen.


Now I cut the edge of the black cardstock and wrapped a spider web around the hole with black thread. Finally I glued all the layers together with 3D pads and put the images on top!


BOOOOOOO!!

-------------------------------------------

Hi there, Waleska here! Today I am sharing more inspiration from the newest release! My card features the Too Cute to Spook Stamp Set and Fall Scenes Stamp. This two sets are absolutely adorable and typical Sunny Studio Designs.

Sunny Studio Stamps: Too Cute to Spook Halloween Card by Waleska Galindo (featuring Fall Scenes)

For my card today I used a lot of making tape because I wanted to create a one layer scene. I started by stamping the Spooky house from the Fall Scenes leaving some space at the bottom of the card for the cute Halloween critters. I colored the house with Copic markers and the rest of the scene with oxide inks in colors: Peeled Paint for the grassy area, Seedless Preserves, Carved Pumpkin and Black Soot for the Sky and Pumice Stone for the street.

I choose three of the cute critters, stamp and colored them, I adhered them to the front of the card as if they are ready to trick or treat in that spooky house, I added a couple of bats and some extra spooky tree and spider web too.  

Sunny Studio Stamps: Too Cute to Spook Halloween Card by Waleska Galindo (featuring Fall Scenes)

I finally added the sentiment with Versafine ink and assemble this piece to a white panel and then to a black card base. Thank you so much for visiting today! Remember to stay crafty because today is only lived once, do what you love and enjoy it!

Sunny Studio Supplies Used:

Slimline Nature Borders
Shop at:
Sunny Studio
Fall Scenes Stamps
Fall Scenes Stamps
Shop at:
Sunny Studio
Fall Scenes Dies
Fall Scenes Dies
Shop at:
Sunny Studio
Too Cute To Spook Stamps
Shop at:
Sunny Studio
Too Cute To Spook Dies
Shop at:
Sunny Studio

Wednesday, September 14, 2022

Autumn Greenery Die Focused Cards with Alma and Marie

Hello this is Alma and today I want to share with you an autumn inspiration that even glows in the dark. So at the recipient a really autumnal coziness comes up.

Sunny Studio Stamps: Autumn Greenery Die Focused Card by Alma Störk (featuring Sparkle Word Die, Woodgrain Embossing Folder)

First, I embossed watercolour paper with the Woodgrain Embossing folder. Then I wiped the paper with Distress Oxide Inks in Walnut Stain, Ground Espresso, Frayed Burlap and Black Soot and sprinkled with water.

Afterwards I attached the narrow battery of a string of lights inside the card and pulled the cable through a hole to the front.

Sunny Studio Stamps: Autumn Greenery Die Focused Card by Alma Störk (featuring Sparkle Word Die, Woodgrain Embossing Folder)

I draped the fairy lights in a wreath and glued them in place. Then I punched out lots of leaves with the Autumn Greenery Dies and colored them with Copics. After that I punched out leaves from vellum and worked them all into the garland of lights, creating a 3D effect. Finally, I punched out four papers with the Sparkle Word Die in black, glued them together to make them stable and sticked them into the wreath. Finally, I glued nylon thread into the wreath as decoration. Now the wreath can start glittering!

Have a great autumn!

---------------------------------------

Hello Crafty Friends! This is Marie back again for another card inspiration! Today I am featuring the Autumn Greenery Die to create a Fall Blessings card. 

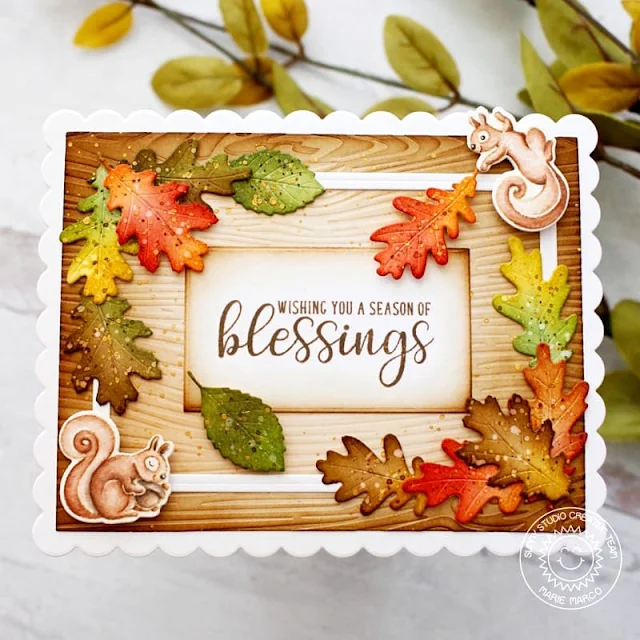
Sunny Studio Stamps: Autumn Greenery Die Focused Card by Marie Marco (featuring Autumn Greetings, Woodgrain Embossing Folder, Squirrel Friends)

Fall is my favorite time of the year! I love when things start to finally cool down, when pumpkin spice fills my coffee mug, and when I can finally start to anticipate the holidays, but one of the most recognizable signs I love and look forward to is when leaves transition into beautiful colors. What a pleasure it was to be able to create my own fall leaves using these amazing Autumn Greenery Die.

I start off by die cutting my leaves from Bristol Smooth white cardstock. I always use bristol smooth cardstock when I ink blend because the smoothness of the paper really helps distress inks blend together like butter. In no particular order here are all the distress inks I used to ink blend my leaves : Festive Berries, Fired Brick, Wild Honey, Scattered Straw, Mowed Lawn, Rustic Wilderness, Vintage Photo, and Walnut stain. After ink blending I splattered the leaves with water droplets, and vintage photo distress ink. I also gave my leaves some gold splatters using Altenew Metallic Watercolors. 

I then die cut an A2 sized piece of bristol smooth cardstock and embossed it using the Sunny Studio Woodgrain 6x6 Embossing Folder. I love this embossing folder! Taking my woodgrain embossed A2 panel, I ink blended the edges using Vintage Photo and Walnut Stain Distress Ink. 

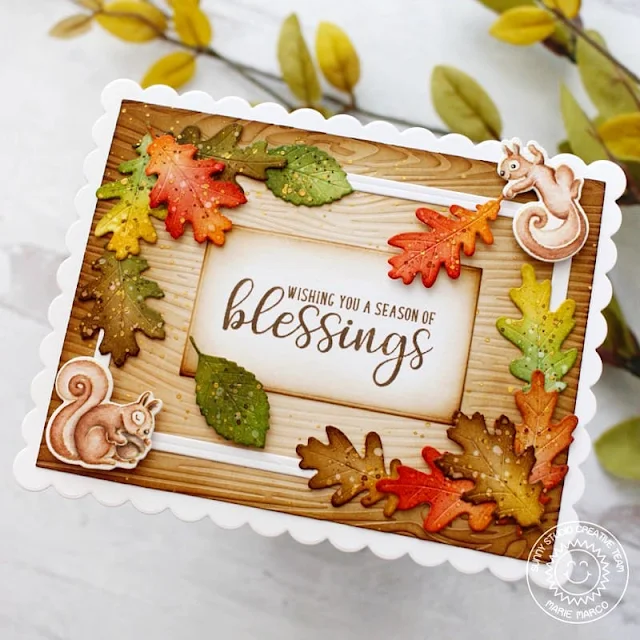
Sunny Studio Stamps: Autumn Greenery Die Focused Card by Marie Marco (featuring Autumn Greetings, Woodgrain Embossing Folder, Squirrel Friends)

To add a super cute touch to my card, I also used the Squirrel Friends Stamps from the latest Fall/WInter Release. I stamped a few images onto watercolor paper and used Derwent Inktense Pencils to color. I cut them out using the corresponding dies

I cut out a sturdy Base panel from Neenah solar white 110 lb cardstock using a scalloped edged die. I took my woodgrain panel and attached it to my white base and a white frame in the center for my leaves. I cute out a rectangle for my sentiment using the Autumn Greetings stamp set. I love how this sentiment and its elegant font. 

I positioned and attached all my elements using Bearly Art Precision Craft Glue, ScorTape, and Foam tape to give some leaves and my squirrels some dimension. And that does it for today's card inspiration! I hope that I've inspired you to create some leaf themed cards not just for fall, but for all year round! These Autumn greenery dies are a year round staple! Until next time, Happy Crafting!!! 

Sunny Studio Supplies Used:

Autumn Greetings Stamps
Shop at:
Sunny Studio
Sparkle Word Die
Sparkle Word Die
Shop at:
Sunny Studio
Woodgrain Embossing
Woodgrain Embossing
Shop at:
Sunny Studio
Squirrel Friends Stamps
Shop at:
Sunny Studio
Squirrel Friends Dies
Shop at:
Sunny Studio
Autumn Greenery Dies
Shop at:
Sunny Studio

Tuesday, September 13, 2022

Fall Scenes Cards with Isha and Kavya

Hello everyone! Isha here with you with a fun autumn theme card featuring the new Fall Scenes Stamp and dies. This stamp gives a perfect starting point to any scene card and makes it so easy.

Sunny Studio Stamps: Fall Scenes Card by Isha Gupta (featuring Squirrel Friends, Too Cute to Spook)

I started by creating the sky by sponging scattered straw, worn lipstick, kitsch flamingo and peacock feathers distress inks onto a white panel. Flick some ink to this. Die-cut this panel using the Frilly Frame Quatrefoil die.

Stamp the images and die-cut using the coordinating dies. Color using copic markers.

Tree and fence, leaf cluster, raker - Fall Scenes stamps and dies
Squirrels - Squirrel Friends stamp and die
Pumpkins - Too Cute To Spook stamp and die
Scare-crow - Farm Fresh stamp and die
Sentiment - Fall Friends

Sunny Studio Stamps: Fall Scenes Card by Isha Gupta (featuring Squirrel Friends, Too Cute to Spook)

Adhere all the images to create the scene. Add some details using a white gel pen. 

Thank you for stopping by and have a nice day!

---------------------------------------

Hi folks, Kavya here. I am back on the blog with another fun project! The new Mini Mat & Tag dies are perfect for creating mini note cards and obviously - mini critter scenes. I used the new Fall Scenes Stamp set to create a fun autumn scene and I love how this looks! 

Sunny Studio Stamps: Fall Scenes Card by Kavya (featuring Mini Mat & Tag Dies, Fall Kiddos)

I first die cut Mini Mat & Tag 4 out of white cardstock and ink blended the background using blue dye inks. Then, I cut the a tree background using Fall Scenes Stamp and some critters from Fall Kiddos

Sunny Studio Stamps: Fall Scenes Card by Kavya (featuring Mini Mat & Tag Dies, Fall Kiddos)

Added them on to the background and finished it off by adding a sentiment and matting it on some patterned paper from Sweater Weather.

That’s it folks! I hope you enjoyed this fun project :) Happy Crafting!

Sunny Studio Supplies Used:

Fall Friends Stamps
Fall Friends Stamps
Shop at:
Sunny Studio
Fall Kiddos Stamps
Fall Kiddos Stamps
Shop at:
Sunny Studio
Fall Kiddos Dies
Fall Kiddos Dies
Shop at:
Sunny Studio
Frilly Frames Quatrefoil
Shop at:
Sunny Studio
Farm Fresh Stamps
Farm Fresh Stamps
Shop at:
Sunny Studio
Farm Fresh Dies
Farm Fresh Dies
Shop at:
Sunny Studio
Sweater Weather Paper
Shop at:
Sunny Studio
Fall Scenes Stamps
Fall Scenes Stamps
Shop at:
Sunny Studio
Fall Scenes Dies
Fall Scenes Dies
Shop at:
Sunny Studio
Squirrel Friends Stamps
Shop at:
Sunny Studio
Squirrel Friends Dies
Shop at:
Sunny Studio
Too Cute To Spook Stamps
Shop at:
Sunny Studio
Too Cute To Spook Dies
Shop at:
Sunny Studio
Mini Mat & Tag 4 Dies
Shop at:
Sunny Studio

Monday, September 12, 2022

Autumn Tree Cards with Bobbi and Cathy

They say money doesn’t grow on trees, but how about love? If you love apples, you’ll love the new Autumn Tree Dies. You can fill this tree with various leaves to make different trees and even bright red-filled apple trees. It’s Bobbi here with an apple tree card made with love using the new dies by Sunny Studio. 


Sunny Studio Stamps: Autumn Tree Die Focused Card by Bobbi Lemanski (featuring Stitched Rectangles)


I created this 5″ X 7″ card using the Autumn Trees dies and pattern papers from the Sweater Weather paper pack. I used two teal pattern papers for the background. I added the tree and attached the leaves and apples. I kept the apples on the lower branches to create “low hanging fruit.” Those are so much easier to pick later.  


I used the following colors to color the images:
Tree trunk/branches: E49, E59, E57, E55

Apples and heart: R29, R17, R14, YG00
Leaves: YG67, YG17, YG03, YG00


Sunny Studio Stamps: Autumn Tree Die Focused Card by Bobbi Lemanski (featuring Stitched Rectangles)


Did you notice the cute heart in the middle of the trunk? I used a die cut from the 
Bursting Hearts Die. I colored it to match the apples. I also added a little bling to the heart and the tree using the Red Zircon Jewels.


Lastly, I added a band of a Sweater Weather pattern paper. I enhanced the strip by adding white stitches using my Gelly Roll white gel pen and stamped the "Thinking of You" phrase from the Watering Can set between the stitching lines. This is a very easy card to make, but be prepared to add lots of leaves! It’s addicting. 


Thanks for stopping by today. If you want to see more ideas and inspiration from me, subscribe to my blog, BobbiHartDesign.com. I’ll send you updates on new posts! You can also find me on Instagram as @BobbiHartDesign and on Facebook as BobbiHartDesign.


-------------------------------------------

Hey friends! Cathy here today and it looks like love is in the trees for at least one of these little squirrels!


Sunny Studio Stamps: Autumn Tree Die Focused Card by Cathy Chapdelaine (featuring Fall Scenes, Squirrel Friends)
 
To create my card, I started by die-cutting a piece of Neenah Classic Crest 80lb solar white cardstock using a Stitched Rectangle die. I lightly inked the sky with Tumbled Glass Distress ink on the top half of the piece and Antique Linen on the bottom half. I added a die-cut cloud using the Tropical Trees Backdrop Die. Setting this piece aside, I die-cut another piece of Neenah Classic Crest 80lb solar white cardstock with the Stitched Rectangle die and stamped the fence portion of a Fall Scenes stamp 1 1/2" from the bottom. I colored the stamped image with Copics, inked the grass below with Shabby Shutters and Crushed Olive Distress inks and heat embossed the sentiment. I then used the coordinating dies to the Fall Scenes stamps to die-cut along the fence line and adhered this piece to the bottom of the inked sky cardstock piece.


Sunny Studio Stamps: Autumn Tree Die Focused Card by Cathy Chapdelaine (featuring Fall Scenes, Squirrel Friends)
 
Next, I die-cut 2 trees and leaves using the Autumn Tree Dies and colored them with Copics. I adhered one to each side of the cardstock piece overlapping the edges and used precision tip scissors to cut carefully along the edges of the cardstock. I stamped and colored the 2 adorable little squirrels and acorns from the Squirrel Friends stamps with Copics and die-cut them using the coordinating dies.


For the hearts above my amorous little squirrel, I inked a piece of white cardstock with Saltwater Taffy Distress ink and die-cut the piece using the Bursting Hearts die. This gave me a bunch of different sized hearts that I heat embossed with clear embossing powder for a little shine. I adhered the panel to a light gray A2 card front.


I hope you enjoyed and thanks for stopping by today! For more inspiration, please visit my blog www.inkredibleadventures.com and you can also find me on Instagram as @cathy.chapdelaine.


Sunny Studio Supplies Used:


Stitched Rectangle Dies
Shop at:
Sunny Studio
Sweater Weather Paper
Shop at:
Sunny Studio
Bursting Heart Die
Bursting Heart Die
Shop at:
Sunny Studio
Watering Can Stamps
Watering Can Stamps
Shop at:
Sunny Studio
Tropical Trees Backdrop
Shop at:
Sunny Studio
Fall Scenes Stamps
Fall Scenes Stamps
Shop at:
Sunny Studio
Fall Scenes Dies
Fall Scenes Dies
Shop at:
Sunny Studio
Squirrel Friends Stamps
Shop at:
Sunny Studio
Squirrel Friends Dies
Shop at:
Sunny Studio
Autumn Tree Die
Autumn Tree Die
Shop at:
Sunny Studio