Wednesday, September 7, 2022

Too Cute to Spook Cards with Marie and Marine

Hello Crafty Friends, Marie here! I am super excited to share this card with you today because it features my most favorite holiday of the whole entire year, Halloween! This card features the adorable stamp set Too Cute To Spook, as well as the Fall Scenes stamps. 

Sunny Studio Stamps: Too Cute to Spook Halloween Card by Marie Marco (featuring Fall Scenes)

For this project, I start off by die cutting an A2 sized panel from watercolor paper (this panel is where I stamp my haunted house/fall scene image).  I stamp all my images using Distress Ink in "Antique Linen". I then proceed to water color my images using Derwent Inktense Pencils.  I then die cut all the images using the Too Cute to Spook corresponding dies
and the Fall Scenes corresponding dies.

After coloring my images, I die cut my A2 Background panel using bristol smooth cardstock, and a scalloped rectangle panel in Neenah solar white 110 lb cardstock as my base. 

I inked up my background using Distress Oxide in "Shabby Shutters" then going to a darker green in Distress ink "Rustic Wilderness" and finally to Make the edges super dark, I used Black soot Distress ink. I also embossed my sentiment and bats using black embossing powder. 

Sunny Studio Stamps: Too Cute to Spook Halloween Card by Marie Marco (featuring Fall Scenes)

I proceeded to adhere my A2 background to my scalloped base and attached all my critters and pumpkins. I wanted to give the trick or treaters a Hocus Pocus vibe by adding some matching rhinestone embellishments from Sunny Studio. I love how just adding embellishments just makes a card come to life. 

I hope you were inspired to create some Spooktacular Halloween cards for all your friends and loved ones this year! Until next time, Happy Crafting!!!

---------------------------------------------

Hello crafty friends! Marine here, back with some spooky cute inspiration showcasing the brand new Too cute to spook stamp set, super adorable with fun critters all dressed up to go trick or treating in the neighborhood. Love their happy faces and fun costumes! This set includes everything you need to create a sweet and spooky little scene.

Sunny Studio Stamps: Too Cute to Spook Halloween Card by Marine Simon

I first started by stamping my images using an alcohol marker friendly black ink: three critters, the house, some dead trees and pumpkins, as well as two cute spiders and spider webs. I cut them all using the coordinating dies, and then colored everything using my alcohol markers.

Sunny Studio Stamps: Too Cute to Spook Halloween Card by Marine Simon

Next I cut all the different pieces to build my pop-up card. I went with black mostly, and embossed my "Happy Halloween" sentiment from Too cute to spook in silver on the foreground element. I cut the grass borders out of dark green cardstock, and created a night sky using blueprint sketch, chipped sapphire and black soot oxide inks. 

Sunny Studio Stamps: Too Cute to Spook Halloween Card by Marine Simon

I assembled all those pieces to build the card base, and then I attached all my cute images on the grass borders using 3mm glue dots. I also wanted a couple of bats to fly in the sky, so I attached them on thin strips of acetate, and finally stuck those strips inside the box, using glue dots again.

Sunny Studio Stamps: Too Cute to Spook Halloween Card by Marine Simon

And that's it! I hope that you like this adorable and spooky little scene. As always, feel welcome to watch the process video (click on the image above) for more details and information about this pop-up card. Thank you so much for stopping by and see you next week!

Sunny Studio Supplies Used:

Fall Scenes Stamps
Fall Scenes Stamps
Shop at:
Sunny Studio
Fall Scenes Dies
Fall Scenes Dies
Shop at:
Sunny Studio
Too Cute To Spook Stamps
Shop at:
Sunny Studio
Too Cute To Spook Dies
Shop at:
Sunny Studio

Tuesday, September 6, 2022

Autumn Greenery Die Focused Cards with Kavya and Isha

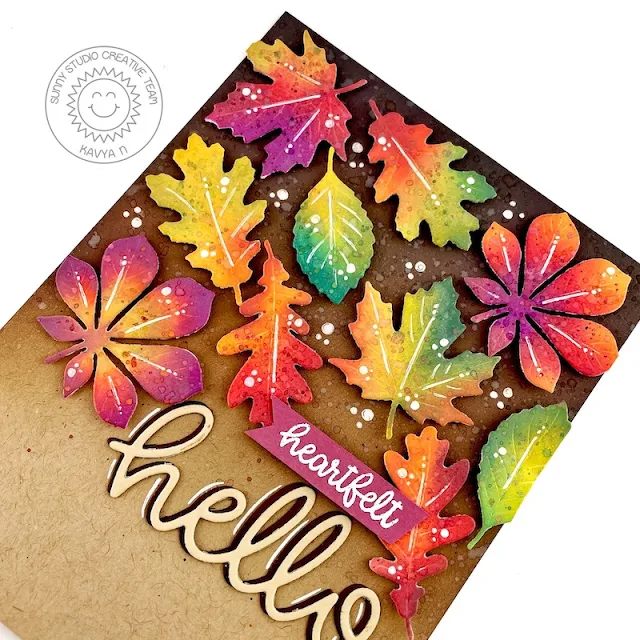
Hi folks, Kavya here. I am back on the blog with another fun project! Anyone who is familiar with my work knows that I love making things realistic. The new Autumn Greenery dies in the latest release were a perfect opportunity for me to try out some realistic ink bending!

Sunny Studio Stamps: Autumn Greenery Everyday Card by Kavya (featuring Hello Word Die)

I first started off by prepping my background. I ink blended an edge of kraft cardstock with some brown die ink and splattered some white and brown paint. Then, I die cut the leaves from Autumn Greenery using white cardstock and ink blended it using different shades of green, yellow, orange, red and purple distress oxide inks. 

Sunny Studio Stamps: Autumn Greenery Everyday Card by Kavya (featuring Hello Word Die)

I then splattered some water drops and added details using a white gel pen. Then, I placed the leaves onto the brown background and added a heat embossed sentiment and a die cut Hello Word to finish off my card!

That’s it folks! I hope you enjoyed this fun project :) Happy Crafting! 

------------------------------------------

Hello everyone, Isha here! Today, I am featuring the Autumn Greenery Dies with you. I love autumn, mainly because of the crisp air and the colors. These new dies are perfect with some intricate impressions.

Sunny Studio Stamps: Autumn Greenery Everyday Card by Isha Gupta (featuring Mini Mat & Tag Dies)

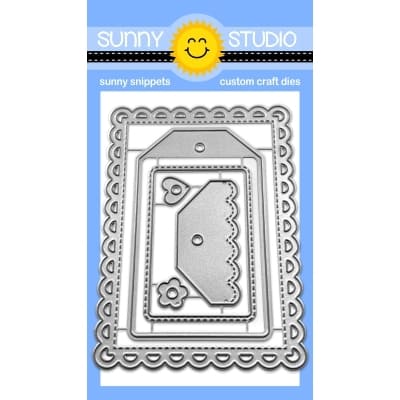
I started by creating the background layer. I took a white card and embossed it using the Cable Knit embossing folder. I then sponged kitsch flamingo and dried marigold distress inks. Flick gold watercolor. Next I die-cut the mat layer using the new Mini Mat and Tag 3 dies. Then I stamped the sentiment using the Cherry Blossoms stamp. Add gold watercolor to the edges. Adhere these mat layers to the card.

Sunny Studio Stamps: Autumn Greenery Everyday Card by Isha Gupta (featuring Mini Mat & Tag Dies)

Die-cut various leaves from the Autumn Greenery dies, add distress ink for the color. Flick water and gold watercolor. Adhere to the card.

Thank you for dropping by and have a nice day!

Sunny Studio Supplies Used:

Hello Word Die
Hello Word Die
Shop at:
Sunny Studio
Cable Knit Embossing
Shop at:
Sunny Studio
Cherry Blossoms Stamps
Shop at:
Sunny Studio
Autumn Greenery Dies
Shop at:
Sunny Studio
Mini Mat & Tag 3 Dies
Shop at:
Sunny Studio

Monday, September 5, 2022

Fall Scenes Cards with Cathy and Bobbi

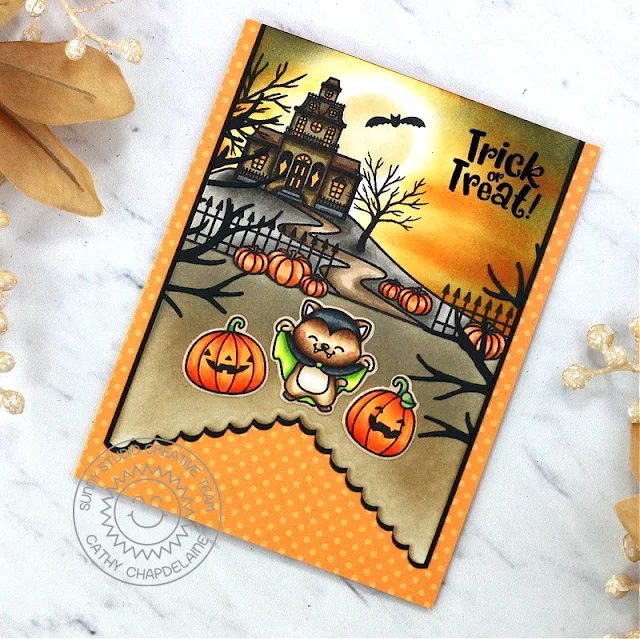
Hey friends! Cathy here sharing a card today featuring the spooktacular haunted mansion from the Fall Scenes stamp set paired with a little cutie from the Too Cute to Spook stamps.

Sunny Studio Stamps; Fall Scenes Card by Cathy Chapdelaine (featuring Too Cute To Spook, Fishtail Banner Dies, Stitched Circle Dies, Autumn Tree Dies)

I started with a piece of Neenah Classic Crest 80lb solar white cardstock cut to 3 3x4” x 5 1/2". I die-cut the bottom edge using a Fishtail Banners II die. I also cut a mat for this panel slightly larger from a piece of black cardstock and die-cut the bottom edge. I stamped the haunted mansion scene towards the top of the cardstock piece and masked the image using eclipse tape. I then inked the ground with Pumice Stone and Frayed Burlap Distress ink.

Sunny Studio Stamps; Fall Scenes Card by Cathy Chapdelaine (featuring Too Cute To Spook, Fishtail Banner Dies, Stitched Circle Dies, Autumn Tree Dies)

To create a spooky night sky, I die-cut a circle from eclipse tape using a 
Stitched Circles Small die and used the negative cut out from the tape to ink a moon with Antique Linen Distress ink. I then masked the moon and inked the sky with Scattered Straw, Wild Honey, Spiced Marmalade and Black Soot Distress inks. I stamped a bat from the Fall Scenes stamps across the moon.

Sunny Studio Stamps; Fall Scenes Card by Cathy Chapdelaine (featuring Too Cute To Spook, Fishtail Banner Dies, Stitched Circle Dies, Autumn Tree Dies)

To finish, I colored the stamped images with Copics and die-cut the Too Cute to Spook images using the coordinating dies. I heat embossed a sentiment from the Too Cute to Spook stamps and adhered a portion of the Autumn Tree die-cut from black cardstock to the left and right sides of the cardstock panel. I cut a piece of paper from the Critter Country paper pack 4 1/4" x 5 1/2" and adhered it to an A2 card base. I then matted the cardstock panel on the black cardstock and adhered it to the card front.

I hope you enjoyed and thanks for stopping by today! For more inspiration, please visit my blog www.inkredibleadventures.com and you can also find me on Instagram as @cathy.chapdelaine. 

----------------------------------------------------

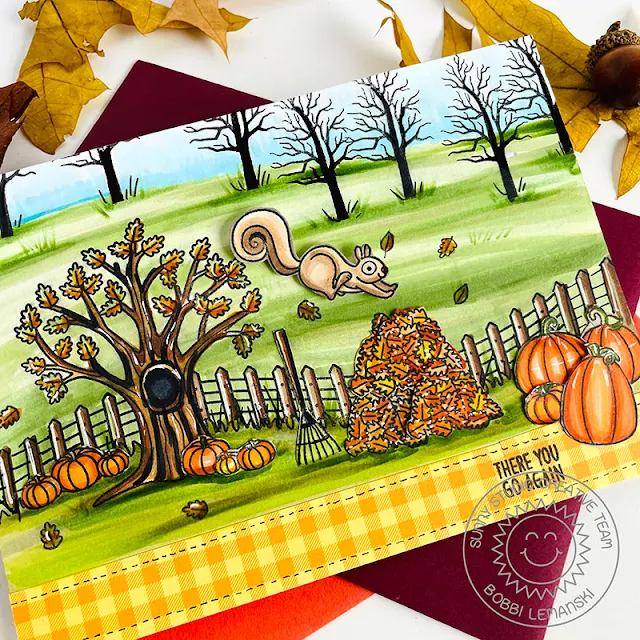
Hello Sunny friends. It’s Bobbi here with a fall scene card featuring some of the new fall sets just released by Sunny Studio Stamps. 


Sunny Studio Stamps; Fall Scenes Card by Bobbi Lemanski (featuring Squirrel Friends, Too Cute to Spook, Words of Gratitude)

Today, I’m using the following products:

Fall Scenes stamps and coordinating dies

Squirrel Friends stamps and coordinating dies

Too Cute to Spook stamps and coordinating dies

Words of Gratitude Stamps

Critter Country Pattern Paper


Sunny Studio Stamps; Fall Scenes Card by Bobbi Lemanski (featuring Squirrel Friends, Too Cute to Spook, Words of Gratitude)

To make this 5″ X 7″ size card, I started by stamping the fence and tree setting from the Fall Scenes stampsNote: Because my card is 7″ wide, I did add in more fencing on both sides to extend the fence line on the card front panel. Next, I created a background landscape using Copic markers in various greens and blues. I used a lot of different greens. Simply explore what you like. I tend to gravitate to yellow-greens for meadows, but since this is a fall scene, I brought in some grayish greens, too. Using the bare silhouette tree from the Too Cute to Spook stamps, I added trees in the background by the sky. This creates some depth in the scene.

Sunny Studio Stamps; Fall Scenes Card by Bobbi Lemanski (featuring Squirrel Friends, Too Cute to Spook, Words of Gratitude)

I stamped the foreground items including: 5 leaf piles, various small pumpkins, and a rake. I also added some larger pumpkins from the Too Cute to Spook stamp set and the flying squirrel is from the Squirrel Friends stamps. Adding the larger pumpkins in the very front provides more scene dimension. All of the images were adhered in place. I popped up the flying squirrel using foam tabs to make him look like he is in the air.

Lastly, I added some designer paper to the bottom of this scene and added faux stitching by hand and a stamped phrase from the Words of Gratitude Stamp set.

Sunny Studio Stamps; Fall Scenes Card by Bobbi Lemanski (featuring Squirrel Friends, Too Cute to Spook, Words of Gratitude)

Inside, I finished the sentiment thought with another one. This card is ready to send!

Thanks for stopping by today. If you want to see more ideas and inspiration from me, subscribe to my blog, BobbiHartDesign.com. I’ll send you updates on new posts! You can also find me on Instagram as @BobbiHartDesign and on Facebook as BobbiHartDesign. Bobbi Hartmann Lemanski, Bobbi Hart♥ Design, Adding h♥art into every design.


Sunny Studio Supplies Used:

Fishtail Banner II Dies
Shop at:
Sunny Studio
Words of Gratitude Stamps
Shop at:
Sunny Studio
Stitched Circle Small Dies
Shop at:
Sunny Studio
Fall Scenes Stamps
Fall Scenes Stamps
Shop at:
Sunny Studio
Fall Scenes Dies
Fall Scenes Dies
Shop at:
Sunny Studio
Squirrel Friends Stamps
Shop at:
Sunny Studio
Squirrel Friends Dies
Shop at:
Sunny Studio
Too Cute To Spook Stamps
Shop at:
Sunny Studio
Too Cute To Spook Dies
Shop at:
Sunny Studio
Autumn Tree Die
Autumn Tree Die
Shop at:
Sunny Studio
Critter Country Paper
Shop at:
Sunny Studio

Sunday, September 4, 2022

Cards & Color Charts using Tombow's ABT Pro Alcohol-Based Markers

Last Christmas Tombow reached out to me for a collaboration with our two teams and while the logistics didn't quite work out, they still mailed me a few of their alcohol based ABT Pro Markers sets to try out and I actually really liked them. The are produced with excellent quality flexible Japanese nibs that are really enjoyable to color with and form a nice fine point that are perfect for coloring small stamp images like ours. They also have some lovely bright colors that Copics doesn't produce so little by little, sale by sale I ended up purchasing the entire line. 

I think the only real downside is they are not refillable, but their reasonable price point (see sales info at the bottom of my post) and their new color options has helped me get past that one flaw. When I was initially looking to add just a few colors to my collection, I was having a really tough time finding anyone who had created real life color charts with side-by-side color comparisons for the entire collection. I didn't feel I could rely on the colors on the caps which is the case with most markers. 

I also found that the 5-pen color groups were a great way to pick up pens at a cheaper price point, however they didn't always appear to have pens grouped together that were the best for blending purposes (some sets are better than others in this department--The red set in particular really needs the help of open stock colors). When I was discovering this issue I was dying to know which open stock colors I would need to purchase to remedy this, but I came up empty in my search so today I thought I would share my own findings for others that might be finding themselves in the same boat. 

To start, here is my (sloppy) coloring of the chart that Tombow provides as a free download on their website HERE (under the product downloads tab). You can click on my image below to view it larger.

Sunny Studio Stamps Blog: Tombow ABT Pro Alcohol Markers Pens 108 Color Chart Swatches Example Filled Out

I also wanted to create my own color chart by placing colors side-by-side that I thought would blend well together to make it easier for me to quickly grab colors while I'm coloring stamp images. In addition, I like to have larger color swatches to fully see the colors so this is what I came up with. It's far from perfect, but you can print and/or download a blank version of my "chart" HERE (just make sure to print it in landscape mode)

While it's impossible to have every color you might want for a blend with "only" 108 colors (vs. Copic's 358 colors) I found I almost always was able to get around this with some tip-to-tip coloring to help blend out shades that might be farther apart than I would have liked. I also think I will start incorporating these colors to fill gaps in shades with my Copics and vice-versa. 

There are quite a few pretty purples and pinks in particular that I have been longing for so I'm super excited for those. I also love some the bright greens, turquoise shades and blues which are also unique to these pens. As a result many of my card samples below focused on these new-to-me colors.

Sunny Studio Stamps Blog: Tombow ABT Pro Alcohol Markers Pens 108 Color Swatch Chart Swatches by Blending Families Groups with Free Download

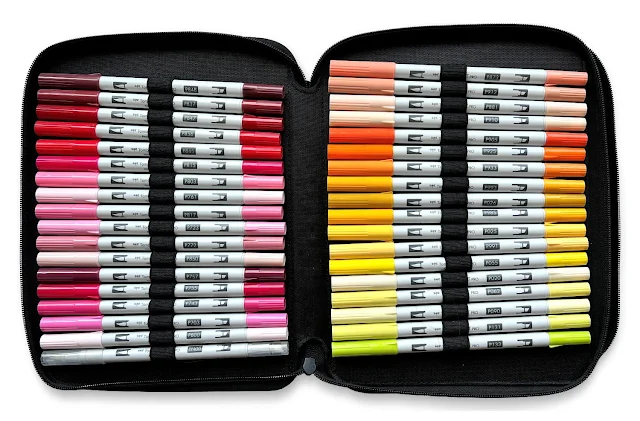
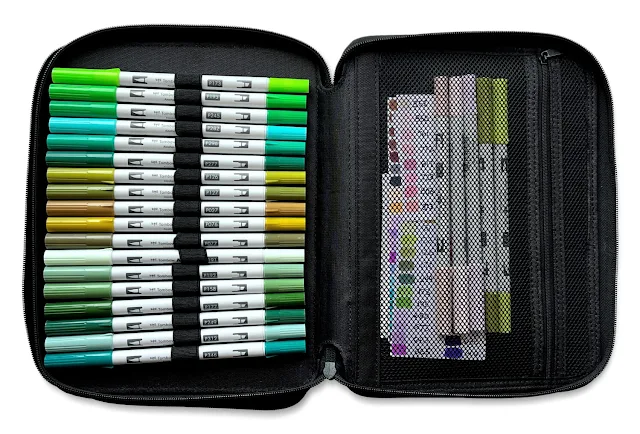
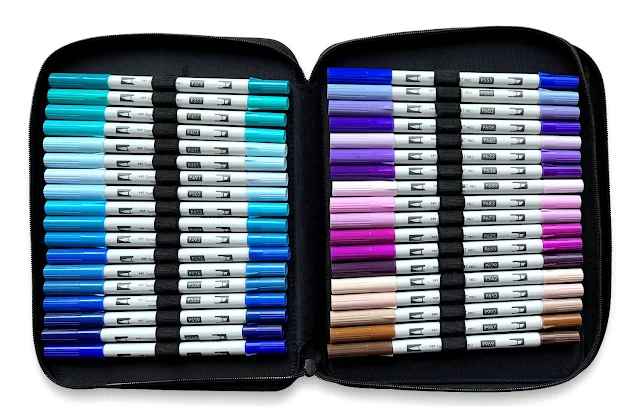
Tombow has these awesome storage cases which have been custom made to perfectly fit their longer markers. Each binder holds 54 pens and there are 108 ABT Pro Marker Colors available so you can fit the entire collection in two binders. The binders come with a zippered pocket on the last flap which I've used to put color swatches and extra pens I've purchased of my most used colors that I want to have back-ups for when my original markers run out of ink. 

Some of these colors might look out of order to you, but I was trying to place them in color blending families similar to my chart so that I could figure out what blended best together even when I might not have my color chart handy. As mentioned earlier, in some cases the cap colors are also misleading.

Sunny Studio Stamps Blog: Tombow Pinks, Reds, Oranges and Yellows ABT Pro Alcohol Based Markers in Black Zippered Storage Case Binder

Sunny Studio Stamps Blog: Tombow Greens & Aquas ABT Pro Alcohol Based Markers in Black Zippered Storage Case Binder

Sunny Studio Stamps Blog: Tombow Teals, Blues, Purples & Violets ABT Pro Alcohol Based Markers in Black Zippered Storage Case Binder

Sunny Studio Stamps Blog: Tombow Browns & Grays Greys ABT Pro Alcohol Based Markers in Black Zippered Storage Case Binder

Shortly after I purchased my binders, Tombow released this amazing Desktop Organizer with stacking trays. I also discovered they have a handy Marker Case that holds all 108 pens in one convenient handled organizer. Oh well... While I'm loving both these other options, I think my zipper binders will travel well with me on the go in a carry-on bag so I have no regrets. I'm also lacking extra counter space so the trays as pretty as they are weren't going to be a viable option for me anyway.

I recently shared a number of cards for our Fall & Holiday release last week using these ABT Pro Markers which I will re-share here just so you can see the type of coloring you can achieve with these pens. While I didn't keep track of the exact blends I used for each card, I think it's fairly easy to figure out using the color chart I shared above. Clicking on the individual card photos will take you to the coordinating blog post where additional details were shared about each card including the links for the Sunny Studio products used.

Sunny Studio Holiday Card (using Tombow ABT Pro Markers, Cozy Christmas, Santa Claus Lane Stamps, Slimline Pennant Dies & Sleek Stripes Paper)Sunny Studio Kids with Presents, Armchair & Pink Holiday Tree Card (using Tombow ABT Pro Markers, Cozy Christmas & Fall Kiddos Stamps, Flirty Flowers, Subtle Grey Tones & Joyful Holiday Paper, Slimline Pennant & Stitched Semi-Circle Dies)

Sunny Studio Pink Polka-dot Snowmen Christmas Card (using Tombow ABT Pro Markers, Snowman Kisses Stamps, Joyful Holiday Paper, Icing Border, Scalloped Circle Tag & Stitched Rectangle Dies)

Sunny Studio Rainbow Snowmen Holiday Christmas Card (using Tombow ABT Pro Makers, Snowman Kisses Stamps, Lacy Snowflakes, Layered Snowflake Frame & Slimline Scalloped Frame Dies)

Sunny Studio Happy New Year Snowmen Card (using Tombow ABT Pro Markers, Snow One Like You, Snowman Kisses & Holiday Greetings Stamps and Forest Trees Stencils)

Sunny Studio Wrapped in Happiness Holiday Tree Card (using Tombow ABT Pro Makers, Penguin Party, Cozy Christmas Stamps, Forest Trees Stencils, Slimline Nature Border Dies)

Sunny Studio Christmas Snowmen Card (using Tombow ABT Pro Markers, Snowman Kisses & Holiday Greetings Stamps, Snowflake Circle Frame & Slimline Nature Border Dies)

Sunny Studio Christmas Holiday Shaker Gift Tags (using Tombow ABT Pro Markers, Penguin Party & Season's Greetings Stamps, Mini Mat & Tag 3 & Slimline Nature Border Dies)

I hope you've found this helpful. ☺

Please note: While Tombow mailed me a few initial sets of markers for my post I shared HERE, they did not ask me to promote them here today. I'm just a happy customer who loves to color with alcohol markers and was excited to find additional color options I felt like I was missing with my Copic color wheel and thought others might feel the same way. 

If you haven't signed up for Tombow's mailing list, I would highly recommend it. They have some seriously great sales on their site that are hard to pass up. I know a series of stellar sales definitely helped me assemble the majority of my collection you see here today. In fact, in honor of Labor Day I see they are having a 50% off sale on select items including all their ABT Pro Marker sets and binders featured here today running through Monday using discount code SAVE2022 at checkout. Even better they have automatic free shipping for all USA orders over $40.

Sunny Studio 7th Birthday & Holiday 2022 Sneak Peek Week Winners

Sunny Studio Blog: Fall, Autumn & Halloween 2022 Clear Stamps, Metal Cutting Dies & Patterned Paper Collection Release

Thank you all for helping us celebrate our 7th birthday and Holiday Sneak Peek Week last week. We definitely wouldn't still be here without all of you and the sweet support and encouragement you've shown us over the years. 

Here are the fifteen winners for the $25 gift codes to our store...

Sunny Studio Blog ~ Monday
Fran Simkins

Sunny Studio Blog ~ Tuesday
Kelsey Thomas

Sunny Studio Blog ~ Wednesday
Debbie Mason

Sunny Studio Blog ~ Thursday
Lynn Chan

Sunny Studio Blog ~ Friday
Amy Gross

Alma's Winner
Laura Lazarski Corkill

Bobbi's Winner
Sharon Gullickson

Cathy's Winner
Lori Podolsky

Isha's Winner
Linda Andersson

Kavya's Winner
Migdalia Crafts

Marine's Winner
Lisa B. Harvey Reber

Marney's Winner
Marisela Delgado

Tina's Winner
Alexandra (@rookiecardmaker)

Vanessa's Winner
Debra Hession

Waleska's Winner
Avra Williams

I have emailed everyone I had emails for, but if you didn't hear from me please check your spam folder as sadly many of our emails land there, particularly for people with gmail accounts. If it's not there, please reach out to us using the contact form on our website HERE.

Thanks again and congrats to the winners!