Thursday, December 9, 2021

Pristine Poinsettias & Winter Greenery Cards with Marine and Anja

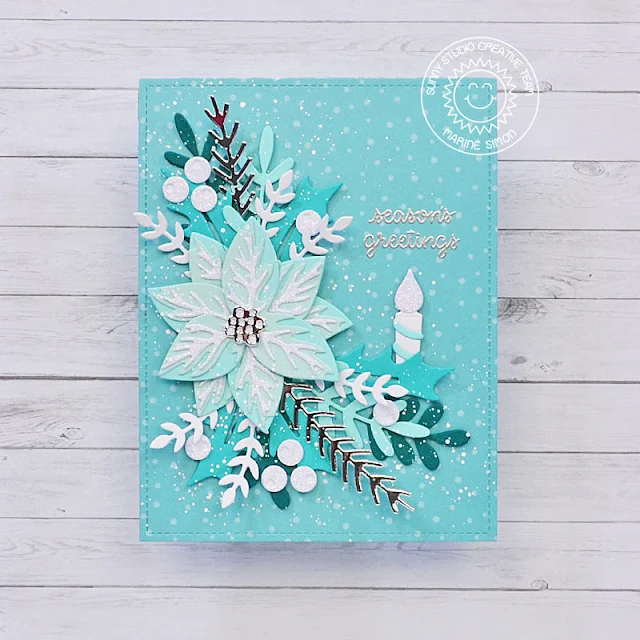
Hello crafty friends, Marine here with a very pretty poinsettia arrangement showcasing the Pristine Poinsettia die set and the Winter Greenery die set.

Sunny Studio Stamps: Pristine Poinsettias & Winter Greenery Christmas Card by Marine Simon

I cut a 5,5 x 4,25" panel out of a blue pattern paper from the All Is Bright 6x6 paper pack, as well as all the greenery and berry elements, and went with a turquoise color palette, with silver mirror and white glitter accents. But I think that this design would look gorgeous with a pink poinsettia + violet shades for the greenery + some silver glitter accents, or maybe something more traditional with a red poinsettia + green shades for the greenery + gold glitter accents. The possibilities are endless!

The first thing I did was to assemble the poinsettia and to do this, I referred to the guide on the Pristine Poinsettia page to help me build it the right way.

Sunny Studio Stamps: Pristine Poinsettias & Winter Greenery Christmas Card by Marine Simon

And once my poinsettia was done, I placed my panel in my Misti tool with everything (poinsettia + greenery) on top of it, just to get a general idea of the design, and I placed my sentiment stamps from Holiday Express on the right side. I removed the poinsettia and die cut pieces, and silver heat embossed my sentiment.

Next I stuck my panel on a blue card base, and I stuck all my elements, starting with the poinsettia using glue dots. And next the other pieces including the candle from the Cupcake Shape Dies using liquid glue and as well as foam squares to bring dimension.

Sunny Studio Stamps: Pristine Poinsettias & Winter Greenery Christmas Card by Marine Simon

Once everything was attached, I felt like it needed a final touch but I didn't want to add highlights using my white gel pen like I usually do, so I just mixed a few drops of Copic opaque white ink with water and splattered a few drops on top of the poinsettia and greenery to bring some kind of a frosty/snowy look.

Sunny Studio Stamps: Pristine Poinsettias & Winter Greenery Christmas Card by Marine Simon

And that's it! Click on the image above to watch my video tutorial! I hope that this card will inspire you to create your own floral arrangement, maybe a wreath would look great as well! Like I said: the possibilities are endless! Thanks for stopping by, and see you next week.

--------------------------------------------

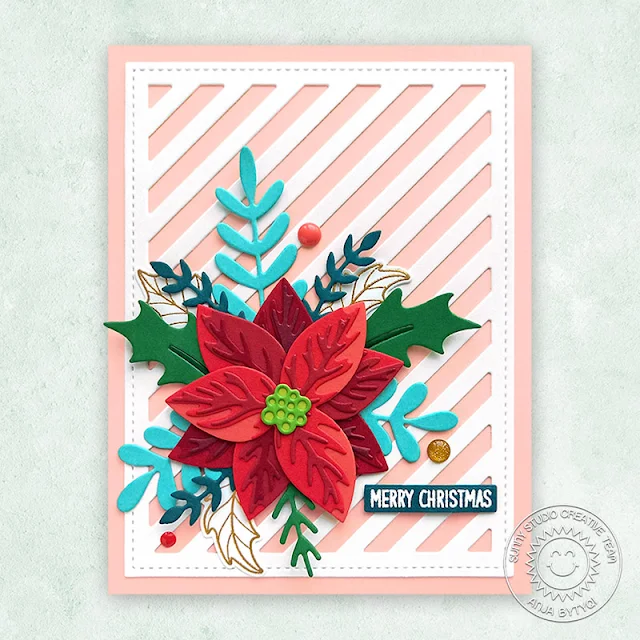
Hi everyone, Anja here and today's holiday card features the beautiful Pristine Poinsettia and Winter Greenery Dies that go perfectly together.

Sunny Studio Stamps: Pristine Poinsettias & Winter Greenery Christmas Card by Anja Bytyqi (featuring Frilly Frame Dies)

First, I created an A2 top-folding card base from light peachy pink cardstock. For the striped background, I combined the stitched rectangle mat (Frilly Frames Retro Petals Dies) with the diagonal stripes (Frilly Frames Stripes Dies) and cut it from white cardstock. I adhered it directly to the card base.

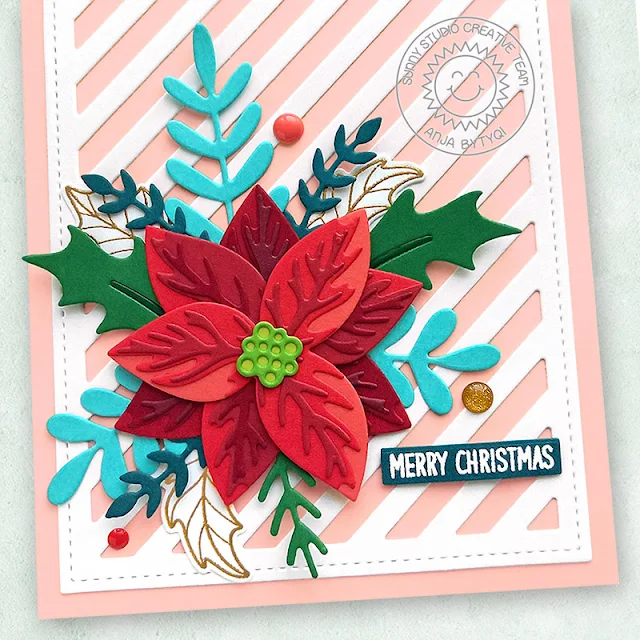
Next, I die cut the individual poinsettia layers three times from several tones of red cardstock. I assembled the sets and stacked them on top of each other. By rotating them a bit each time, I created a perfect multi-dimensional poinsettia. Finally, I die cut the center pieces from two shades of green cardstock and adhered them as well.

Sunny Studio Stamps: Pristine Poinsettias & Winter Greenery Christmas Card by Anja Bytyqi (featuring Frilly Frame Dies)

The greenery was die cut from aqua, dark teal and green cardstock. To build a pretty bouquet, I tucked the die cuts behind the poinsettia. I also added three gold heat embossed leaves from the Classy Christmas set. The Bear Hugs sentiment was stamped in VersaMark Ink onto a small cardstock strip and I heat embossed it in white. I popped it up with foam tape and adhered three enamel dots to finish off my card.

Thank you so much for stopping by! Wishing you a wonderful day!

Sunny Studio Supplies Used:

Bear Hugs Stamps
Bear Hugs Stamps
Shop at:
Sunny Studio
Holiday Express Stamps
Shop at:
Sunny Studio
Frilly Frames Stripes Die
Shop at:
Sunny Studio
Frilly Frames Retro Petals Dies
Shop at:
Sunny Studio
Classy Christmas Stamps
Shop at:
Sunny Studio
Classy Christmas Dies
Shop at:
Sunny Studio
Pristine Poinsettia Dies
Shop at:
Sunny Studio
Winter Greenery DIes
Shop at:
Sunny Studio
All Is Bright Paper
All Is Bright Paper
Shop at:
Sunny Studio

Wednesday, December 8, 2021

Christmas Critters Tags, Card, & Video Tutorial with Franci and Julia

Happy Wednesday everyone! It's Franci here with some adorable Christmas gift tags. Aww the new Christmas Critters set is soo cute! 

Sunny Studio Stamps: Christmas Critters Christmas Gift Tags by Franci Vignoli (featuring Scalloped Tag Dies, Stitched Rectangle Dies)

First of all I stamped all my images, colored them with Copics and then die cut them out with their coordinated dies. I also die cut 2 stitched banners out of white cardstock using the Stitched Rectangle dies set and stamped my sentiments onto them. 

I die cut 2 tags out of white cardstock and another 2 out of patterned paper from the All Is Bright 6x6 paper pad using the Scalloped Tag Circle dies and glued them back to back.

Sunny Studio Stamps: Christmas Critters Christmas Gift Tags by Franci Vignoli (featuring Scalloped Tag Dies, Stitched Rectangle Dies)

Then I sponged some Distress inks to the patterned paper sides to add interest/ dimension and glued all my elements with foam adhesive. Finally I added some ribbon at the top and a couple of Pure White Jewels + lots of details with my white gel pen.

I love these festive tags so much, hope you like them too and thanks a lot for stopping by!

-----------------------------------------------

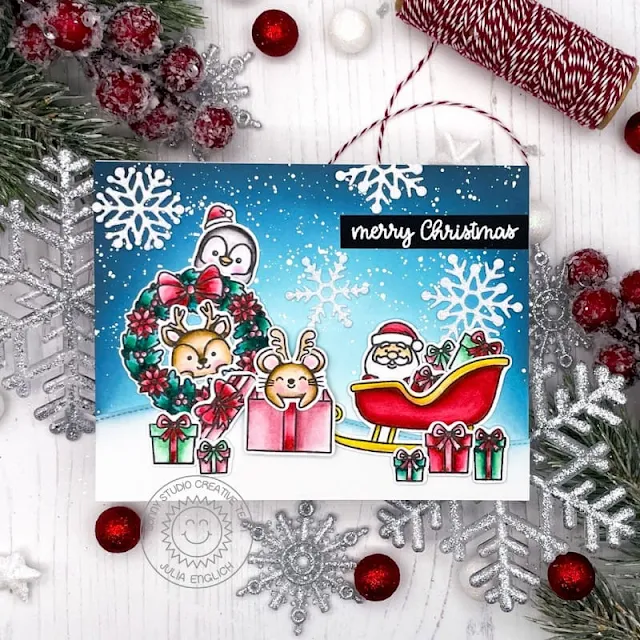
Hello friends! It’s Julia here and this time I have a fun Christmas scene card to share with you!

Sunny Studio Stamps: Christmas Critters Christmas Card by Julia Englich (featuring Holiday Express, Lacy Snowflake Dies, Santa Claus Lane)

First, I stamped the images from Christmas Critters, Holiday Express, and Santa Clause Lane onto Bristol Smooth cardstock and I colored them with Zig Clean Color Real Brush Markers.

Then, I ink blended the background with Distress Oxides and added lots of white splatters for a snowy look. I added a hill with the Slimline Nature Borders and added a little bit of ink blending to the edge as well. 

Sunny Studio Stamps: Christmas Critters Christmas Card by Julia Englich (featuring Holiday Express, Lacy Snowflake Dies, Santa Claus Lane)

Then, it was finally time to build my scene with lots of presents, critters, and more! The little "reindeer-mouse" just cracks me up!! For a final touch, I added a few Lacy Snowflakes to the background.

If you want to see how the card came together, you can check out the video above. I had so much fun creating this fun scene and I really hope you like it! Holiday hugs.

Sunny Studio Supplies Used:

Stitched Rectangle Dies
Shop at:
Sunny Studio
Christmas Critters Stamps
Shop at:
Sunny Studio
Christmas Critters DIes
Shop at:
Sunny Studio
Holiday Express Stamps
Shop at:
Sunny Studio
Holiday Express DIes
Shop at:
Sunny Studio
Lacy Snowflakes Die
Lacy Snowflakes Die
Shop at:
Sunny Studio
Santa Claus Lane Stamps
Shop at:
Sunny Studio
Santa Claus Lane Dies
Shop at:
Sunny Studio
Scalloped Tags-Circle
Shop at:
Sunny Studio
Slimline Nature Borders
Shop at:
Sunny Studio
All Is Bright Paper
All Is Bright Paper
Shop at:
Sunny Studio

Tuesday, December 7, 2021

Holiday Express Cards with Isha and Kavya

Hello everyone, Isha here! Today, I have a fun season's greetings card featuring the Holiday Express stamps and dies. I love creating skies and this time I went with Nordic skies. 

Sunny Studio Stamps: Holiday Express Christmas Card by Isha Gupta (featuring Penguin Pals, Winter Scenes)

I started by cresting the sky by sponging various distress inks to a white cardstock. Flick white paint and let it dry. Stamp images, color using Copic markers and die-cut using coordinating dies.

Engine and some other images - Holiday Express stamp and dies
Penguins - Penguin Pals stamp and dies
Winter village - Winter Scenes stamps and dies

Sunny Studio Stamps: Holiday Express Christmas Card by Isha Gupta (featuring Penguin Pals, Winter Scenes)

Sponge ink to create snow drifts. Adhere the images to create a winter scene. Add some Novo glitter drops. Flick white paint and the card is ready. 

Thank you for dropping by. Have a nice day!

------------------------------------------------

Hi folks, Kavya here. I am back on the blog with another fun card to share with you all! I absolutely loved Mayra’s gingerbread train so I decided to create a candy themed one!  This is super easy to create with a bunch of previously released stamps from SSS that you might already have in your stash. 

Sunny Studio Stamps: Holiday Express Christmas Card by Kavya (featuring Candy Shoppe, Santa Claus Lane, North Pole)

I first started off by stamping and coloring a bunch of images from Holiday ExpressNorth PoleCandy ShoppeSanta Claus Lane and Fall Kiddos. I changed the main engine of the train to make it look like it was made out of cookies and candy canes. For the carriages, I made them look like waffles complete with cream cheese icing! 

Sunny Studio Stamps: Holiday Express Christmas Card by Kavya (featuring Candy Shoppe, Santa Claus Lane, North Pole)

For the background, I ink blended a mini slimline sized cardstock with Antique Linen and Victorian Velvet Distress oxide ink. For the bottom, I used a peach striped pattern paper from Dots and Stripes Pastels pattern paper set. 

Sunny Studio Stamps: Holiday Express Christmas Card by Kavya (featuring Candy Shoppe, Santa Claus Lane, North Pole)

Finally, adhere all the stamped images and you are done! You can choose to add a sentiment if you’d like but I felt like the card was already too busy and it’s pretty obvious that it’s a Christmas themed card!

That’s it! I hope you liked this fun tutorial :) I sure had fun making it! Happy Crafting!

Sunny Studio Supplies Used:

Candy Shoppe Stamps
Candy Shoppe Stamps
Shop at:
Sunny Studio
Candy Shoppe Dies
Candy Shoppe Dies
Shop at:
Sunny Studio
Holiday Express Stamps
Shop at:
Sunny Studio
Holiday Express DIes
Shop at:
Sunny Studio
Fall Kiddos Stamps
Fall Kiddos Stamps
Shop at:
Sunny Studio
Fall Kiddos Dies
Fall Kiddos Dies
Shop at:
Sunny Studio
Dots & Stripes Pastels 6x6 Paper
Shop at:
Sunny Studio
Santa Claus Lane Stamps
Shop at:
Sunny Studio
Santa Claus Lane Dies
Shop at:
Sunny Studio
North Pole Stamps
North Pole Stamps
Shop at:
Sunny Studio
North Pole Dies
North Pole Dies
Shop at:
Sunny Studio
Penguin Pals Stamps
Penguin Pals Stamps
Shop at:
Sunny Studio
Penguin Pals Dies
Penguin Pals Dies
Shop at:
Sunny Studio
Winter Scenes Stamps
Shop at:
Sunny Studio
Winter Scenes Dies
Winter Scenes Dies
Shop at:
Sunny Studio