Thursday, September 30, 2021

Words of Gratitude Cards with Marine and Anja

Hey crafty friends, Marine here, I'm thrilled to be on the blog today with this lovely pop-up scene at the pumpkin patch. My all time favorite thing is to create cute scenes, and I like to pick my images from lots of stamp sets to help me build the idea I have in mind. 

Sunny Studio Stamps: Words of Gratitude Fall Friends Fall Kiddos Happy Harvest Thank You Card by Marine Simon

So here are the sets I used:

Words of Gratitude - to create my sentiment in three parts
Fall Kiddos - three kids
Happy Harvest - pumpkins + sunflowers
Fall Friends - wooden cart
Harvest Mice - more pumpkins
Farm Fresh - two crows
Picket Fence - grass border

I stamped all the images using an alcohol marker friendly black ink, cut them all using the coordinating dies and then colored everything using my alcohol markers.

Once the coloring was done, I cut a panel using the center picture window die set by Lawn Fawn and created an autumn sky using dried marigold, kitsch flamingo, picked raspberry and seedless preserves oxide inks. I blended those inks on the top section of the panel, and then added lots of texture to that background to bring more interest to it.

Sunny Studio Stamps: Words of Gratitude Fall Friends Fall Kiddos Happy Harvest Thank You Card by Marine Simon

Next I created an identical panel that will go on the front of the card, and cut a window out of it using an oval shape die. I folded the main panel in half, flipped it upside down, lined up the window panel with the bottom section of the main panel, applied glue right on the blank section in the middle, and then attached the oval shape right on that blank spot. And next I stuck foam squares at the back of the window panel that I attached on the bottom section of the main panel to frame the oval shape.

I colored the inside bottom section of the panel using frayed burlap oxide ink, and cut two small grass borders, using a die from Picket Fence, that I colored using the same ink. I stuck one of these on the outside of the card and the other one on the inside of the card. And next I attached a few images on the front of the card using liquid glue and foam squares.

Next I moved on to the inside of the card and before creating the pop-up mechanism, I attached all the images I wanted to see in the background.

Sunny Studio Stamps: Words of Gratitude Fall Friends Fall Kiddos Happy Harvest Thank You Card by Marine Simon

For the pop-up mechanism, it's always easier to understand with images so I invite you to watch the video below to see how it was made. Basically I created two rows of pop-up sections: on the middle section I attached the wooden cart full of pumpkins and sunflowers with a kid on top, and one the front section I stuck a line of pumpkins and sunflowers with a kid on the left side and a crow on the right.

At the end I created my sentiment in three parts using Words Of Gratitude: the first part says 'Thank you' and goes on the front of the card, and the second and third parts go on the inside and say 'for always being there' and '& always being you'. And finally I added lots of highlights and details on the images and autumn sky using a white gel pen.

Sunny Studio Stamps: Words of Gratitude Fall Friends Fall Kiddos Happy Harvest Thank You Card by Marine Simon

And that's it! I hope you like this sweet little scene at the pumpkin patch. Right above is the process video (just click on the image) so feel welcome to check it out! See you soon for another Sunny Studio project!

----------------------------------------------

Hi everyone, Anja here and today's focus is on the Word of Gratitude Stamps which are perfect to simply say Thank You in many different ways.

Sunny Studio Stamps: Words of Gratitude Frilly Frame Dies Winter Greenery Card by Anja Bytyqi

I combined the largest of the Stitched Rectangle Dies with the Frilly Frames Chevron background and die cut it from white cardstock. I also die cut the chevrons from three colors of cardstock and alternately inlaid them. I adhered the chevron background with a piece of fun foam to the white A2 card base.

Sunny Studio Stamps: Words of Gratitude Frilly Frame Dies Winter Greenery Card by Anja Bytyqi

The sentiment was stamped in two colors onto a white stitched cardstock circle. I additionally heat embossed the pink words 'thank you' with clear embossing powder. Next, I die cut a couple of Winter Greenery sprigs from white cardstock and adhered them behind the sentiment circle which I popped up with foam tape. To embellish the card, I added three Iridescent Pearls in matching colors.

Thank you so much for stopping by! Have a fabulous day!

Sunny Studio Stamps: 

Picket Fence Border Dies
Shop at:
Sunny Studio
Stitched Rectangle Dies
Shop at:
Sunny Studio
Fall Friends Stamps
Fall Friends Stamps
Shop at:
Sunny Studio
Fall Friends Dies
Fall Friends Dies
Shop at:
Sunny Studio
Words of Gratitude Stamps
Shop at:
Sunny Studio
Fall Kiddos Stamps
Fall Kiddos Stamps
Shop at:
Sunny Studio
Fall Kiddos Dies
Fall Kiddos Dies
Shop at:
Sunny Studio
Happy Harvest Stamps
Shop at:
Sunny Studio
Happy Harvest Dies
Happy Harvest Dies
Shop at:
Sunny Studio
Frilly Frames Chevron Die
Shop at:
Sunny Studio
Farm Fresh Stamps
Farm Fresh Stamps
Shop at:
Sunny Studio
Farm Fresh Dies
Farm Fresh Dies
Shop at:
Sunny Studio
Harvest Mice Stamps
Harvest Mice Stamps
Shop at:
Sunny Studio
Harvest Mice Dies
Harvest Mice Dies
Shop at:
Sunny Studio
Winter Greenery DIes
Shop at:
Sunny Studio

Wednesday, September 29, 2021

Icing Border Die Focused Cards with Franci and Julia

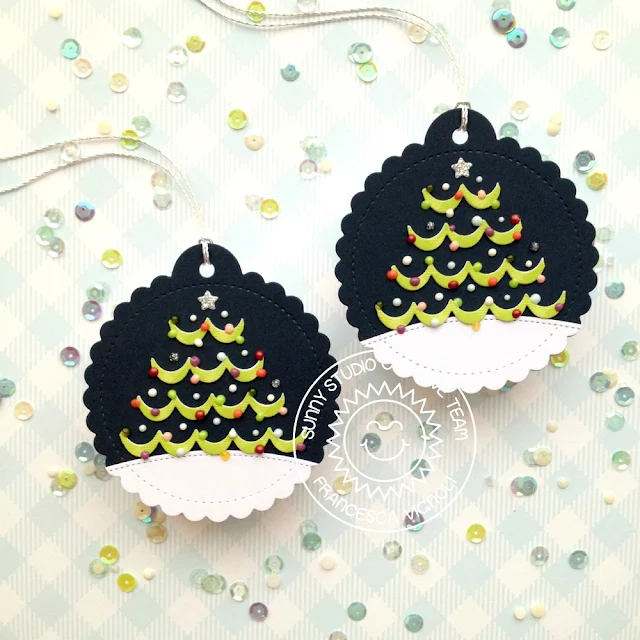
Hello there and happy Wednesday! It's Franci here with some Christmas tags featuring the new Icing Border dies. Ta daaa! Yes, I used one of the new border to create a Christmas tree for my tags! 

Sunny Studio Stamps: Icing Border Die Scalloped Circle Tag Die Inside Greetings Christmas Tags by Franci Vignoli

First of all I die cut all the tag elements out of white and blue cardstock using the Scalloped Tag Circle dies and the Slimline Nature Borders dies and put them together. 

I stamped my sentiment on the back of both tags (it's from the Inside Greetings Holiday set) and then moved onto the trees at the front. I die cut one of the new borders multiple times out of this green paper from the All is Bright 6x6 set and out of white cardstock.

Sunny Studio Stamps: Icing Border Die Scalloped Circle Tag Die Inside Greetings Christmas Tags by Franci Vignoli

I layered them all to give my tree more dimension and then I cut them out into shorter pieces. You can count the scallop details as a guide: I chose to create a tree with 4 layers + the 5th one = the star! So my bottom layer counts 5 scallop details, the next one 4, then 3 and the last one 2. I glued them down and added all my decorations. I used lots of colored Nuvo Drops but you can use sequins, clay embellishments, gems.

Hope you like this fun idea to stretch your supplies and thanks a lot for stopping by! Have a lovely day!

------------------------------------------

Hello! It’s Julia here and I am super excited to share this fun gingerbread house-shaped card with you!

Sunny Studio Stamps: Icing Border Die Christmas Cookies Gingerbread House Die Christmas Card by Julia Englich

First, I stamped the images from Christmas Cookies and Candy Shoppe onto Bristol Smooth cardstock and I colored them in using Zig Clean Color Real Brush Markers.

Then, to create my shaped card, I used an A2-sized card base and the outline house die from the Gingerbread House dies. I lined up the top edge of the die with the edge of the folded card base, making sure to leave a little gap between the cutting edge and the card base, so the top won't be cut through. I ran it through the die-cutting machine twice to make it cuts through both layers of cardstock. After that, I also die-cut all the other pieces of the Gingerbread House and I ink blended them with Distress Oxide inks.

Sunny Studio Stamps: Icing Border Die Christmas Cookies Gingerbread House Die Christmas Card by Julia Englich


I adhered all the decorative house pieces to my shaped card base. I also die-cut all three of the
Icing Borders and adhered them to the roof, door, and sides of the house. Then it was time to embellish! I added Rubellite and Pink Spinel jewels to the roof lining as well as to the door and then I added lots and lots of stickles to all the areas that I thought could use a little extra sparkle! So basically everywhere - haha!

Have you ever made a shaped card? I had so much fun making this one and I hope you like it! Thanks so much for stopping by today and have a wonderful day!

Sunny Studio Supplies Used:

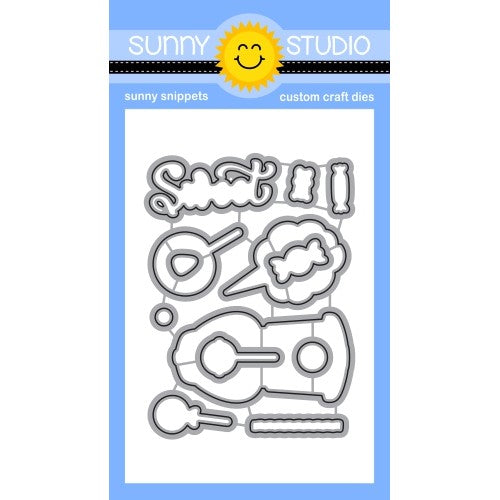
Candy Shoppe Stamps
Candy Shoppe Stamps
Shop at:
Sunny Studio
Candy Shoppe Dies
Candy Shoppe Dies
Shop at:
Sunny Studio
Christmas Cookies Stamps
Shop at:
Sunny Studio
Christmas Cookies Dies
Shop at:
Sunny Studio
Gingerbread House Dies
Shop at:
Sunny Studio
Icing Border DIes
Icing Border DIes
Shop at:
Sunny Studio
Scalloped Tags-Circle
Shop at:
Sunny Studio
Slimline Nature Borders
Shop at:
Sunny Studio
Inside Greetings-Holidays
Shop at:
Sunny Studio
All Is Bright Paper
All Is Bright Paper
Shop at:
Sunny Studio

Tuesday, September 28, 2021

Bewitching Cards with Isha and Kavya

Hello everyone, Isha here! Since Autumn is officially here, I decided to create a fun autumn theme card featuring our Bewitching Stamps and dies. As always I love to combine various products to create a scene.

Sunny Studio Stamps: Bewitching Gingerbread House Dies Stitched Semi-Circle Dies Fall Friends Card by Isha Gupta

I started by die-cutting a window to the white front panel using the biggest of the Stitched Semi-Circle die. Now, I took a white card base and sponged salvaged patina and spiced marmalade distress inks to it. Now I used a brick stencil from my stash and added some brick texture using the same inks. Die-cut the door, window panels and the base panel using the Gingerbread House dies. I colored all the pieces using Copic markers. Adhere yellow cardstock behind the window panel and add glossy accent for the glass effect.

Adhere the white piece onto the brick card base. Adhere the door and the window. Stamp all the images and color them using Copics. Die-cut using the coordinating dies.

Sunny Studio Stamps: Bewitching Gingerbread House Dies Stitched Semi-Circle Dies Fall Friends Card by Isha Gupta

Cat with hat and cauldron: Bewitching stamp and Dies
Boy: Fall Kiddos stamp and Dies
Big leaves and sentiment: Crisp Autumn stamp and Dies
Candy Corn: Candy Shoppe stamp and Dies
Berries, Pumpkins and small Ahorn leaves: Bountiful Autumn stamp and Dies

Stamp the sentiment and assemble the scene. To finish, I added some clear glitter to the green potion and glossy accents to berries and candy corns.

Thanks for dropping by! Have a nice day.

-------------------------------------------------

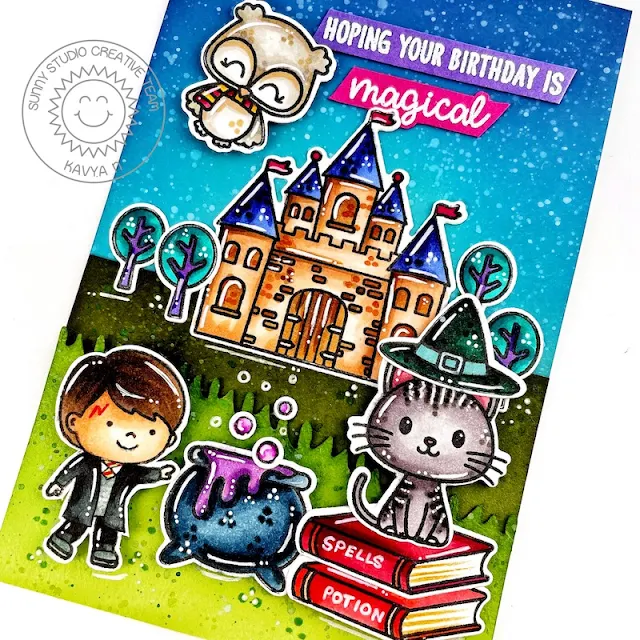
Hi folks, Kavya here. I am back on the blog with another fun card using the new Bewitching stamp set. When I first saw the stamp set, it immediately reminded me of Professor Minerva McGonagall from Harry Potter! She transfigures into tabby cat! I used a bunch of sets from the SSS to create a fun Harry Potter themed card! 

Sunny Studio Stamps: Bewitching Enchanted Slimline Dies Card by Kavya

I first started off by creating a background by ink blending the sky using shades of blue and mint and added a green landscape using Slimline Nature Border die and different shades of green cardstock. I ink blended the edges of the green cardstock to make a bit more realistic :) I then stamped and colored images from the following stamp sets using Copic markers:

Sunny Studio Stamps: Bewitching Enchanted Slimline Dies Card by Kavya

I finally heat embossed a sentiment from 
Garden Fairy stamp set to finish off the card! 

That’s it folks! I hope this card inspires you :) Happy Crafting.

Sunny Studio Supplies Used:

Candy Shoppe Stamps
Candy Shoppe Stamps
Shop at:
Sunny Studio
Candy Shoppe Dies
Candy Shoppe Dies
Shop at:
Sunny Studio
Bewitching Stamps
Bewitching Stamps
Shop at:
Sunny Studio
Bewitching Dies
Bewitching Dies
Shop at:
Sunny Studio
Crisp Autumn Stamps
Crisp Autumn Stamps
Shop at:
Sunny Studio
Crisp Autumn Dies
Crisp Autumn Dies
Shop at:
Sunny Studio
Gingerbread House Dies
Shop at:
Sunny Studio
Fall Kiddos Stamps
Fall Kiddos Stamps
Shop at:
Sunny Studio
Fall Kiddos Dies
Fall Kiddos Dies
Shop at:
Sunny Studio
Happy Owlidays Stamps
Shop at:
Sunny Studio
Happy Owlidays Dies
Happy Owlidays Dies
Shop at:
Sunny Studio
Enchanted Stamps
Enchanted Stamps
Shop at:
Sunny Studio
Enchanted Dies
Enchanted Dies
Shop at:
Sunny Studio
Grad Cat Stamps
Grad Cat Stamps
Shop at:
Sunny Studio
Grad Cat Dies
Grad Cat Dies
Shop at:
Sunny Studio
Stitched Semi-Circle Dies
Shop at:
Sunny Studio
Slimline Nature Borders
Shop at:
Sunny Studio
Bountiful Autumn Stamps
Shop at:
Sunny Studio
Bountiful Autumn Dies
Shop at:
Sunny Studio
Balloon Rides Stamps
Shop at:
Sunny Studio
Balloon Rides Dies
Balloon Rides Dies
Shop at:
Sunny Studio
Garden Fairy Stamps
Garden Fairy Stamps
Shop at:
Sunny Studio