Thursday, April 8, 2021

Slimline Pennant Die Focused Cards by Anja and Vanessa

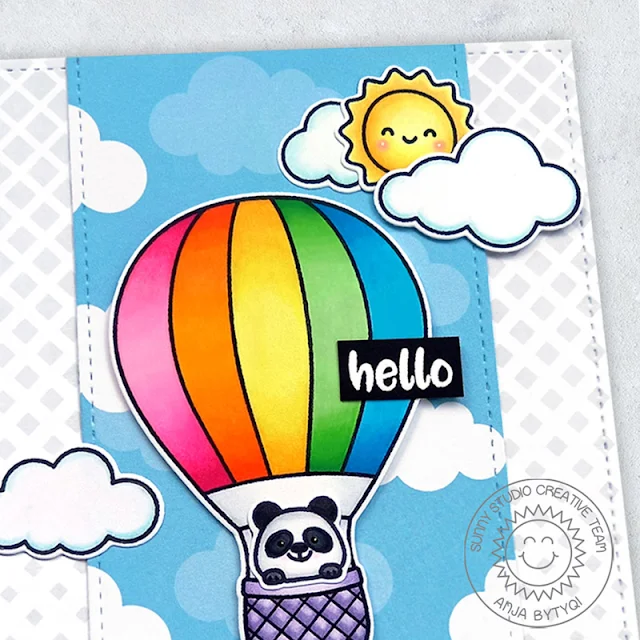
Hello everyone, Anja here and today I'm featuring the versatile Slimline Pennant Dies which can be used in many ways and of course they work with A2 standard size cards as well. I adore the Balloon Rides Stamps and added patterned papers to the background.

Sunny Studio Stamps: Slimline Pennant Dies Balloon Rides Fishtail Banner Dies Everyday Cards by Anja Bytyqi

First, I cut out the diamonds pattern from the Subtle Grey Tones Paper pack with the stitched rectangle mat die included in the Frilly Frames Quatrefoil Dies set and adhered it to my A2 top-folding card base.

The cloudy paper (Summer Splash Paper) was die cut with the second largest pennant. To create a reverse banner I additionally used one of the Fishtail Banner Dies and cut off the top from the green floral pennant (Spring Fling Paper).

Sunny Studio Stamps: Slimline Pennant Dies Balloon Rides Fishtail Banner Dies Everyday Cards by Anja Bytyqi

I stamped the images in Memento Tuxedo Black Ink and colored them with Copic Markers. I used the coordinating dies to cut everything out. The sentiment from the Lovable Llama set was stamped in VersaMark Ink onto a black cardstock strip and I heat embossed in white. Finally, I assembled my card by adhering all elements with liquid glue and foam tape.

Thank you so much for stopping by! I hope you have an amazing day!

----------------------------------------------

Hello to you! Vanessa here with a cute shaped card using the Slimline Pennant Dies

Sunny Studio Stamps: Slimline Pennant Dies My Otter Half Everyday Card by Vanessa Menhorn

I first created the card base from two large pennants. Now I die-cut the smaller pennant, stamped the otters, masked them and inked the background with Salty Ocean Distress Oxide Ink. Then I die-cut the border from Slimline Nature Borders Dies from scrap paper and used this as a stencil to create waves with Blueprint Sketch Distress Oxide Ink. 

Supplies used:
Slimline Pennant Dies
Slimline Nature Borders Dies
My Otter Half Stamps + Dies

Sunny Studio Stamps: Slimline Pennant Dies My Otter Half Everyday Card by Vanessa Menhorn

After I had added water droplets and details with a white gel pen, I colored the images with Copic markers and adhered the panel to the card. Finally, I stamped the sentiment onto vellum, heat-embossed it with white embossing powder, die-cut the small pennant from it and adhered it. Then I die-cut the "otter" from blue cardstock and added it to the pennant.

This dies set is fantastic! Love what you can make with it. Have a lovely day!

Sunny Studio Supplies Used:

Fishtail Banner Dies
Shop at:
Sunny Studio
Summer Splash 6x6 Paper
Shop at:
Sunny Studio
Subtle Grey Tones Paper
Shop at:
Sunny Studio
Spring Fling Paper
Spring Fling Paper
Shop at:
Sunny Studio
Frilly Frames Quatrefoil
Shop at:
Sunny Studio
Slimline Nature Borders
Shop at:
Sunny Studio
Balloon Rides Stamps
Shop at:
Sunny Studio
Balloon Rides Dies
Balloon Rides Dies
Shop at:
Sunny Studio
Lovable Llama Stamps
Shop at:
Sunny Studio
My Otter Half Stamps
Shop at:
Sunny Studio
My Otter Half Dies
My Otter Half Dies
Shop at:
Sunny Studio
Slimline Pennant Dies
Shop at:
Sunny Studio

Wednesday, April 7, 2021

Feeling Froggy Cards by Franci and Julia

Hi there and happy Wednesday! It's Franci here with you today, with a magical card. Oh, this little cutie is soo adorable! 

Sunny Studio Stamps: Feeling Froggy Enchanted Frog Themed Card by Franci Vignoli

First of all I created my card base out of white cardstock and inked my sky on the front using blue Distress inks. I stamped, colored with Copics and die cut all the images and then I glued them down with foam adhesive.

I combined these sets here: Feeling Froggy + coordinated dies and Enchanted set + coordinated dies.

Sunny Studio Stamps: Feeling Froggy Enchanted Frog Themed Card by Franci Vignoli

I stamped my sentiment at the bottom, added a little heart coated in Glossy Accents and drew little stars and dots on the night sky with a silver pen to make it magical.

I hope you like this card as much as I do and thanks a lot for stopping by! Have a lovely day.

---------------------------------------------------

Hey crafty friends! It’s Julia here with a fun birthday card! I just can't get enough of the cute froggy - so this time he is bringing balloons, flowers and gifts to the party!!

Sunny Studio Stamps: Feeling Froggy Country Scenes Floating By Frog Themed Card by Julia Englich


I started by stamping out my images from the Feeling Froggy, Country Scenes, as well as from Love Monkey (flowers), Floating By (balloons and bowtie), Alpaca Holiday (gift stack), North Pole (little gift), Balloon Rides (clouds). and Spring Scenes. I colored all the images with Copic Markers.

I ink blended the sky and pond onto a piece of bristol smooth cardstock. I also stamped a few "waves" on the pond from the My Otter Half stamp set. For my sentiment I stamped the word "hoppy" from Feeling Froggy, "birthday" from Garden Fairy and "wishes" from Eggs to Dye For and then heat embossed it in white onto black cardstock. 

Sunny Studio Stamps: Feeling Froggy Country Scenes Floating By Frog Themed Card by Julia Englich


Then, I added all my cute images to the card using liquid glue and foam squares. I wanted to add a white frame, so I die cut the
Comic Strip Everyday dies and just snipped off the inside pieces. To finish my card, I added lots of shimmer pen, white gel pen highlights and Stardust Stickles. I really hope you like it!

Inks used: Scattered Straw, Cracked Pistachio, Peacock Feathers, Spun Sugar, Kitsch Flamingo, Seedless Preserves Distress Oxide Copic Markers used: 0; E50, E51, E53, E55, E57, E59; YG000, YG01, YG03, G000, G02, G17, G28; B21, B23, B26, B28; R81, R83, R85, RV02, RV06; V000, V01, V04, V09; Y000, Y11, Y13; Y15.

Thank you so much for spending time with me today! Have a wonderful day!

Sunny Studio Supplies Used:

Comic Strip Everyday Dies
Shop at:
Sunny Studio
Alpaca Holiday Stamps
Shop at:
Sunny Studio
Alpaca Holiday Dies
Alpaca Holiday Dies
Shop at:
Sunny Studio
Love Monkey Stamps
Love Monkey Stamps
Shop at:
Sunny Studio
Love Monkey Dies
Love Monkey Dies
Shop at:
Sunny Studio
Enchanted Stamps
Enchanted Stamps
Shop at:
Sunny Studio
Enchanted Dies
Enchanted Dies
Shop at:
Sunny Studio
Floating By Stamps
Floating By Stamps
Shop at:
Sunny Studio
Floating By Dies
Floating By Dies
Shop at:
Sunny Studio
Spring Scenes Stamps
Shop at:
Sunny Studio
Spring Scenes Dies
Spring Scenes Dies
Shop at:
Sunny Studio
North Pole Stamps
North Pole Stamps
Shop at:
Sunny Studio
North Pole Dies
North Pole Dies
Shop at:
Sunny Studio
Balloon Rides Stamps
Shop at:
Sunny Studio
Balloon Rides Dies
Balloon Rides Dies
Shop at:
Sunny Studio
Country Scenes Stamps
Shop at:
Sunny Studio
Country Scenes Dies
Country Scenes Dies
Shop at:
Sunny Studio
Eggs To Dye For Stamps
Shop at:
Sunny Studio
Feeling Froggy Stamps
Shop at:
Sunny Studio
Feeling Froggy Dies
Feeling Froggy Dies
Shop at:
Sunny Studio
Garden Fairy Stamps
Garden Fairy Stamps
Shop at:
Sunny Studio
My Otter Half Stamps
Shop at:
Sunny Studio

Tuesday, April 6, 2021

Balloon Rides Cards by Kavya and Isha

Hi folks, Kavya here. I am back on the blog with fun way to stretch Balloon Rides stamp set! If you know me, I love galaxies. Unfortunately, I haven’t had the chance to make one in a while. I jumped at the opportunity the minute I saw this stamp set! I created a ’night time’ themed card using just the Balloon Rides stamp set and obviously, Slimline Nature Borders die set.

Sunny Studio Stamps: Balloon Rides Slimline Dies Inside Greetings Birthday Card by Kavya

I first started off by ink blending the bottom half of a mini slimline sized white cardstock using lighter shades of blue and teal ink. For the top galaxy portion of the card, I used black, navy blue, teal, pink and purple! The best part of this card is that you don’t have to get even blends! Almost all your imperfections will be covered by ’stars’ aka white paint splatters. Also, majority of the galaxy sky is covered by the hot air balloon. If you always wanted to try a galaxy background but were afraid for a number of reasons, now is your perfect chance! 

Sunny Studio Stamps: Balloon Rides Slimline Dies Inside Greetings Birthday Card by Kavya

Now, I wanted some planets but didn’t really have the space left in the cardstock. So, I decided to convert the hot air balloon into one! While stamping it, I stamped the ‘inner lines’ using a lighter shade of ink so that I can make it a bit more realistic while coloring. I then colored the earth using alcohol markers and colored pencils. I added the ‘clouds’ on top using a white re-nker. Just simply dilute the ink to make it more translucent! Then, I also splattered some paint on the ‘earth’ to cover up the remaining areas. 

Sunny Studio Stamps: Balloon Rides Slimline Dies Inside Greetings Birthday Card by Kavya

Then, I colored the rest of the images from the set using shades of blue and purple. I added a small portion of ‘land’ by using Slimline Nature Borders Die and some ink blended teal cardstock. I finished the card by adding a sentiment from Inside Greetings Birthday heat embossed on blue cardstock. 

That’s it folks! I hope this card inspires you to try out a galaxy/night sky themed card! 

-------------------------------------------------------

Hello everyone! Isha here with you again featuring our Balloon Rides stamps and dies. I turned this into a shaker as you know how much I love creating shaker cards :)

Sunny Studio Stamps: Balloon Rides Slimline Dies Card by Isha Gupta

To start, I die-cut the cloud and hills from the Slimline Nature Border dies onto acetate to create stencils. Using these stencils, I sponged the clouds and hills onto a white panel. I then Die-cut the hot air balloon using the Balloon Rides dies onto this panel. 

Stamp the images onto an alcohol ink friendly paper, color using Copics and die-cut. Place the mat layer to the card base and adhere the hot air balloon directly to the card base.

Sunny Studio Stamps: Balloon Rides Slimline Dies Card by Isha Gupta

Remove the mat layer and adhere acetate behind the opening. Adhere score tape all around the acetate and the edges. Add WOW! Starlight Sparkles to the balloon on the card base. Remove the liner of the tape from the mat layer and adhere to the card.

Now, adhere all the images to the card and stamp the sentiment. Hope you like this flat shaker card, perfect for mailing :) Thanks for dropping by! Have a nice day.

Sunny Studio Supplies Used:

Slimline Nature Borders
Shop at:
Sunny Studio
Balloon Rides Stamps
Shop at:
Sunny Studio
Balloon Rides Dies
Balloon Rides Dies
Shop at:
Sunny Studio
Inside Greetings Birthday
Shop at:
Sunny Studio