Monday, March 15, 2021

Captivating Camellias Cards with Ashley and Mayra

Hi friends! It's Ashley with a happy card full of layered florals to brighten your Monday! I combined a few sets to make this bright bouquet - no coloring required!

Sunny Studio Stamps: Captivating Camellias Frilly Frame Dies Slimline Dies Everyday Card by Ashley Ebben

I started by blending some Pinkfresh Studio Slumber ink in the middle of a piece of white cardstock. I added some blue and silver watercolor splatters, then cut the piece with the Frilly Frames Chevron die. I added it to some light blue patterned paper from the Classic Sunburst paper pack cut to A2 size.

I stamped the flowers from the new Captivating Camellias stamp using the purple Pinkfresh Studio Soul of Provence ink cube set. These sets are my absolute favorite for layering stamps and I love that they are in the Sunny Studio shop now! I also stamped the leaves from Captivating Camellias in the Pinkfresh Studio Over the Hills ink cube set and the flowers from Timeless Tulips in the Pinkfresh Studio Indian Summer ink cube set along with Raspberry Bliss. I stamped the jar from Vintage Jar to look like those pretty antique blue mason jars by using Pinkfresh Studio Island Oasis inks. I cut all of my images out using the matching dies and arranged them on the card, popping a few up with foam tape for dimension. Before adding the jar to the card, I added a few stamped stems from Timeless Tulips in Fresh Pear.

Sunny Studio Stamps: Captivating Camellias Frilly Frame Dies Slimline Dies Everyday Card by Ashley Ebben

Instead of adding a sentiment strip, I decided to try a different look and stamp directly on the card. I used Versafine Onyx Black ink to add a sentiment from Eggs to Dye For onto my jar. I finished with some iridescent jewels scattered around for a bit more interest and sparkle.

Thank you so much for stopping by! Have a wonderful day!

---------------------------------------------

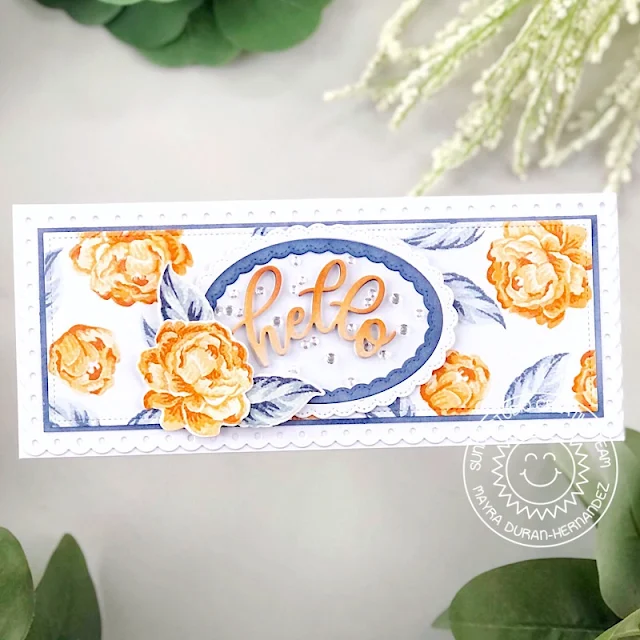
Hello and happy Monday. Mayra here with you today. I created a card to share with you using the beautiful Captivating Camellias stamp set. I actually created three versions of the same card. 

Sunny Studio Stamps: Captivating Camellias Slimline Dies Stitched Oval Dies Everyday Cards by Mayra Duran-Hernandez

I started by stamping each of the layers to create the Camellias in various areas of what would be the card base. I used the Pinkfresh Studio Ink Cubes Indian Summer set. For the leaves, I used the Northern Shore set from Altenew. I also stamped an extra flower and leaves to die cut as well using the coordinating dies

Sunny Studio Stamps: Captivating Camellias Slimline Dies Stitched Oval Dies Everyday Cards by Mayra Duran-Hernandez

Now for the different versions of the same card, lol. For the card base and scalloped edge layer, I used the Slimline Scalloped Frames dies set. For the first card, I die cut the hello from the Slimline Scalloped Frames  dies set. I also used the Stitched Oval and Fancy Frames Oval die sets for each version of cards. On the first card, I used the same colors as the flowers and leaves to add color to the hello and the inside part of the fancy frame. 

Sunny Studio Stamps: Captivating Camellias Slimline Dies Stitched Oval Dies Everyday Cards by Mayra Duran-Hernandez

For the second card, I just used the oval over the larger of the fancy frames scalloped ovals. The third version has both layers of the fancy frame over the sentiment from the Pink Peonies stamp set.

I hope you enjoy the card I created to share with you today Thank you very much for taking the time to stop by. I hope you each have a wonderful and blessed day. 

Sunny Studio Supplies Used:

Timeless Tulips Dies
Shop at:
Sunny Studio
Timeless Tulips Stamps
Shop at:
Sunny Studio
Fancy Frames- Ovals
Fancy Frames- Ovals
Shop at:
Sunny Studio
Stitched Oval Dies
Stitched Oval Dies
Shop at:
Sunny Studio
Frilly Frames Chevron Die
Shop at:
Sunny Studio
Pink Peonies Stamps
Pink Peonies Stamps
Shop at:
Sunny Studio
Slimline Scalloped Frame
Shop at:
Sunny Studio
Classic Sunburst Paper
Shop at:
Sunny Studio
Captivating Camellias Stamps
Shop at:
Sunny Studio
Captivating Camellias Dies
Shop at:
Sunny Studio
Eggs To Dye For Stamps
Shop at:
Sunny Studio

Saturday, March 13, 2021

Guest Designer Spotlight: Cards with Michelle Short

Hello there, Michelle Short here and I am delighted to be back guesting with Sunny Studio Stamps. Today I have projects to share with you using the Balloon Rides and Lovable Llama sets.

Sunny Studio Stamps: Balloon Rides Slimline Pennant Dies Build A Tag Dies Card and Tag by Michelle Short

My first card uses the adorable Balloon Rides stamp set and coordinating dies, along with the Slimline Pennants dies. I started off by die cutting a panel of white cardstock using the largest of the Slimline Pennants dies. I blended Mermaid Lagoon and Tumbled Glass Distress Oxide Inks on top to create the sky. The clouds, hot air balloon and bunny from the Balloon Rides stamp set were stamped on to white cardstock with black ink and coloured using Copic Markers. They were cut out using the coordinating dies.

Sunny Studio Stamps: Balloon Rides Slimline Pennant Dies Build A Tag Dies Card and Tag by Michelle Short

The background piece was adhered to an A2 white card base with foam tape and the clouds added on top with tape runner. The hot air balloon was added on top with foam tape and then I popped the bunny on top. Doesn’t he look cute flying in the air? I took the sentiment from the set and stamped it on to black cardstock with Versamark Ink. I applied white embossing powder, heat set and cut it in to a strip. This was added to the card with thin foam tape. To finish off, I added a few clear droplets.

Sunny Studio Stamps: Balloon Rides Slimline Pennant Dies Build A Tag Dies Card and Tag by Michelle Short

When I was making the card, I had stamped and coloured the sun from the set, plus additional clouds but I didn’t used them. I couldn’t let them go to waste, so I made a little tag with them. I die cut the Build A Tag 1 dies from white cardstock and blended on the same Distress Oxide Inks. The images were adhered on top with tape runner. I stamped the little bear from the set, along with the mortar board and popped them behind the stamped and embossed sentiment. I thought he looked cute peeking up from behind the sentiment!

Sunny Studio Stamps: Slimline Pennant Dies Build A Tag Dies Lovable Llama Card and Tag by Michelle Short

My second card uses the Loveable Llama set. This little guy is so cute! I stamped him, his hat and presents on to white cardstock with black ink. They were coloured using Copic Markers and die cut out with the coordinating dies. I then set them aside while I worked on my background. I took the next largest size of the Slimline Pennants dies and die cut a panel of white cardstock. Using blending brushes, I blended on Wilted Violet, Blueprint Sketch and Mermaid Lagoon Distress Oxide Inks.

Sunny Studio Stamps: Slimline Pennant Dies Build A Tag Dies Lovable Llama Card and Tag by Michelle Short

I took the panel and ran it through my die cutting machine with the Sunburst Embossing folder. The panel was adhered flat to an A2 white card base. I took the sentiment from the Magical Mermaids stamp set and stamped and embossed it on to black cardstock. It was cut out and added to the card with foam tape. The llama was popped behind with thin foam tape, followed by the presents with tape runner. The card felt a little off, so I stamped, coloured and die cut another present, this time cutting off the top present only. When it is popped behind the sentiment strip, you cannot see that it was cut apart from the others.

Sunny Studio Stamps: Slimline Pennant Dies Build A Tag Dies Lovable Llama Card and Tag by Michelle Short

I fell in love with this llama, he is indeed lovable! So I had to make a little tag with him too! I die cut the Build A Tag 1 die from white cardstock, blended the same Distress Oxides Inks on top and ran it through my die cutting machine with the Sunburst Embossing folder. I stamped another Loveable Llama, coloured him with Copics and die cut him out. I also die cut the bunting image from the Balloon Rides set, coloured it with Copics and die cut it out as well. The bunting was adhered to the top of the tag with tape runner and the llama added on top with foam tape. I left off a sentiment as I thought it could be added to a gift.

That’s it from me. A huge thank you to Mendi and her team for having me back to guest with them. It is always a pleasure! Have a wonderful day!

Sunny Studio Supplies Used: 

Magical Mermaid Stamps
Shop at:
Sunny Studio
Build-A-Tag #1 Dies
Build-A-Tag #1 Dies
Shop at:
Sunny Studio
Sunburst Embossing
Sunburst Embossing
Shop at:
Sunny Studio
Balloon Rides Stamps
Shop at:
Sunny Studio
Balloon Rides Dies
Balloon Rides Dies
Shop at:
Sunny Studio
Lovable Llama Stamps
Shop at:
Sunny Studio
Lovable Llama Dies
Lovable Llama Dies
Shop at:
Sunny Studio
Slimline Pennant Dies
Shop at:
Sunny Studio

Friday, March 12, 2021

My Otter Half Cards with Kay and Candice

Hi there! Kay here and I have a super fun card to share with you today using the adorable new My Otter Half stamp setMy Otter Half coordinating dies and Country Scenes stamp set.

Sunny Studio Stamps: My Otter Half Country Scenes Otter Themed Card by Kay Miller

For this card, I first stamped the pond and cattails scene about midway on my white card base, then I stamped the tree line and hills just above that. I colored the entire card with Copic markers, and blended the sky with just a bit of Broken China Distress ink. After all of the coloring was finished, I speckled a little blue ink on the water and some darker green ink onto the hills above.


Sunny Studio Stamps: My Otter Half Country Scenes Otter Themed Card by Kay Miller

I colored the adorable little otters and the extra cattails with Copic markers, cut them out with the My Otter Half dies, and added them to the card with foam tape. The sentiment is included in the My Otter Half stamp set, and I stamped it on black cardstock and heat embossed with white embossing powder. I cut this out and added it to my card with foam tape.

I hope you have enjoyed my card today! Thanks so much for stopping by!

---------------------------------------------

Hi! It's Candice back with you this fabulous Friday! I adore these cute otters and agree that we sure do need each otter at this time!

Sunny Studio Stamps: My Otter Half Country Scenes Slimline Dies Stitched Circle Dies Otter Themed Card by Candice Fisher

I used these Sunny Studio products for my slimline design:

I began my slimline with an 8 1/2 x 3 1/2 card base. For the background, I first die cut a stitched panel from white cardstock and glued to the center of my card front. This allows the scenes and circles to be grounded to the card. I then die cut the larger circles from blue striped paper and adhered to each side of the card front.

Next, I created the water, by die cutting a stencil from the slimline scalloped border die and used the negative to add waves to the smaller stitched circles with Salty Ocean. I then inked over the whole circle pieces with Tumbled Glass to get a more muted look and then splattered them with Salty Ocean and white paint using a damp paint brush.

Sunny Studio Stamps: My Otter Half Country Scenes Slimline Dies Stitched Circle Dies Otter Themed Card by Candice Fisher

While that dried, I stamped the images from the stamp sets listed above, colored them with copic markers and used the coordinating dies to cut them out. I then heat embossed the sentiment in white on a banner I inked with Riped Persimmon and die cut a layered "otter" with the top inked with Dried Marigold. I put it all together with either glue or foam tape to give lots of depth to the scenes! I finished with some clear Nuvo drops to mimic water drops!

Thank you so much for visiting with us today!

Sunny Studio Supplies Used:

Dots & Stripes Pastels 6x6 Paper
Shop at:
Sunny Studio
Best Fishes Stamps
Best Fishes Stamps
Shop at:
Sunny Studio
Best Fishes Dies
Best Fishes Dies
Shop at:
Sunny Studio
Slimline Basic Borders
Shop at:
Sunny Studio
Slimline Scalloped Frame
Shop at:
Sunny Studio
Country Scenes Stamps
Shop at:
Sunny Studio
Country Scenes Dies
Country Scenes Dies
Shop at:
Sunny Studio
My Otter Half Stamps
Shop at:
Sunny Studio
My Otter Half Dies
My Otter Half Dies
Shop at:
Sunny Studio
Stitched Circle Large Dies
Shop at:
Sunny Studio

Thursday, March 11, 2021

Stitched Circle Die Focused Cards with Anja and Vanessa

Hello everyone, Anja here and today I'm sharing a colorful birthday card. I used the versatile Stitched Circle Large Dies to create a happy rainbow for the Prancing Pegasus.

Sunny Studio Stamps: Stitched Circle Dies Prancing Pegasus Birthday Card by Anja Bytyqi

I started off with an A2 card base and cut out the purple Classic Sunburst Paper with the stitched rectangle die included in the Frilly Frames Quatrefoil Dies set. I left all the stitched circle dies attached (as they come from the manufacturer) and ran them through my die cutting machine with some Bristol cardstock. I cut them in half to create the rainbow pieces which I watercolored with Karin Brushmarkers.

For the clouds, I used a speech bubble die from the Comic Strip Speech Bubbles Die set. I colored the Pegasus with the Karin Brushmarkers as well and cut it out with the coordinating die. The sentiment was stamped in VersaMark Ink onto a black cardstock banner and heat embossed in white.

Sunny Studio Stamps: Stitched Circle Dies Prancing Pegasus Birthday Card by Anja Bytyqi

I adhered the rainbow and sentiment banner with liquid glue and popped up the clouds and Pegasus with foam tape. Finally, I added Iridescent Pearls and a tiny star sequin as embellishments.

Thank you so much for stopping by! Have an awesome day!

---------------------------------------

Hello to you! Vanessa here with a circle card using the Stitched Circle Large Dies. You can't have enough circles to use on various card designs! This is my take:

Sunny Studio Stamps: Stitched Circle Dies Balloon Rides Hello Card by Vanessa Menhorn

I first die-cut the largest circle thrice from white cardstock. Now I inked one circle with Salty Ocean, Blueprint Sketch and Chipped Sapphire Distress Oxide Inks and added white droplets. I assembled the inked piece with another circle to create a card base. Then I used a smaller circle die to create the half moon shape on the remaining circle, inked the piece with Squeezed Lemonade and Fossilized Amber Distress Oxide Inks, added water droplets and adhered the moon to the card.

Supplies used:
Stitched Circle Large dies (base, moon)
Balloon Rides stamps (bear, clouds)
Lovable Llama (hello)
Primary Star Confetti (little stars)

Sunny Studio Stamps: Stitched Circle Dies Balloon Rides Hello Card by Vanessa Menhorn

I stamped the bear and the clouds onto white cardstock, colored them with Copics, fussy-cut the images and adhered them to the card with foam tape. Then I stamped the hello onto black cardstock, heat-embossed it with white embossing powder, trimmed it and adhered it to the card. Finally, I added the tiny stars.

Thank you so much for stopping by today! Have a wonderful day!

Sunny Studio Supplies Used:

Comic Strip Speech Bubble Dies
Shop at:
Sunny Studio
Prancing Pegasus Stamps
Shop at:
Sunny Studio
Prancing Pegasus Dies
Shop at:
Sunny Studio
Frilly Frames Quatrefoil
Shop at:
Sunny Studio
Classic Sunburst Paper
Shop at:
Sunny Studio
Balloon Rides Stamps
Shop at:
Sunny Studio
Lovable Llama Stamps
Shop at:
Sunny Studio
Stitched Circle Large Dies
Shop at:
Sunny Studio