Tuesday, February 25, 2020

Frilly Frames Eyelet Die Focused Cards with Leanne and Mindy

Hi there! Leanne here and I have a sweet and simple Easter card to share. I think when you have a simpler scene on a card, it's important to accent it with other design elements that won't be too over powering. That's where a die like the Frilly Frames Eyelet Lace comes in handy. This die can create just the right amount of interest without taking away from the focal point of the card. 

Sunny Studio Stamps: Frilly Frame Dies Stitched Oval Dies Chickie Baby Easter Card by Leanne West

I started with an A2 sized white card base. I die cut the Eyelet Lace frame from pastel aqua card stock and adhered it to the card base with dimensional foam squares. Next I die cut a stitched oval from white card stock to house my little Easter scene.  

Copic colors used: yellow - Y0000, Y00, Y15  pink - RV52, RV55  green - YG01, YG05  blue - BG10, BG11, BG13  light brown - E41, E42, E43  dark brown - E25, E27

Sunny Studio Stamps: Frilly Frame Dies Stitched Oval Dies Chickie Baby Easter Card by Leanne West

I used a mix images from a few different Sunny Studio stamps sets for the scene. The chick, basket, & eggs are from Chickie Baby. The little chocolate bunny is from Chubby Bunny. The tulips are from Spring Greetings. The greeting is from Happy Thoughts. I Copic colored the images and die cut with the coordinating dies. I then simply adhered the images onto the oval in a pleasing arrangement to complete the card. 

----------------------------------------------------

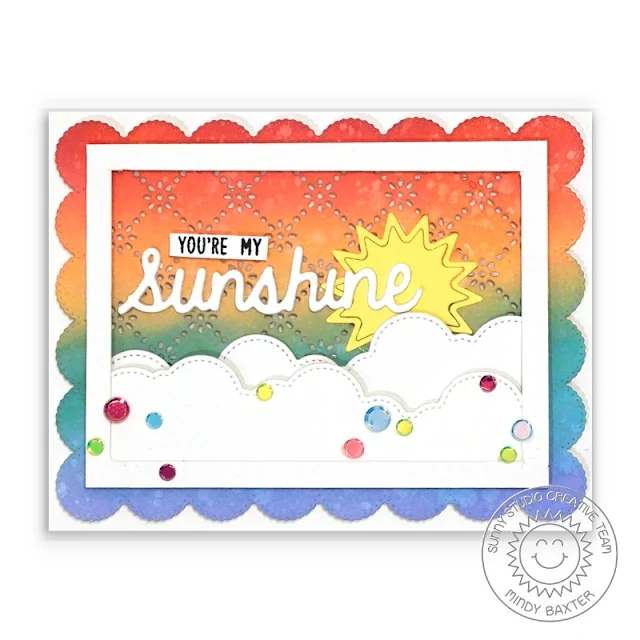
Hello! It’s Mindy from My Creative Scoop.Today I’m sharing a bright and cheerful card using the Frilly Frames Eyelet Lace Die

Sunny Studio Stamps: Frilly Frame Dies Fluffy Cloud Border Dies Sunshine Word Die Friendship Card by Mindy Baxter

First I used my Distress Oxide Inks and created a rainbow on my die cut. I’m also using the Fluffy Cloud Border Die, Sunshine Word Die, Comic Strip Speech Bubbles. It’s so much fun to mix and match dies to create a card. I was searching through my stamps and in the new Enchanted Stamp Set I found this “You’re My”, which goes perfect with Sunshine.

Sunny Studio Stamps: Frilly Frame Dies Fluffy Cloud Border Dies Sunshine Word Die Friendship Card by Mindy Baxter

I’m using the following Distress Oxide Inks: Barn Door, Dried Marigold, Scattered Straw, Evergreen Bough, Tumbled Glass, Shaded LilacI wanted to add some bling so I added some Iridescent Pastel Confetti to my card for a little sparkle and shine.

Check out my video below!


Thank you so much stopping by. Have a great day!

Sunny Studio Supplies Used:

Sunshine Word Die
Sunshine Word Die
Shop at:
Sunny Studio
Happy Thoughts Stamps
Shop at:
Sunny Studio
Stitched Oval Dies
Stitched Oval Dies
Shop at:
Sunny Studio
Chubby Bunny Stamps
Chubby Bunny Stamps
Shop at:
Sunny Studio
Chubby Bunny Dies
Chubby Bunny Dies
Shop at:
Sunny Studio
Spring Greetings Stamps
Shop at:
Sunny Studio
Spring Greetings Dies
Shop at:
Sunny Studio
Fluffy Clouds Border Dies
Shop at:
Sunny Studio
Comic Strip Speech Bubble Dies
Shop at:
Sunny Studio
Chickie Baby Stamps
Chickie Baby Stamps
Shop at:
Sunny Studio
Chickie Baby Dies
Chickie Baby Dies
Shop at:
Sunny Studio
Enchanted Stamps
Enchanted Stamps
Shop at:
Sunny Studio
Frilly Frames-Eyelet Lace
Shop at:
Sunny Studio

Monday, February 24, 2020

Enchanted Cards with Lynn and Ashley

Hello, friends! It’s Lynn here and I’m excited to share the tunnel card that I created featuring the sweet new stamp set Enchanted.

Sunny Studio Stamps: Enchanted Frilly Frame Dies Banner Basics Phoebe Alphabet Birthday Card by Lynn Put

To create my tunnel card, I started out by stamping a few of the images from the Enchanted stamp set, coloring them using Copic markers, and then using the Enchanted dies to die cut them out. Next I used the Frilly Frames Hexagon die and die cut a piece of white card stock for my top layer. Using two circle dies I die cut first my top white layer using the larger circle die and then some lavender card stock using the smaller circle die.

Before adhering my die cut layers on my white card base, I blended on some Spun Sugar Distress Oxide ink, added my castle and green card stock hill then stamped my sentiment. The “birthday” portion of my sentiment was from the Prancing Pegasus stamp set. On my pink background I also stamped some of the star images from the Enchanted stamp set and added some glitter to each of them.

Sunny Studio Stamps: Enchanted Frilly Frame Dies Banner Basics Phoebe Alphabet Birthday Card by Lynn Put

Once the background for my tunnel card was done, I adhered my two layers using foam tape. I added my princess using more foam tape and adhered flowers from the Chickie Baby stamp set which I stamped colored and die cut using the Chickie Baby dies. I used the Banner Basics stamp set and Banner Basics dies along with the Phoebe Alphabet to stamp the Princess portion of my sentiment.

Thanks so much for stopping by!

-------------------------------------------------------------

Hello everyone! It's Ashley today with a sparkly card featuring the Enchanted stamp set that just perfect for the princess in all of us!

Sunny Studio Stamps: Enchanted Sparkle Word Die Everyday Card by Ashley Ebben

I started by masking off sections of my card so I could ink blend different pieces of the background at a time. For the sky, I used Distress Oxides in Mermaid Lagoon, Blueprint Sketch, Wilted Violet, and Chipped Sapphire for a deep blue night time sky. I used a toothbrush to spray white paint for many tiny stars, followed by a paintbrush and silver watercolor for larger, shimmery stars. I added a grassy section with Distress Oxides in Bundled Sage and Peeled Paint for the castle to go on, and a pavement section with Distress Ink in Pumice Stone for the carriage. I used a stitched rectangle die and adhered the background to a starry piece of patterned paper from the Subtle Grey Tones pack.

I stamped several images from Enchanted in Lawn Fawn Jet Black ink and colored with Copics. I added dots of color and white gel pen dots and crosses to the princess dress to give the illusion of sparkle. I cut everything out with the matching dies and added the images to my card, popping the princess up with foam squares to make her stand out even more.

Sunny Studio Stamps: Enchanted Sparkle Word Die Everyday Card by Ashley Ebben

For my sentiment, I used the Sparkle Word die three times on white cardstock and a fourth time on sparkly white cardstock and glued the stack together. I added a sentiment from the Born to Sparkle stamp set with VersaMark ink and embossed in white. For extra sparkly finishing touches, I added a few white gel pen "sparkles" to the sky along with some blue confetti from Iridescent Pastel Confetti.

Thank you so much for stopping by! I hope your day sparkles!

Sunny Studio Supplies Used:

Born To Sparkle Stamps
Shop at:
Sunny Studio
Sparkle Word Die
Sparkle Word Die
Shop at:
Sunny Studio
Frilly Frames Hexagon Dies
Shop at:
Sunny Studio
Subtle Grey Tones Paper
Shop at:
Sunny Studio
Banner Basics Stamps
Shop at:
Sunny Studio
Banner Basics Dies
Banner Basics Dies
Shop at:
Sunny Studio
Chickie Baby Stamps
Chickie Baby Stamps
Shop at:
Sunny Studio
Chickie Baby Dies
Chickie Baby Dies
Shop at:
Sunny Studio
Enchanted Stamps
Enchanted Stamps
Shop at:
Sunny Studio
Enchanted Dies
Enchanted Dies
Shop at:
Sunny Studio
Phoebe Alphabet Stamps
Shop at:
Sunny Studio
Prancing Pegasus Stamps
Shop at:
Sunny Studio

Saturday, February 22, 2020

Guest Designer Spotlight: Cards with Karin Akesdotter

Hi everyone! I'm Karin Ã…kesdotter from Peppermint Patty’s Papercraft and I am so excited to be here to share some cards that I've created using the new Sunny Studio stamps. 

Sunny Studio Stamps: Pink Peonies Frilly Frame Dies Love Monkey Wishes Word Die Birthday Card by Karin Akesdotter

For my first card I started by making a card base from white cardstock and then cut a scalloped panel using the Frilly Frames Eyelet Lace dies. Next I die cut the beautiful "quilt" pattern through a rectangle piece of white cardstock, which I then adhered to the center of my card. This made a beautiful, textured background for the wonderful Pink Peonies

Sunny Studio Stamps: Pink Peonies Frilly Frame Dies Love Monkey Wishes Word Die Birthday Card by Karin Akesdotter

The peonies were first stamped in Antique Linen Distress ink, then colored with Copic markers before re-stamping and embossing the flowers again with gold embossing. I then made a little flag - with an embossed sentiment from Love Monkey and the Wishes Word die.  

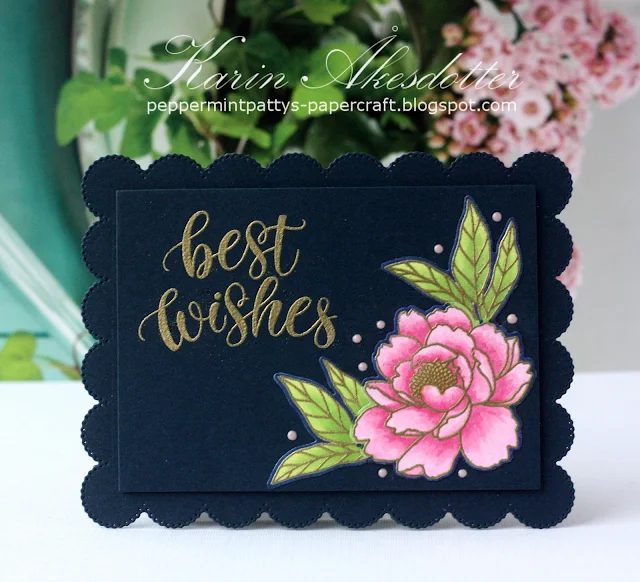
Sunny Studio Stamps: Pink Peonies Frilly Frame Dies Best Wishes Card by Karin Akesdotter

My second card was made in a very similar way, I just used dark colored cardstock instead to get a totally different look. So many possibilities with these wonderful sets!

Sunny Studio Stamps: Chickie Baby Easter Card by Karin Akesdotter

My last card is a fun and simple design where I stamped a row of adorable chicks, using the Chickie Baby stamp set. I then masked them off and inked the background with Distress ink. Before removing the masking I spattered the background with gold watercolor from Daniel Smith.

Sunny Studio Stamps: Chickie Baby Easter Card by Karin Akesdotter


Thank you so much for joining me here today! 

Sunny Studio Supplies Used:

Wishes Word Die
Wishes Word Die
Shop at:
Sunny Studio
Love Monkey Stamps
Love Monkey Stamps
Shop at:
Sunny Studio
Chickie Baby Stamps
Chickie Baby Stamps
Shop at:
Sunny Studio
Chickie Baby Dies
Chickie Baby Dies
Shop at:
Sunny Studio
Pink Peonies Stamps
Pink Peonies Stamps
Shop at:
Sunny Studio
Pink Peonies Dies
Pink Peonies Dies
Shop at:
Sunny Studio
Frilly Frames-Eyelet Lace
Shop at:
Sunny Studio

Friday, February 21, 2020

Spring Scenes Cards with Juliana and Candice

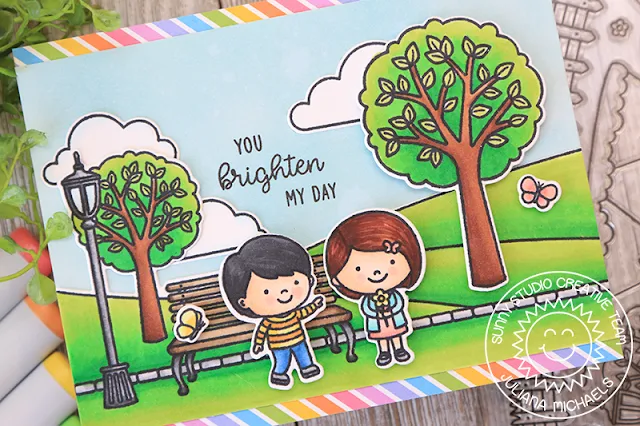
Hello friends! It's Juliana here and today I'll be sharing a card featuring the Spring Scenes Stamp Set. I couldn't resist combining it with the Spring Showers Stamp Set to create a spring themed card.

Sunny Studio Stamps: Spring Scenes Spring Showers Seasonal Trees Everyday Cards by Juliana Michaels

I began by stamping and coloring all the images from the Spring Scenes Stamp Set and Spring Showers Stamp Set with Copic Markers. I also added a tree image from the Seasonal Tree Stamp Set. I then die cut them using the coordinating dies and began arranging them to create a cute spring theme.

Sunny Studio Stamps: Spring Scenes Spring Showers Seasonal Trees Everyday Cards by Juliana Michaels

For the background, I ink blended a piece of White Bristol Paper with Tumbled Glass Distress Oxide. I then adhered the scene and added some stamped and die cut clouds. As I added the clouds, I made sure to leave room for the sentiment which is from the Spring Showers Stamp Set. For the final touch, I added some strips of patterned paper from the Spring Sunburst Paper.

I hope you enjoyed this bit of spring inspiration using the Spring Scenes Stamp Set. Isn't it great how wonderfully it coordinates with so many of the stamps from the spring release? Thanks so much for stopping by today!

-----------------------------------------------------

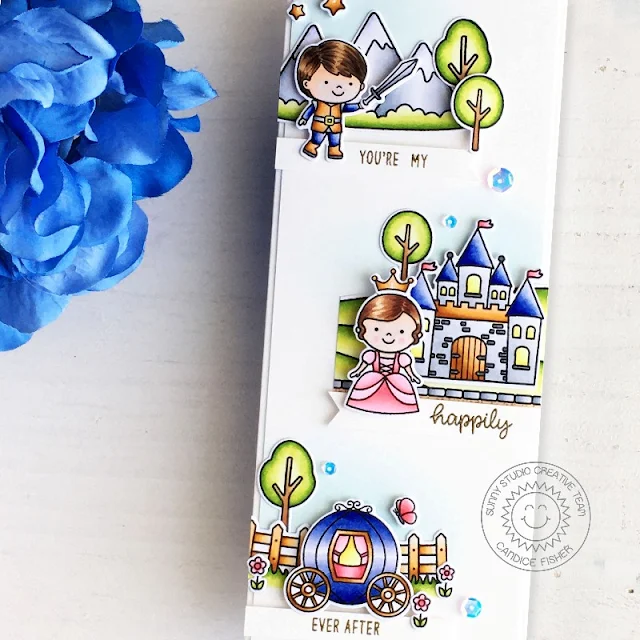
Hello, Candice with you today with this sweet little story on my slimline card using the awesome new Spring Scenes stamps to create the backgrounds for each scene!

Sunny Studio Stamps: Spring Scenes Enchanted Everyday Card by Candice Fisher

I used two sets from the new release:

I began by creating an 8 1/2 x 3 1/2 card base which is the perfect size for your standard envelopes. I first stamped all the images from Spring Scenes & Enchanted stamp sets, colored them with copic markers, and used the coordinating dies listed above to cut them out. I then created three banners using the sentiments from the Enchanted set and heat embossed them in gold.

Sunny Studio Stamps: Spring Scenes Enchanted Everyday Card by Candice Fisher

Before adhering each scene, I lined them up and inked lightly with tumbled glass for the sky and then glued the backgrounds down and used foam tape to add dimension to the front images. I kept the embellishments simple by adding a few sequins to let the story be the center of attention on my card.

Thank you for stopping by!

Sunny Studio Supplies Used:

Spring Sunburst 6x6 Paper
Shop at:
Sunny Studio
Seasonal Trees Stamps
Shop at:
Sunny Studio
Seaonal Trees Dies
Seaonal Trees Dies
Shop at:
Sunny Studio
Enchanted Stamps
Enchanted Stamps
Shop at:
Sunny Studio
Enchanted Dies
Enchanted Dies
Shop at:
Sunny Studio
Spring Scenes Stamps
Shop at:
Sunny Studio
Spring Scenes Dies
Spring Scenes Dies
Shop at:
Sunny Studio
Spring Showers Stamps
Shop at:
Sunny Studio
Spring Showers Dies
Spring Showers Dies
Shop at:
Sunny Studio