Thursday, February 20, 2020

Chickie Baby Cards with Vanessa and Anja

Hello to you! Vanessa here with a new card using the adorable Chickie Baby Stamps. These chicks are hilarious. Today, they are celebrating a birthday party:

Sunny Studio Stamps: Chickie Baby Blooming Frame Dies Birthday Card by Vanessa Menhorn

I first inked a panel of white cardstock with Distress Oxide Inks and adhered it to the card base. Now I stamped the images, colored them with Copics, die-cut everything with the matching dies and adhered the elements to the card with foam tape.

Sunny Studio Stamps: Chickie Baby Blooming Frame Dies Birthday Card by Vanessa Menhorn

Finally, I die-cut the "Happy Birthday", using the Blooming Frame Dies from pink and white cardstock, layered the pieces and adhered them. Stamps used in addition: Oceans of Joy (balloon)Purrfect Birthday (hats)

I hope these cuties made you smile today! Thanks for visiting!

-------------------------------------------------------

Hello everyone, Anja here and today the spotlight is on the Chickie Baby Stamps. Aren't they the cutest?!

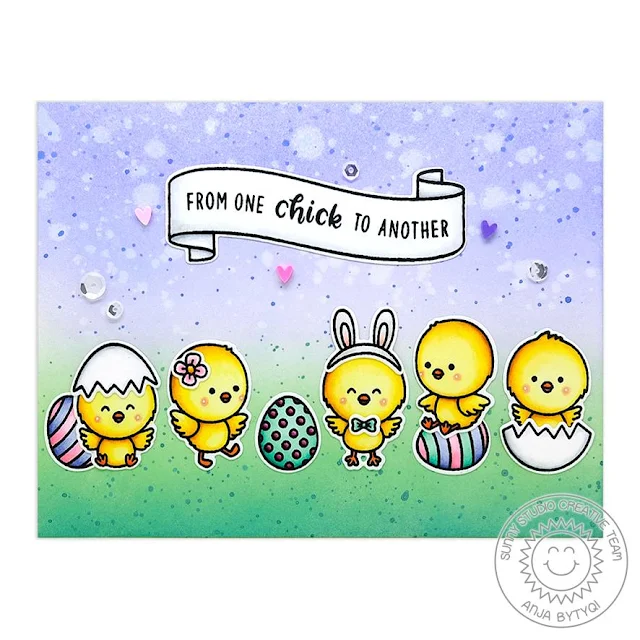
Sunny Studio Stamps: Chickie Baby Banner Basics Friendship Card by Anja Bytyqi

For the Distress Oxide Ink background, I blended together Shaded Lilac, Cracked Pistachio and Evergreen Bough. I also added water droplets and ink splatters.

I stamped the chickens, eggs and little accessories in Memento Tuxedo Black Ink and did some Copic coloring. I used the coordinating dies to cut out the images. To fit the sentiment inside one of the Banner Basics Stamps, I slightly curved it. I did a bit of shading with grey Copics and used the matching die to cut it out.

Sunny Studio Stamps: Chickie Baby Banner Basics Friendship Card by Anja Bytyqi

I arranged the chickens in a row and placed the banner above them. To finish off my card, I adhered Pink & Purple Heart Confetti clay embellishments and sparkling clear sequins.

Thank you so much for stopping by! Wishing you a lovely day!

Sunny Studio Supplies Used:

Oceans of Joy Dies
Oceans of Joy Dies
Shop at:
Sunny Studio
Oceans of Joy Stamps
Shop at:
Sunny Studio
Purrfect Birthday Stamps
Shop at:
Sunny Studio
Purrfect Birthday Dies
Shop at:
Sunny Studio
Banner Basics Stamps
Shop at:
Sunny Studio
Banner Basics Dies
Banner Basics Dies
Shop at:
Sunny Studio
Chickie Baby Stamps
Chickie Baby Stamps
Shop at:
Sunny Studio
Chickie Baby Dies
Chickie Baby Dies
Shop at:
Sunny Studio
Blooming Frame Die
Blooming Frame Die
Shop at:
Sunny Studio

Wednesday, February 19, 2020

Prancing Pegasus Cards with Franci and Ana

Happy Wednesday friends! Franci here with you and today I have a magical card to share.
Time to put the new Prancing Pegasus set on the spotlight! 

Sunny Studio Stamps: Prancing Pegasus Frilly Frame Dies Hello Card by Franci Vignoli

First of all I die cut this scalloped square out of white cardstock using the Frilly Frames Eyelet Lace set and the partial die cutting technique. I created a matching card base out of the same cardstock and covered the front with this fun stripy rainbow paper from the Spring Fling set.

I stamped the Pegasus and all the stars (multiple times!), colored them all with Copics and die cut them with their coordinated dies. I stamped my "Hello" sentiment from the Cheerful Daisies set on the bottom and glued all the images in the center with foam adhesive.

Sunny Studio Stamps: Prancing Pegasus Frilly Frame Dies Hello Card by Franci Vignoli

I mounted my decorated panel on to my card with foam adhesive and finally added some details with a white gel pen and some sparkling clear sequins to finish my design.

Hope you like my card and thank you so much for stopping by today! Have a lovely day!

-------------------------------------------------------

Hello crafty friends! It’s Ana here today with a birthday card featuring Prancing Pegasus stampscoordinating dies and Spring Fling paper pack.

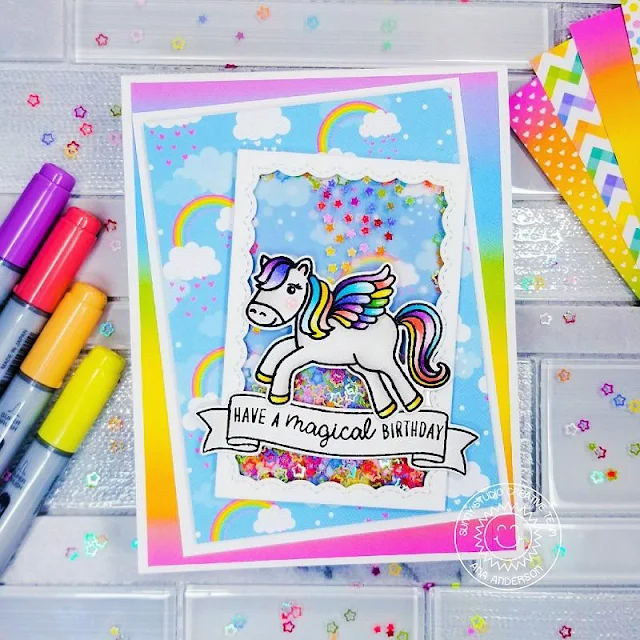
Sunny Studio Stamps: Prancing Pegasus Banner Basics Fancy Frame Dies Birthday Shaker Card by Ana Anderson

I started with stamping Prancing Pegasus with Copic friendly ink and coloring him with Copic markers in rainbow colors. I stamped the sentiment (from Prancing Pegasus set) on a banner (from Banner Basics) and added some shading with warm gray marker. Once my images were colored, I cut them with coordinating Prancing Pegasus and Banner Basics dies.

For the background, I choose rainbow and blue rainbow sky papers from Spring Fling paper pack, trimmed the rainbow piece slightly smaller than A2 size card base, then trimmed a piece of blue rainbow paper to 3 x 4 1/4 and matted it with white cardstock.

Sunny Studio Stamps: Prancing Pegasus Banner Basics Fancy Frame Dies Birthday Shaker Card by Ana Anderson

For the shaker part of the card, I used the smallest Fancy Frames Rectangles die to cut the white frame, added acetate, foam tape and filled the shaker with Rainbow Star Confetti. I backed the shaker with a piece of vellum, to mute the background a bit so the shaker stars can stand out more.

I adhered the sentiment banner with liquid glue and added Prancing Pegasus with foam tape. To embellish the shaker, I adhered the stars (from Rainbow Star Confetti) to the front of the shaker in rainbow order, then added Wink of Stella to the Pegasus’ mane and hooves.

I just love how happy and colorful this card turned out! I really hope I have inspired you today and until next week I wish you happy crafting!

Sunny Studio Supplies Used:

Fancy Frames- Rectangles
Shop at:
Sunny Studio
Banner Basics Stamps
Shop at:
Sunny Studio
Banner Basics Dies
Banner Basics Dies
Shop at:
Sunny Studio
Prancing Pegasus Stamps
Shop at:
Sunny Studio
Prancing Pegasus Dies
Shop at:
Sunny Studio
Frilly Frames-Eyelet Lace
Shop at:
Sunny Studio
Spring Fling Paper
Spring Fling Paper
Shop at:
Sunny Studio

Tuesday, February 18, 2020

Blooming Frame Die Focused Cards with Angelica and Mindy

Hi friends! Angelica here, and I have a card to share with you today featuring the Blooming Frame Die.

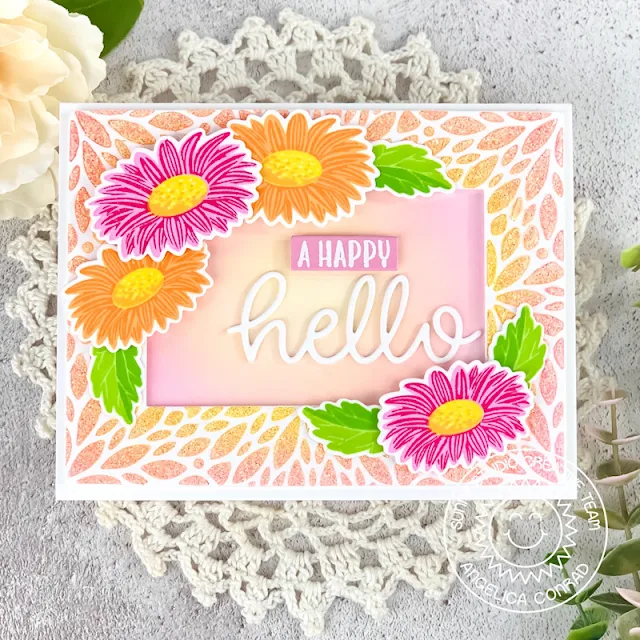
Sunny Studio Stamps: Blooming Frame Dies Cheerful Daisies Hello Word Die Hello Card by Angelica Conrad

I die-cut a white card stock panel with the Blooming Frame Die, and used the panel as a stencil. I blended yellow and pink ink over the "stencil", finishing up with a thin layer of Gina K Designs White Glitter Gel. Once dry, I trimmed the glittery panel into a frame, and made coordinating Cheerful Daisies to decorate the frame. 

Sunny Studio Stamps: Blooming Frame Dies Cheerful Daisies Hello Word Die Hello Card by Angelica Conrad

I white heat-embossed a partial Cheerful Daisies sentiment onto pink card stock, trimmed it, and attached it to the card with foam squares. I finished the card with a die-cut Hello

Thanks so much for joining me today. I hope I have given you an idea or two on how to stretch your supplies!

---------------------------------------------------------

Hello! It’s Mindy from My Creative Scoop. Today I’m sharing a fun Birthday Card using the Blooming Frame Die and Prancing Pegasus Stamp and die set. I’m also using the new Spring Fling Paper behind my Blooming Frame Die

Sunny Studio Stamps: Blooming Frame Dies Prancing Pegasus Fancy Frame Dies Birthday Card by Mindy Baxter

I love how the white pattern pops against the rainbow paper. The Scalloped border around the ‘Happy Birthday’ is from the Fancy Frame Rectangle Dies. I actually cut 2 out in black and then one in white to give the frame a little bit of a shadow.

Sunny Studio Stamps: Blooming Frame Dies Prancing Pegasus Fancy Frame Dies Birthday Card by Mindy Baxter

I colored my Prancing Pegasus Stamp with my Copic Markers. Here’s a list of the colors I used. Body – N3, N1, N0, R32, R30. Rainbow hair and Wings – R32, Y35, Y02, YG13, B14, V12, N3.

Thank you so much stopping by. Have a great day!

Sunny Studio Supplies Used:

Fancy Frames- Rectangles
Shop at:
Sunny Studio
Hello Word Die
Hello Word Die
Shop at:
Sunny Studio
Cheerful Daisies Stamps
Shop at:
Sunny Studio
Cheerful Daisies Dies
Shop at:
Sunny Studio
Prancing Pegasus Stamps
Shop at:
Sunny Studio
Prancing Pegasus Dies
Shop at:
Sunny Studio
Blooming Frame Die
Blooming Frame Die
Shop at:
Sunny Studio
Spring Fling Paper
Spring Fling Paper
Shop at:
Sunny Studio

Monday, February 17, 2020

Spring Showers Cards with Lynn and Ashley

Hi there! It’s Lynn here and today I’m sharing a fun interactive card I created featuring the adorable new stamp set Spring Showers.

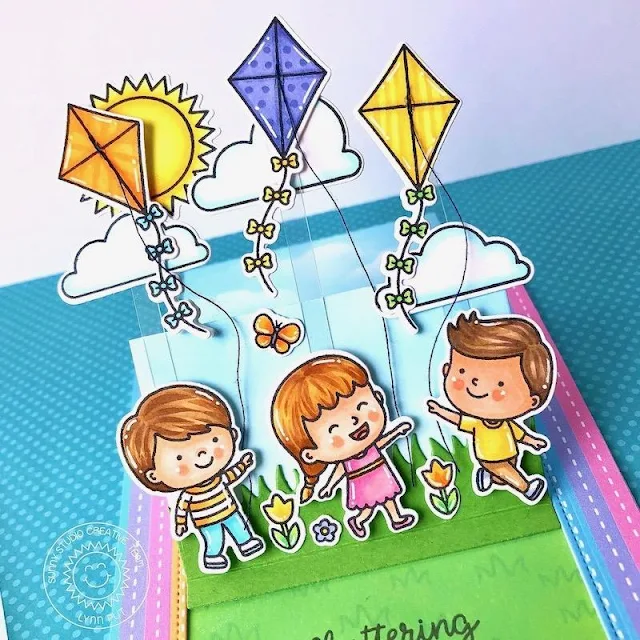
Sunny Studio Stamps: Spring Showers Sliding Window Dies Sunny Sentiments Spring Scenes Interactive Birthday Card by Lynn Put

The Spring Showers stamp set is such a fun set with all of the cute characters, kites and umbrellas, I knew I wanted to create something with kites flying up in the air and with the Sliding Window dies I gave it a go.

To create my card, I started out by stamping my images from the Spring Showers stamp set and coloring them using Copic markers then die cutting them out using the Spring Showers dies. I also stamped the sun from the Sunny Sentiment stamp set, colored that and die cut it using the Sunny Sentiment diesOnce all of my images were colored and die cut, I started on making my sliding window. To put together the Sliding Window card, I followed these easy directions which you can find here or you can watch a video tutorial here. 

Sunny Studio Stamps: Spring Showers Sliding Window Dies Sunny Sentiments Spring Scenes Interactive Birthday Card by Lynn Put

There are three pieces needed to create the Sliding Window card, a card base, a piece of card stock cut 4 7/8” x 3 1/4” and your top panel which is 5 1/2” x 4 1/4”. For my top panel, I used a piece of white card stock and a piece of rainbow striped paper from the Spring Fling paper pack and die cut them together using the Sliding Window main rectangle die and the tab die. After that I used my paper trimmer along the top of the flap of the striped paper to cut the center portion out so the white card stock underneath would show through. On that center white card stock and the 4 7/8” x 3 1/4” piece of white card stock I blended on some Tumbled Glass Distress Oxide ink

Sunny Studio Stamps: Spring Showers Sliding Window Dies Sunny Sentiments Spring Scenes Interactive Birthday Card by Lynn Put

Next I cut thin strips of clear acetate and attached my kites, clouds and sun to the end of them, popping up the orange kite with foam tape. The ends of the clear acetate strips were then adhered to the bottom of the center ink blended piece on my top panel. After that I used the Sunny Sentiment grass die which I cut from green card stock for a grassy ground. I adhered the three children with foam tape and added some flowers and a butterfly. For kite string I used some black thread and attached just a sliver of a glue dot to the back of the children's hands and then onto the centers of the kites.

Sunny Studio Stamps: Spring Showers Sliding Window Dies Sunny Sentiments Spring Scenes Interactive Birthday Card by Lynn Put

To finish my Sliding Window card, I blended on some Mowed Lawn Distress Oxide ink on the lower half of my card base and stamped some grass from the Spring Scenes stamp set and stamped my sentiment, then I adhered my 4 7/8” x 3 1/4” pull panel and adhered my top panel with the striped rainbow paper and my images.

Thank you so much for stopping by!

----------------------------------------------------------

Hi friends! It's Ashley with a cute rainy day scene featuring Spring Showers! As soon as I saw the cute umbrellas in this set, I knew I wanted to make a rain shaker card. It's a perfect match! I decided to change it up a bit though, and give the umbrellas to the chicks from Chickie Baby! I think the result is adorable!

Sunny Studio Stamps: Spring Showers Spring Scenes Chickie Baby Everyday Shaker Card by Ashley Ebben

I started by stamping the bench scene from Spring Scenes onto white cardstock with Lawn Fawn Jet Black ink. I colored it with Copics, then masked it off so I could ink blend the sky. I used a cloud stencil and Lawn Fawn Manatee ink to give some rainy day clouds. I created the rain shaker using skinny foam tape, fishing line, and clear iridescent beads. I have a more in depth tutorial from a previous card on my blog here

For my top piece, I die cut a cloud border and blended a bit more Manatee ink on the edges. I stamped my sentiment from Spring Showers on the middle of the cloud in VersaMark Onyx Black and embossed with clear. I used Copic markers on a white strip of cardstock to create the pavement and added both pieces to a skinny white frame. 

Sunny Studio Stamps: Spring Showers Spring Scenes Chickie Baby Everyday Shaker Card by Ashley Ebben

I stamped the chicks from Chickie Baby and the umbrellas and clouds from Spring Showers in Lawn Fawn Jet Black ink and colored with Copics. I put one chick behind the strings of my rain shaker on the bench and added the other two to the pavement strip. I placed a few clouds at the top to finish the card.

Thank you so much for stopping by! Have a wonderful day!

Sunny Studio Supplies Used:

Sunny Sentiments Dies
Shop at:
Sunny Studio
Sunny Sentiments Stamps
Shop at:
Sunny Studio
Sliding Window Dies
Sliding Window Dies
Shop at:
Sunny Studio
Chickie Baby Stamps
Chickie Baby Stamps
Shop at:
Sunny Studio
Chickie Baby Dies
Chickie Baby Dies
Shop at:
Sunny Studio
Spring Scenes Stamps
Shop at:
Sunny Studio
Spring Showers Stamps
Shop at:
Sunny Studio
Spring Showers Dies
Spring Showers Dies
Shop at:
Sunny Studio
Spring Fling Paper
Spring Fling Paper
Shop at:
Sunny Studio