Thursday, October 17, 2019

Santa Claus Lane Cards with Anja and Vanessa

Hello everyone, Anja here with another inspiration card using products from the latest Winter Release which help to build a gorgeous holiday scene quickly.

Sunny Studio Stamps: Santa Claus Lane Christmas Garland Frame Dies Winter Themed Christmas Card by Anja Bytyqi

I immediately fell in love with this beautiful patterned paper from the Very Merry 6x6 Paper pack. It's the perfect winter night scene and the glowing moon looks amazing!

I combined it with the cute Santa Clause Lane Stamps. The images were stamped in Memento Tuxedo Black Ink and colored with Copic Markers. I used the coordinating dies to cut them out.

Sunny Studio Stamps: Santa Claus Lane Christmas Garland Frame Dies Winter Themed Christmas Card by Anja Bytyqi

For the sentiment, I die cut the word 'merry' included in the Christmas Garland Frame Die set from red glitter cardstock and adhered it across the moon. Next, I stamped the words in VersaMark Ink above and below it and heat embossed them with silver embossing powder. I added silver star sequins to complete my card.

Thank you so much for stopping by! Hope to see you again next week!

-----------------------------------------------

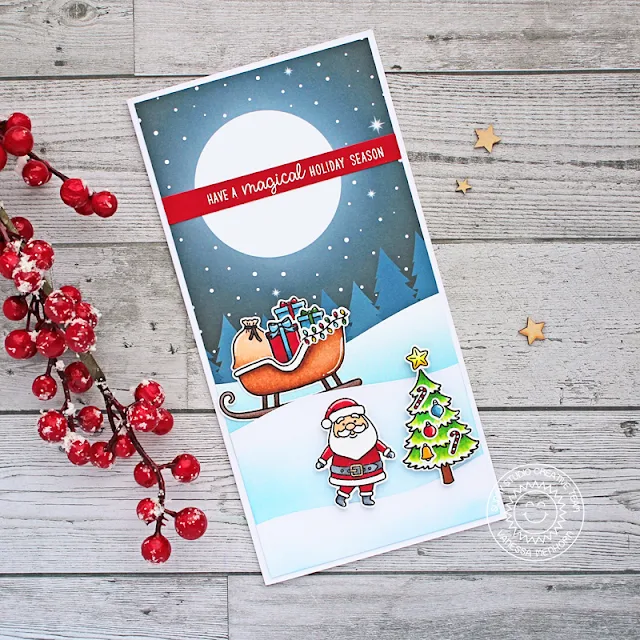
Hello to you! Vanessa here today with a slim sized card using the adorable Santa Claus Lane Stamps. I love the new Very Merry 6x6 Paper, especially the landscape backgrounds Mendi is providing with this paper pad.

Sunny Studio Stamps: Santa Claus Lane Seasonal Trees Winter Themed Christmas Card by Vanessa Menhorn

First, I trimmed the patterned paper slightly smaller than the width of the card and adhered it. Now I die-cut snow drifts, using the sand dune from the Oceans of Joy Dies, inked the bottom slightly with Distress Ink and adhered them. I stamped all the images, colored them with Copics, die-cut them with the matching dies and adhered the elements to the card.

Sunny Studio Stamps: Santa Claus Lane Seasonal Trees Winter Themed Christmas Card by Vanessa Menhorn

Finally, I stamped and heat-embossed the sentiment onto a strip of red cardstock, trimmed it and adhered it to the card. I so love the new cute Christmas stamps! Here I added a tree from the Seasonal Trees set and a larger present from the Playful Polar Bears set

Thank you for visiting today!

Sunny Studio Supplies Used:

Oceans of Joy Dies
Oceans of Joy Dies
Shop at:
Sunny Studio
Oceans of Joy Stamps
Shop at:
Sunny Studio
Playful Polar Bears Stamps
Shop at:
Sunny Studio
Playful Polar Bears Dies
Shop at:
Sunny Studio
Seasonal Trees Stamps
Shop at:
Sunny Studio
Seaonal Trees Dies
Seaonal Trees Dies
Shop at:
Sunny Studio
Very Merry 6x6 Paper
Shop at:
Sunny Studio
Santa Claus Lane Stamps
Shop at:
Sunny Studio
Santa Claus Lane Dies
Shop at:
Sunny Studio
Christmas Garland Frame
Shop at:
Sunny Studio

Wednesday, October 16, 2019

Layered Poinsettia Cards with Ana and Franci

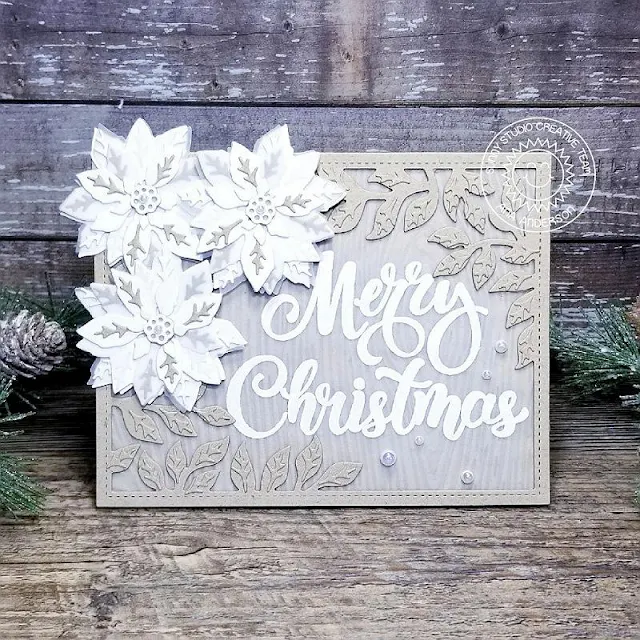
Hello friends! It’s Ana here today with a rustic Christmas card featuring gorgeous Layered Poinsettia Die set as well as Woodgrain Embossing folder from the new holiday release.

Sunny Studio Stamps: Layered Poinsettia Dies Season's Greetings Botanical Backdrop Dies Elegant Christmas Card by Ana Anderson

To create the rustic background I die cut kraft cardstock twice with Botanical Backdrop die and layered them together using liquid glue. I dry embossed another piece of kraft cardstock with Woodgrain Embossing folder. I stamped Merry Christmas sentiment (from Season’s Greetings Stamps) with VersaMark Watermark ink and white heat embossed it on a piece of vellum.

I adhered sentiment vellum piece to woodgrain panel, then added the botanical backdrop die cut on top and placed the completed background panel under large acrylic block. I die cut the poinsettia pieces from white cardstock and vellum, layered them together, adding kraft and white veins to the layers.

Sunny Studio Stamps: Layered Poinsettia Dies Season's Greetings Botanical Backdrop Dies Elegant Christmas Card by Ana Anderson

I die cut additional veins from kraft cardstock and adhered them to the leaves of the botanical backdrop background. To finish the card I embellished it with white pearls.

Thank you so much for taking the time to stop by today. Until next week, I wish you happy crafting!

----------------------------------------------

Hello crafty friends and happy Wednesday! Franci here with you today and I'm happy to share a cute little DIY project made with the new Layered Poinsettia dieI love this new set so much! Here I created 2 poinsettia pins and mounted them onto little tags so they could be perfect little handmade gift or you can use them as tags on to your Xmas presents.

Sunny Studio Stamps: Layered Poinsettia Dies Scalloped Tag Dies Elegant Christmas Tags by Franci Vignoli

I die cut the tiny Scalloped Tag Square die twice out of the new Subtle Grey Tones 6x6 paper and white cardstock, I stamped the "to and from" included in the Season's Greetings stamp set on the back and I glued them together. I also added some green ribbon and some silver twine at the top.

Sunny Studio Stamps: Layered Poinsettia Dies Scalloped Tag Dies Elegant Christmas Tags by Franci Vignoli

I colored some white cardstock by sponging some Abandoned Coral, Candid Apple and Picked Raspberry distress inks + Twisted Citron Distress inks Oxide, Shabby Shutters and Olive Crush distress inks and die cut all the different Poinsettia elements.

Sunny Studio Stamps: Layered Poinsettia Dies Scalloped Tag Dies Elegant Christmas Tags by Franci Vignoli

I assembled each flower and glued everything together with liquid glue, then I mounted my pin on the back and secured with hot glue. Finally I punched a little hole in each tags and attached my pins.

Hope you like them and thank you so much for stopping by today! 

Sunny Studio Supplies Used:

Botanical Backdrop Die
Shop at:
Sunny Studio
Subtle Grey Tones Paper
Shop at:
Sunny Studio
Woodgrain Embossing
Woodgrain Embossing
Shop at:
Sunny Studio
Season's Greetings Stamps
Shop at:
Sunny Studio
Layered Poinsettia Dies
Shop at:
Sunny Studio
Scalloped Tags-Square
Shop at:
Sunny Studio

Tuesday, October 15, 2019

Merry Mice Cards with Angelica and Juliana

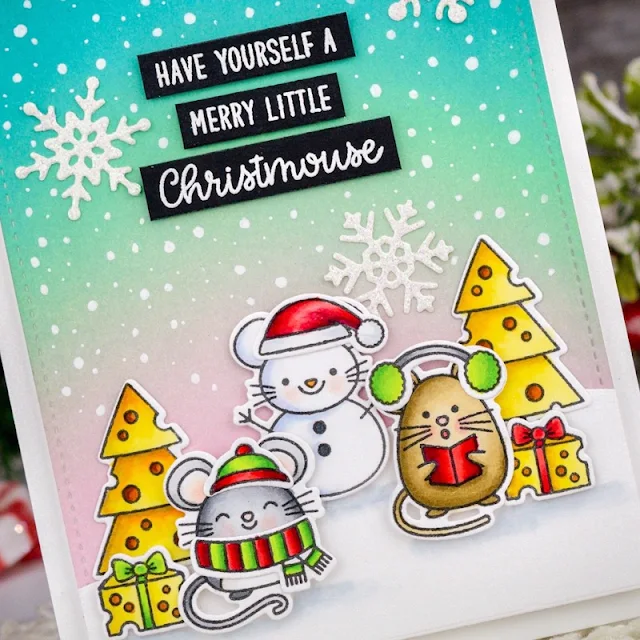
Hi friends, Angelica here, with a fun Christmas card featuring the adorable Merry Mice stamp set.

Sunny Studio Stamps: Merry Mice Layered Snowflake Frame Dies Frilly Frame Dies Christmas Card by Angelica Conrad

I colored these festive mice with Copic Markers before using the coordinating dies to die-cut them. I used glue to attach the scarf and hats. For the background, I blended Spun Sugar, Cracked Pistachio, and Peacock Feathers Distress Oxide inks onto white card stock. I trimmed the panel with the stitched Frilly Frames Retro Petals rectangle, then attached it to a card base with foam adhesive.

Sunny Studio Stamps: Merry Mice Layered Snowflake Frame Dies Frilly Frame Dies Christmas Card by Angelica Conrad

To finish the card, I added a white card stock hill and trees to the panel, then used foam squares to add the presents and mice. I stamped and white heat-embossed a sentiment onto black card stock, trimmed the words, and used thin foam squares to add them to them to the card. I added die-cut snowflakes from the Layered Snowflake Frame Die, and finished the card by adding snow with a white gel pen.

I hope I have helped with ideas for this sweet Merry Mice stamp set. Thanks so much for stopping by!

--------------------------------------------------

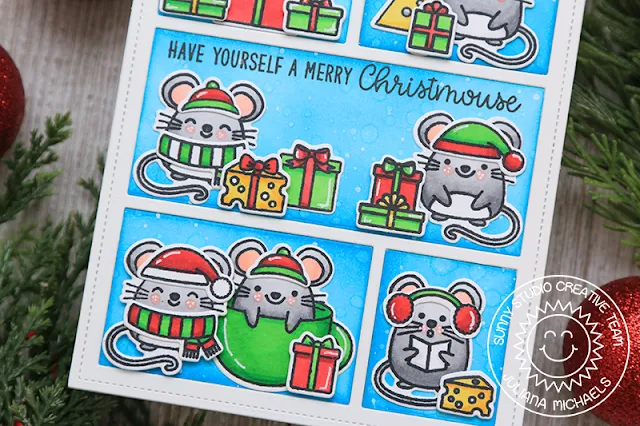
Hello Sunny Studio Friends! It's Juliana here and today I'm sharing a card featuring the Merry Mice Stamp Set. I couldn't help but include as many of these adorable images as possible to create a cute little "Christmouse" scene.

Sunny Studio Stamps: Merry Mice Comic Strip Everyday Dies Christmas Card by Juliana Michaels

As always, I began by stamping and coloring a bunch of the images from the Merry Mice Stamp Set. I also added in some extra presents from the Santa Claus Lane Stamp Set. Did you notice the mouse in the present? That present is from the Happy Owlidays Stamp Set. I also added an extra hat from the Alpaca Holiday Stamp Set. Once all of the coloring was completed, I die cut the images using the coordinating die sets.

Sunny Studio Stamps: Merry Mice Comic Strip Everyday Dies Christmas Card by Juliana Michaels

Because I wanted to create a little scene ... almost like a little mouse house, I used the comic strip frame from the Comic Strip Everyday Dies. I cut this from white Bristol Paper. I then took the negative pieces left over from die cutting and inked those with Salty Ocean Distress Oxide, splattered them with a bit of water and dabbed that dry to activate the ink. I then splattered a little bit of watered down white acrylic paint to give the look of falling snow.

I then went about layering the images and creating a scene inside each of the openings. I then completed the card by stamping the sentiment in the center section.

Thanks so much for stopping by today! I hope you enjoyed this bit of inspiration using the Merry Mice Stamp Set

Sunny Studio Supplies Used:

Comic Strip Everyday Dies
Shop at:
Sunny Studio
Alpaca Holiday Stamps
Shop at:
Sunny Studio
Alpaca Holiday Dies
Alpaca Holiday Dies
Shop at:
Sunny Studio
Happy Owlidays Stamps
Shop at:
Sunny Studio
Happy Owlidays Dies
Happy Owlidays Dies
Shop at:
Sunny Studio
Frilly Frames Retro Petals Dies
Shop at:
Sunny Studio
Santa Claus Lane Stamps
Shop at:
Sunny Studio
Santa Claus Lane Dies
Shop at:
Sunny Studio
Merry Mice Stamps
Merry Mice Stamps
Shop at:
Sunny Studio
Merry Mice Dies
Merry Mice Dies
Shop at:
Sunny Studio
Layered Snowflake Frame
Shop at:
Sunny Studio

Monday, October 14, 2019

Hogs & Kisses Cards with Leanne and Eloise

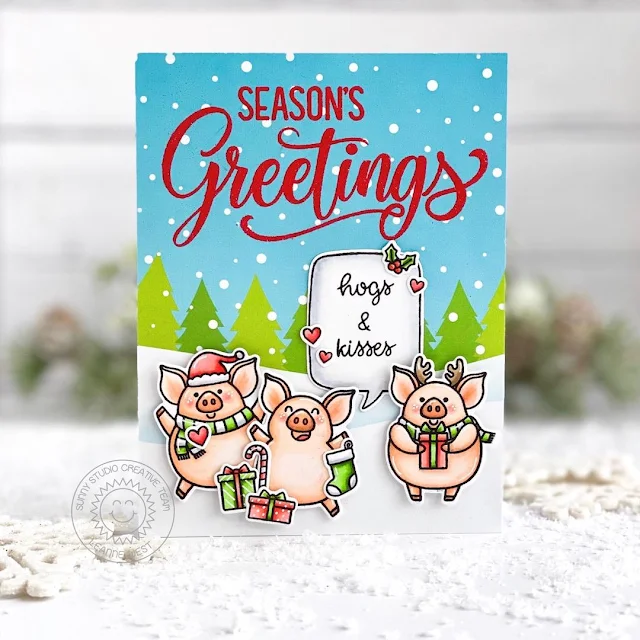
Hi everyone, Leanne here! I have an easy holiday scene card to share today. This scene came together quickly thanks to the pre-printed background. The background for my scene is a piece of patterned paper from the Very Merry 6x6 paper pad. I simply trimmed the patterned paper to A2 size and adhered to the card base.  

Sunny Studio Stamps: Hogs & Kisses Santa Claus Lane Season's Greetings Winter Holiday Themed Card by Leanne West

I stamped and heat embossed the large Season's Greetings onto the sky area of the background. Next comes the fun part.... filling in the scene with lots of cute images. I Copic colored all the adorable pigs from the Hogs & Kisses stamp set (Copic colors for pigs - E000, E00, E01, E21).

Sunny Studio Stamps: Hogs & Kisses Santa Claus Lane Season's Greetings Winter Holiday Themed Card by Leanne West

I wanted to include some extra accessories in this scene. The presents, candy cane, and stocking are from the Santa Claus Lane set. I love how all of Sunny Studio's sets can be mixed and matched to customize any scene. To complete the card I added the speech bubble which is a part of the Hogs & Kisses set.  

---------------------------------------------

Hi friends, Eloise here and today I have a card using the Hogs & Kisses Stamp Set. I used the speech bubble in the set to help frame the pig images and coloured them in using inspiration for the patterned paper I used from Very Merry.

Sunny Studio Stamps: Hogs & Kisses Winter Holiday Themed Card by Eloise Blue

I started off with stamping and colouring in my images from Hogs & Kisses. I used Copic Markers. I then cut them out. Once they were cut out, I used some white gel pen to add some details. I then stamped over the pigs at an angle with the speech bubble stamp and cut around the edges to make sure they would fit inside. I also stamped and cut four more speech bubbles separately too.

(Copic Markers Used: W00, W0 / E41, E42, E43, E44 / R14, R24, R27, R29 / B12, B14, B16, B18 / R000, R00, R20, R22 / R81, R83, R85, R89 / YG01, YG03, YG06, YG09 / 0)

Sunny Studio Stamps: Hogs & Kisses Winter Holiday Themed Card by Eloise Blue

I added foam tape onto the backs of the pigs and adhered them inside the speech bubbles. I then took the ‘Hoggy Holiday Kisses’ sentiment and stamped that inside the last speech bubble. I added foam tape onto the backs of them and adhered them down onto some patterned paper from Very Merry.

Thanks so much for stopping by today and I’ll see you next time.

Sunny Studio Supplies Used: 

Very Merry 6x6 Paper
Shop at:
Sunny Studio
Season's Greetings Stamps
Shop at:
Sunny Studio
Santa Claus Lane Stamps
Shop at:
Sunny Studio
Santa Claus Lane Dies
Shop at:
Sunny Studio
Hogs & Kisses Stamps
Shop at:
Sunny Studio
Hogs & Kisses Dies
Hogs & Kisses Dies
Shop at:
Sunny Studio

Saturday, October 12, 2019

Guest Designer Spotlight: Feeling Frosty Cards with Chitra Nair

Hello everyone!! Chitra here!! I just can't tell you guys how excited I am today to be guest designing for Sunny Studio Stamps!!! Eeeekkkkk!!! And the best part is I got to play with their cutest winter release!!! I have two cards to share with you all today using the cutest snowman stamp set called Feeling Frosty and its coordinating dies

Sunny Studio Stamps: Feeling Frosty Layered Snowflake Frame Dies Winter Themed Cards by Chitra Nair

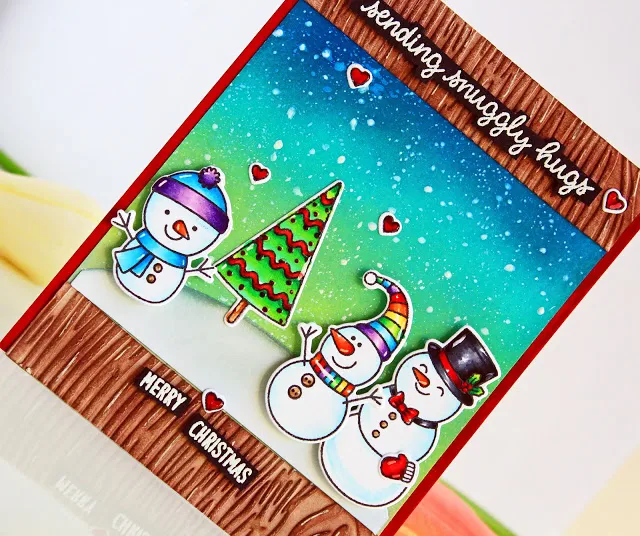
Just look at the cute snowmen!!!! I used 3 of them and the Christmas tree on my first card. I stamped all the images onto crafter's companion ultra-smooth white cardstock and colored with Copics, the snowmen are colored using B00 and 0 and then cut them with their coordinating dies.

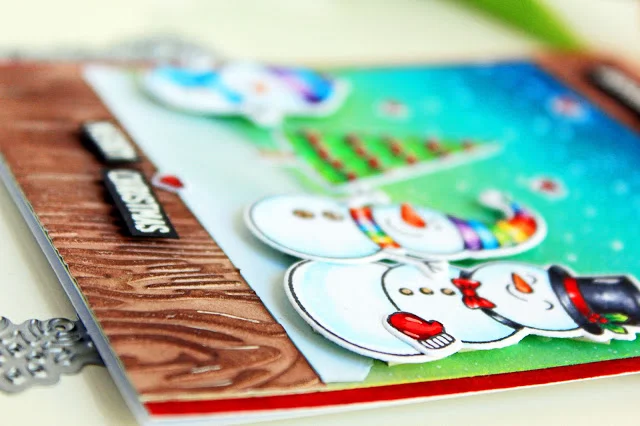
The background is ink blended using distress oxide inks (Mermaid Lagoon, Peacock Feather, and Twisted Citron), then I splattered some water and dried it out using a towel. Once the background was dry I splattered some white acrylic paint and left it to dry. Then I took another piece of white cardstock and embossed it with Woodgrain embossing folder and applied some Rich Cocoa Memento Ink for that wood look. I colored the sides of the white card base with a red marker before adhering anything down.

Sunny Studio Stamps: Feeling Frosty Layered Snowflake Frame Dies Winter Themed Cards by Chitra Nair

First I adhered the colored panel, then I adhered the woodgrain embossed piece on top and bottom to frame the scene. I wanted a snow ground for my snowmen so took another piece of white cardstock and die-cut it out using an oval die to get that curvy snow mountain, adhered that flat and the used some foam squares to adhere my little snowmen.

Sunny Studio Stamps: Feeling Frosty Layered Snowflake Frame Dies Winter Themed Cards by Chitra Nair

The sentiment is heat embossed using WOW white embossing powder on black cardstock and cut out with scissor and adhered that to the card using foam squares. Lastly I added few hearts and then added white highlights using white signo gel pen and also added little Nuvo clear glaze to the buttons.

Sunny Studio Stamps: Feeling Frosty Layered Snowflake Frame Dies Winter Themed Cards by Chitra Nair

My second card is little more simple. This beautiful Layered Snowflake frame die alone is enough to perk up your winter cards. For this card I used rest of the snowmen in the set, stamped them using Memento black ink and colored with Copics and used their coordinating dies to cut them out.

I took a white cardstock and used oxide inks (Antique Linen, Salty Ocean, Blueprint Sketch and Black Soot) to create my snowy sky background, splattered little water and dried out using towel. Once everything dried I stamped some snowflakes with a white pigment ink and then splattered white acrylic paint for the snow.

Sunny Studio Stamps: Feeling Frosty Layered Snowflake Frame Dies Winter Themed Cards by Chitra Nair

I die-cut out snowflake frame (I used the larger frame) out of white cardstock and also I die-cut out few snowflakes and the word winter out of white cardstock, then ink blended the word winter using the same oxide inks. I adhered the colored panel flat on an A2 white card base and also gave a snow ground for the snowmen to stand on. Then I adhered the snowflake frame and the snowmen, I used foam squares for the snowmen.

Sunny Studio Stamps: Feeling Frosty Layered Snowflake Frame Dies Winter Themed Cards by Chitra Nair

I adhered the snowflakes directly to the card base before adhering the sentiment and the word winter is adhered flat on top of the snowflakes. The sentiment is white heat embossed on black cardstock and cut out with scissor and adhered using foam squares. I added few hearts and lots of white details using my white Signo gel pen.

Hope you got inspired to use this cute set and the amazing dies!! Thanks for stopping by and have a great day. Hugs!

Sunny Studio Supplies Used:

Woodgrain Embossing
Woodgrain Embossing
Shop at:
Sunny Studio
Feeling Frosty Stamps
Shop at:
Sunny Studio
Feeling Frosty Dies
Feeling Frosty Dies
Shop at:
Sunny Studio
Layered Snowflake Frame
Shop at:
Sunny Studio