Thursday, December 15, 2022

Joyful Holiday Paper Focused Cards with Waleska and Marine

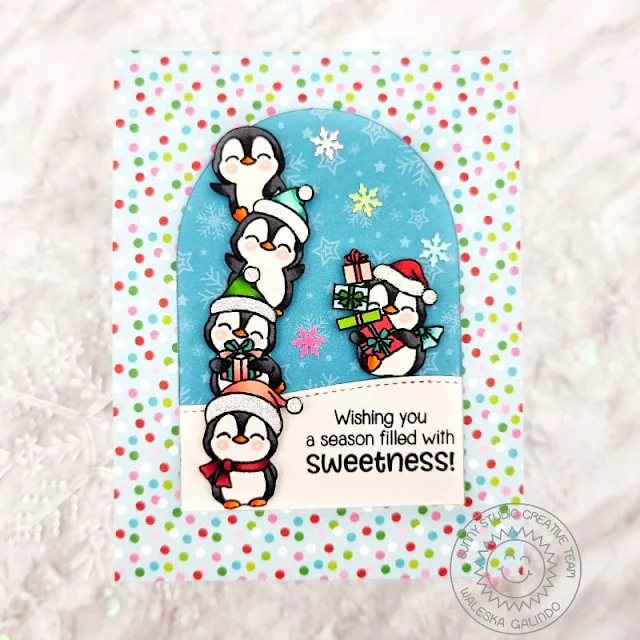
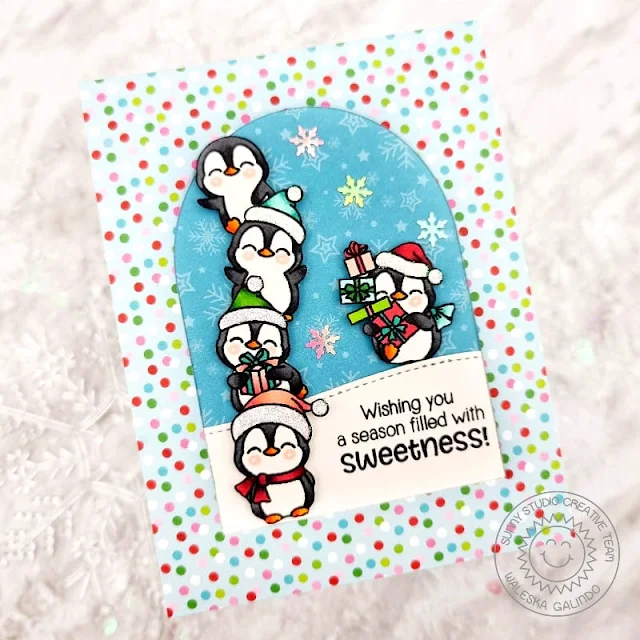
Hello Friends, Waleska here with you. Welcome back to the Sunny Studio Blog for more holiday card inspiration. My card today features the beautiful Joyful Holiday Christmas 6 x 6 paper pad along with a bunch of cute penguins from the Penguin Party Stamp set.

Sunny Studio Stamps: Penguin Party Holiday Card by Waleska Galindo

When I used pattern paper on a card I like to first decide the patterns I will use, and based on those I choose the colors I will use for the rest of my card. I wanted to create a card full of penguins enjoying the Christmas winter weather. I stamped almost all of the penguins from the set and colored them trying to match the colors of the pattern paper, I then fussy cut them and started planning my scene.

Sunny Studio Stamps: Penguin Party Holiday Card by Waleska Galindo

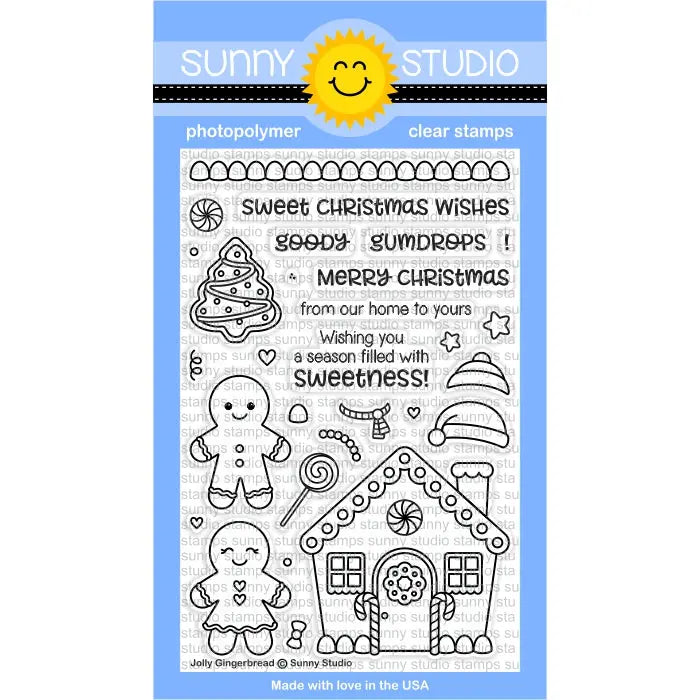
I cut a dome in the center of the front panel and adhered the snowflake paper as the background for the scene and added a snowbank for the penguins. I staked the penguins to the left of the scene and added a last penguin carrying all the presents I finally stamped the sentiment form the Jolly Gingerbread stamps and finally added some iridescent snowflakes.

How much fun they are having? A lot I think! Remember to use your pattern paper more, I need to remember that more often! Thank you so much for stopping by have a great weekend!

-------------------------------------------

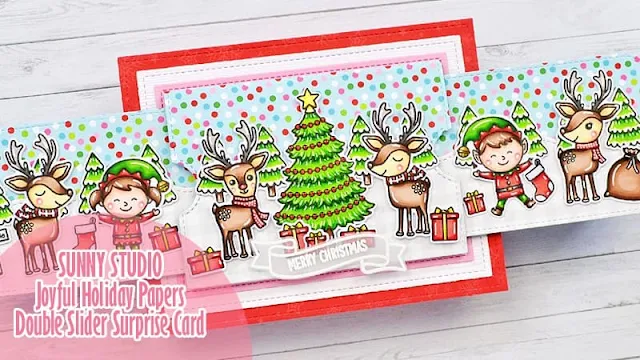
Hi crafty friends! Marine here with you today, back with more inspiration showcasing some of the Fall & Winter 2022 products, as well as some older sets. I mixed & matched a lot of images, and used papers from the Joyful Holiday paper pack to set a cute & fun interactive scene.

Sunny Studio Stamps: Reindeer Games Holiday Card by Marine Simon (featuring Cozy Christmas, Santa Claus Lane, North Pole)

I started off by stamping the images on white cardstock using an alcohol marker friendly black ink, I cut them all using the coordinating dies, and then colored everything using my alcohol markers. These are the sets I picked my images from:

Reindeer Games - four reindeers
Cozy Christmas - Christmas tree & present
Holiday Express - tree
Santa Claus Lane - presents, sack & stocking
North Pole - north pole sign & two elves

Sunny Studio Stamps: Reindeer Games Holiday Card by Marine Simon (featuring Cozy Christmas, Santa Claus Lane, North Pole)

Next I moved on to the interactive feature. I cut all the different panels using some of the gorgeous Joyful Holiday papers, and built the card (the whole process is included in the video so feel welcome to check it out!) To make the sky I picked a multicolored dotted pattern paper, and to make the snowy ground, I picked a white & light grey gingham pattern paper.

Sunny Studio Stamps: Reindeer Games Holiday Card by Marine Simon (featuring Cozy Christmas, Santa Claus Lane, North Pole)

Once the interactive panel was done, I attached the images, and then I layered some panels to create the card base: I stuck a 5,5" x 4,25" red Joyful Holiday panel on a card base, next a white woodgrain panel on top, and then a soft pink panel on top, and finally I attached my interactive panel using foam tape.

Sunny Studio Stamps: Reindeer Games Holiday Card by Marine Simon (featuring Cozy Christmas, Santa Claus Lane, North Pole)

I also cut the handles out of a green gingham Joyful Holiday paper, and attached them on both sides of the card, and then I worked on my greeting. I white heat embossed the banner from Little Birdie on vellum, as well as my "Merry Christmas" greeting from Bear Hugs inside the banner, cut it using the coordinating die, and then attached it below the Christmas tree using clear foam squares. 

Sunny Studio Stamps: Reindeer Games Holiday Card by Marine Simon (featuring Cozy Christmas, Santa Claus Lane, North Pole)

And last but not least, I added a dot of glossy accents on each light in the Christmas tree to make them pop & shine.

Sunny Studio Stamps: Reindeer Games Holiday Card by Marine Simon (featuring Cozy Christmas, Santa Claus Lane, North Pole)

And that's it! Love how new & older Sunny Studio's images can match perfectly to create the cutest little scenes! Thanks so much for stopping by, and see you next time!

Sunny Studio Supplies Used:

Bear Hugs Stamps
Bear Hugs Stamps
Shop at:
Sunny Studio
Holiday Express Stamps
Shop at:
Sunny Studio
Holiday Express Dies
Shop at:
Sunny Studio
Jolly Gingerbread Stamps
Shop at:
Sunny Studio
Santa Claus Lane Stamps
Shop at:
Sunny Studio
Santa Claus Lane Dies
Shop at:
Sunny Studio
North Pole Stamps
North Pole Stamps
Shop at:
Sunny Studio
North Pole Dies
North Pole Dies
Shop at:
Sunny Studio
Little Birdie Stamps
Shop at:
Sunny Studio
Cozy Christmas Stamps
Shop at:
Sunny Studio
Cozy Christmas Dies
Cozy Christmas Dies
Shop at:
Sunny Studio
Penguin Party Stamps
Shop at:
Sunny Studio
Penguin Party Dies
Penguin Party Dies
Shop at:
Sunny Studio
Reindeer Games Stamps
Shop at:
Sunny Studio
Reindeer Games Dies
Reindeer Games Dies
Shop at:
Sunny Studio
Joyful Holiday Paper
Shop at:
Sunny Studio

Wednesday, December 14, 2022

Snowman Kisses Cards with Marie and Alma

Hello Crafty Friends! Marie here. I hope you are all having a wonderful Holiday Season so far! Today I have another holiday card to share with you all featuring the cutest little snowmen images from Sunny Studio's Snowman Kisses Stamps. These little cuties are so fun to color with all their adorable expressions. You can highlight one or use all four like I did in this fun and festive shadow box card. 

Sunny Studio Blog: Snowman Kisses Snowflake Shadow Box Pop-up Winter Holiday Card by Marie Marco

For this card, I cut out all the pieces using a shadow box die from Bristol smooth cardstock to make the inking process super easy and smooth. I ink blended all my pieces front and back, using Distress Ink Oxides in the Color Salvaged Patina. I darkened up the front and back of the box using Distress Ink in the color Pine Needles. For the background panel, I inked it using Salvaged Patina, Uncharted Mariner, and Chipped Sapphire. For the side and back of the box, I used a snowflake stencil with Evergreen Bough Distress Ink. Then, using watered down white acrylic paint, I splattered the inside of the box, the background panel, and all the snow mound panels creating snow like texture. 

After putting my box together, I stamped out my snowman images from the Snowman Kisses Stamps using Distress Ink in Antique Linen. I always use this ink with my no line watercoloring as it disappears when it touches water. I colored all my images using Derwent Inktense water soluble pencils. After coloring my images, I cut them out using the corresponding Snowman Kisses Dies. I also used a candy cane image from the Penguin Party Stamps and used the Penguin Party Dies to cut them out. I adhered all my snowmen to my box card using Bearly Art Precision Craft Glue.

Sunny Studio Blog: Snowman Kisses Snowflake Shadow Box Pop-up Winter Holiday Card by Marie Marco

To make things even more super fun and festive, I die cut a bunch of tiny snowflakes from Bristol smooth cardstock and placed them inside my card using tiny strips of clear acetate. The acetate creates the illusion that the snowflakes are floating because it is clear! I love this technique and use it all the time! I adhered the snowflakes to the tip of the acetate strip using Bearly Art Precision Craft Glue. 

Moving on to the back of my card, I die cut a little rectangle and ink blended the edges using Candied Apple Distress ink, and stamped my sentiment in a red ink, and adhered my fourth snowman to the bottom of my panel for the cutest touch while leaving room for a personal note! 

Sunny Studio Blog: Snowman Kisses Snowflake Shadow Box Pop-up Winter Holiday Card by Marie Marco

Thank you so much for joining me today for this week's Card Making Inspiration! I am so smitten with the way this card turned out and I smile every time I see these snowmen! Have an amazing rest of the week and I wish you all the creative inspiration of the season! Until next time, Happy Cardmaking!!

------------------------------------------------

Today it's my turn, Alma, and I want to show you a little shadow box I made with the cute snowmen from the Snowman Kisses Stamps set. 


Sunny Studio Blog: Snowman Kisses Snowflake Shadow Box Pop-up Winter Holiday Card by Alexandra Stork

First, I cut two 4.5 by 9.5" strips of paper. Then I folded the strips at 2.5 and 7". 
In the "front" strip, I punched the window into the shadow box using the larger Layered Snowflake Frame Die. Then I cut out a 4.5 by 4.5" square and die cut using the smaller Layered Snowflake Frame Die. I glued this square behind the larger snowflake frame to create a layered effect. 


I then glued the front and back together. For the interior design, I punched the clouds from the Slimline Nature Border Dies twice at different heights and cut them to a length of 6.5". I scored these borders at 1" and at 5.5" and glued the two borders into the bottom of the box as snow clouds. You can now stick motifs anywhere. 


Sunny Studio Blog: Snowman Kisses Snowflake Shadow Box Pop-up Winter Holida

For the background I stamped a 4.5 by 4.5 inch paper with the Scenic Route Stamps set and die-cut them with the Scenic Route Dies and wiped the sky with Distress Oxide Inks in blue and turquoise tones. I glued the background to the map, as well as the string of lights from the Scenic Route Stamps set and Scenic Route DiesFinally, I stamped and coloured the snowmen from the Snowman Kisses Stamps set  and die-cut them with the Snowman Kisses Dies and glued them into the shadow box!

Your 3D card is ready! Have fun tinkering!

Sunny Studio Supplies Used:

Scenic Route Stamps
Scenic Route Stamps
Shop at:
Sunny Studio
Scenic Route Dies
Scenic Route Dies
Shop at:
Sunny Studio
Layered Snowflake Frame
Shop at:
Sunny Studio
Slimline Nature Borders
Shop at:
Sunny Studio
Penguin Party Stamps
Shop at:
Sunny Studio
Penguin Party Dies
Penguin Party Dies
Shop at:
Sunny Studio
Snowman Kisses Stamps
Shop at:
Sunny Studio
Snowman Kisses Dies
Snowman Kisses Dies
Shop at:
Sunny Studio

Tuesday, December 13, 2022

Holiday Greetings Cards with Kavya and Isha

Hi folks. Kavya here with another fun holiday project! If you are looking for some fun and quick cards, this one is for you. I have a bunch of washi tape lying around so I decided to create a card using mostly tape. You can also use strips of paper if you don’t have washi tape.  

Sunny Studio Stamps: Holiday Greetings & Classy Christmas Holiday Card by Kavya

I simply layered the tape on a card base diagonally. I used shades of green, pink, red and mint for the background. 

Sunny Studio Stamps: Holiday Greetings & Classy Christmas Holiday Card by Kavya

Then, I stamped and colored images from Classy Christmas Stamp. Added a sentiment from Holiday Greetings Stamp and I was done!

That’s it! I was done! I hope you liked this fun project ;) Happy Crafting!

-------------------------------------

Hello everyone! Isha here with a Christmas card featuring our Holiday Greetings Stamp and coordinating dies. I went for a faux watercolor background.

Sunny Studio Stamps: Holiday Greetings & Classy Christmas Holiday Card by Isha Gupta

To start, I stamped the flowers and pine leaves from the Classy Christmas stamps. I inked them using distress ink, spritz with water twice and stamp onto watercolor paper. Once dry, flick gold and white paint.

Stamp the flower and leaves onto vellum using versamark ink, sprinkle WOW! opaque white embossing powder, heat set and color using copic markers onto the back side. Die-cut using the coordinating dies. Adhere this to a red card base.

Sunny Studio Stamps: Holiday Greetings & Classy Christmas Holiday Card by Isha Gupta

Stamp the sentiment from the Holiday Greetings stamp. Die-cut using the coordinating dies. Die-cut 3 more times and stack these together. Tie a gold floss and adhere the sentiment to the card. Adhere the vellum flower and leaves. 

Thank you for dropping by and have a nice day!

Sunny Studio Supplies Used:

Classy Christmas Stamps
Shop at:
Sunny Studio
Classy Christmas Dies
Shop at:
Sunny Studio
Holiday Greetings Stamps
Shop at:
Sunny Studio
Holiday Greetings Dies
Shop at:
Sunny Studio

Monday, December 12, 2022

Reindeer Games Cards with Cathy and Bobbi

Hey friends! Cathy here today sharing some warm winter wishes featuring these sweeties from the Reindeer Games Stamps!

Sunny Studio Stamps: Reindeer Games Winter Themed Holiday Card by Cathy Chapdelaine (featuring Rustic Winter Dies, Fancy Frame Dies, Autumn Tree Dies)

To start this card, I die-cut a piece of white cardstock using the Fancy Frames Rectangle Dies. I used the center portion of this die-cut piece for my background and inked it with Speckled Egg Distress ink. I heat embossed a sentiment from the Alpaca Holiday Stamps with white embossing powder.

Next, I die-cut the Autumn Tree Dies from light gray cardstock and cut the branches off. I adhered them to the left and right sides of the background piece and trimmed them along the edges. I die-cut birch trees from white and dark gray cardstock using the Rustic Winter Dies, adhered them to the left side and trimmed the excess along the top edge. I also die-cut the cardinals using these dies for a little pop of red above the reindeer.

Sunny Studio Stamps: Reindeer Games Winter Themed Holiday Card by Cathy Chapdelaine (featuring Rustic Winter Dies, Fancy Frame Dies, Autumn Tree Dies)

For the snow along the bottom, I die-cut the Tropical Trees Backdrop Die from white cardstock and then die-cut the "sand" portion along the bottom edge using the Fancy Frames Rectangle Dies. I then adhered this to the bottom of the panel lining up the scalloped edges. I adhered the background panel to the center of a gray A2 card base.

To finish, I stamped the reindeer on Neenah Classic Crest 80lb solar white cardstock, colored them with Copics and die-cut them using the coordinating dies. I decided I wanted a white border, so I adhered the frame portion of the Fancy Frames Rectangle Dies to the card front.

I hope you enjoyed and thanks for stopping by today! For more inspiration, please visit my blog www.inkredibleadventures.com and you can also find me on Instagram as @cathy.chapdelaine.

-----------------------------------------------

Hello Sunny Studio friends! It’s Bobbi here with a card featuring the new Reindeer Games stamps and dies. Jolly Santa must feed the reindeer before their big night, flying in the sky. This herd loves all things sweet including candy canes, colorful gumdrops, and peppermints, too. This is food fit for Rudolph and all the reindeer!


Sunny Studio Stamps: Reindeer Games Winter Themed Holiday Card by Bobbi Lemanski (featuring Scenic Route, Gingerbread House Dies)

To make this 5″ X 7″ card, I created a simple background scene using the Scenic Route stamps. I blended on some blue ink at the top for the sky. I splattered on a little white paint for snow and added a few darker dots of blue in the sky. A little blue coloring was also added to the trees. I wanted to keep the background super simple so all the attention would be on the foreground scene. It’s Santa feeding the reindeer gang!


I stamped, colored and die cut the reindeer and Santa. For the candy, I used the candy cane, peppermint and gumdrop dies from the Gingerbread House dies. I put two candy canes in Santa’s hands. The reindeer on both sides of Santa are ready to take a few licks from these sweet treats! Gumdrops and peppermints, plus a broken candy cane cover the snowy hills.


Sunny Studio Stamps: Reindeer Games Winter Themed Holiday Card by Bobbi Lemanski (featuring Scenic Route, Gingerbread House Dies)

I stamped a few sentiments from the Reindeer Games stamps at the top and bottom and shaded around the elements to ground them and finish this card. I used the following Copic Marker colors to color in the elements:


Browns: E00, E04, E11, E42, E47, E44, E55, E57
Greens YG05, Yg07, YG02, Yg00
Reds: R89, R59, R29, R27, R14, R22, R20, R00
Cool Grays: 100, C7, C5, C3, C1, C00
Pinks: RV17, RV55, RV0
Blues: B000, B00, B02


I also used a Gelly Roll white ink pen for accents such as Santa’s beard and highlights on the candy pieces. Santa, the candy canes in his hands and the front-right side reindeer were attached using dimensional foam tabs.


You can shop all these wonderful products at Sunny Studio Stamps. Thanks for stopping by today. If you want to see more ideas and inspiration from me, subscribe to my blog, BobbiHartDesign.com. I’ll send you updates on new posts! You can also find me on Instagram as @BobbiHartDesign and on Facebook as BobbiHartDesign.


Sunny Studio Supplies Used:

Gingerbread House Dies
Shop at:
Sunny Studio
Fancy Frames- Rectangles
Shop at:
Sunny Studio
Alpaca Holiday Stamps
Shop at:
Sunny Studio
Rustic Winter Dies
Rustic Winter Dies
Shop at:
Sunny Studio
Scenic Route Stamps
Scenic Route Stamps
Shop at:
Sunny Studio
Scenic Route Dies
Scenic Route Dies
Shop at:
Sunny Studio
Tropical Trees Backdrop
Shop at:
Sunny Studio
Reindeer Games Stamps
Shop at:
Sunny Studio
Reindeer Games Dies
Reindeer Games Dies
Shop at:
Sunny Studio
Autumn Tree Die
Autumn Tree Die
Shop at:
Sunny Studio

Saturday, December 10, 2022

Guest Designer Spotlight: Penguin Party Cards with Anja Bytyqi

Hi everyone, Anja here today with two holiday cards featuring the adorable Penguin Party Stamps.

Sunny Studio Stamps: Penguin Party Holiday Card by Anja Bytyqi

On my first Christmas card, I used a couple of dies with stitching details and patterned papers from the Joyful Holiday Paper pack. I just love this happy color combo!

I started off with a white card base that is slightly larger than the standard A2 size. I cut out the patterned papers with the stitched rectangle die that is part of the Frilly Frames Quatrefoil Dies set. For the three openings I used the Window Trio Square Die. I did some ink blending in the background with Distress Oxides (Spun Sugar and Kitsch Flamingo). I trimmed the patterned papers, adhered them to the card base and added a pink cardstock strip on top where the papers meet.

Next, I stamped the penguins in Memento Tuxedo Black Ink and colored them with Copic markers. I cut them out with the coordinating dies and put each cutie inside a window opening.

To create a custom greeting I combined sentiments from the Santa Claus Lane and Merry Mice sets. I stamped them in VersaMark Ink onto a piece of green cardstock. I heat embossed it with white embossing powder and used the banner die from the Stitched Rectangle Dies set to cut it out. Finally, I adhered the banner onto the center of the pink cardstock strip.

Sunny Studio Stamps: Penguin Party Holiday Card by Anja Bytyqi

On my second inspiration card I created a winter scene with a purple night sky. This design would work for a winter birthday card as well, right?

First, I cut and scored an A2 sized card base from white cardstock. For the purple background, I blended the Distress Oxide Inks Milled Lavender, Wilted Violet and Villainous Potion onto a lavender cardstock panel. I let it dry and added white paint splatters with a brush.

Next, I die cut two snow hills from white cardstock using one of the Slimline Nature Borders Dies. I applied Tumbled Glass Distress Oxide Ink to the edges and layered the die cuts on top of each other covering the bottom half of the card.

In addition to the penguins and accessories, I stamped the fir tree, igloo and ice block from the Winter Scenes set in Memento Tuxedo Black Ink. I colored the images with Copics again and used the coordinating dies to cut everything out.

The sentiment from the Inside Greetings Holiday set was stamped in VersaMark Ink onto a dark teal cardstock rectangle and heat embossed in white. I adhered the images and sentiment to finish off the card.

Thank you so much for stopping by! Have a wonderful weekend!

Sunny Studio Supplies Used:

Stitched Rectangle Dies
Shop at:
Sunny Studio
Window Trio- Square Die
Shop at:
Sunny Studio
Santa Claus Lane Stamps
Shop at:
Sunny Studio
Merry Mice Stamps
Merry Mice Stamps
Shop at:
Sunny Studio
Frilly Frames Quatrefoil
Shop at:
Sunny Studio
Slimline Nature Borders
Shop at:
Sunny Studio
Inside Greetings-Holidays
Shop at:
Sunny Studio
Winter Scenes Stamps
Shop at:
Sunny Studio
Winter Scenes Dies
Winter Scenes Dies
Shop at:
Sunny Studio
Penguin Party Stamps
Shop at:
Sunny Studio
Penguin Party Dies
Penguin Party Dies
Shop at:
Sunny Studio
Joyful Holiday Paper
Shop at:
Sunny Studio