Hello Friends! Waleska here. Happy new month! November is my
favorite month, because is my birthday month. I also love the sweater weather
and all the cozy things you do during this time. Today I have a cute and
cozy card for you with the adorable Cozy Christmas Stamps.
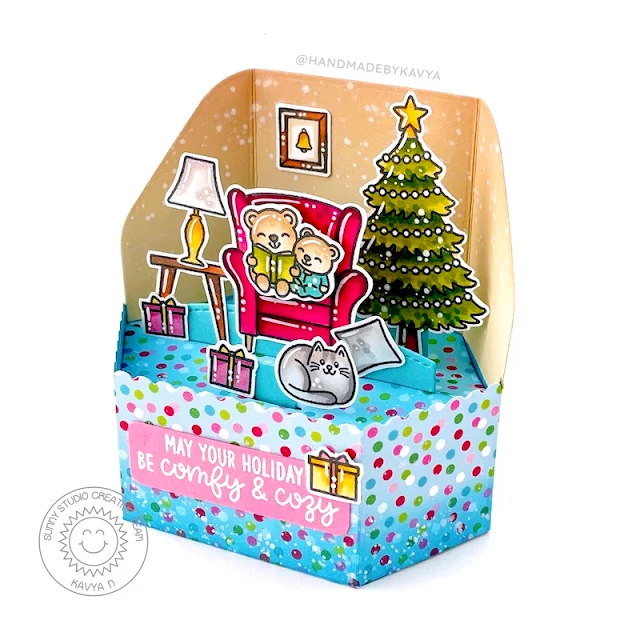
To create this card I first started creating the cozy living room with the Joyful Holiday paper for the walls and for the wood flooring I used kraft cardstock. I stamped and color the images from the Cozy Christmas set to create this adorable scene.
I used copic markers in
colors:
Green G14,G16,G17
Brown E13, E15, E17
Teal BG13, BG15, BG18
Pink RV10, RV11, RV13
Red R24, R27
I also created a snowy window and stamped the sentiment "Be comfy and cozy" on a white banner, this card is so cute I love those adorable bears on their pajamas!
I hope you have a wonderful day, thank you so much for stopping by and remember to stay safe, comfy and cozy!
---------------------------------------
Hello crafty friends, Marine here, super happy to be back this week with a cute and simple card showcasing the adorable Cozy Christmas stamp set. For this card, I did one of my favorite things, which is gathering images from different sets to create a darling scene.
So besides the the ones I picked out from Cozy Christmas, I also chose:
- the fireplace, presents and stocking from Santa Claus Lane
- a character from Spring Showers
- the stuffed mice from Purrfect Birthday
- the cookie plate from North Pole
As always I stamped the images on white cardstock using an alcohol marker friendly black ink, I used the coordinating dies to cut them all and colored everything using my alcohol markers. For the armchair and lamps, I stamped the images a second time on a red pattern paper from the Joyful Holiday paper pack. And it's no secret that I like to use non-traditional colors on holiday cards, but for this one I decided to stick with red, green and brown to make a warm & sweet cozy scene.
Once the coloring was done, I fussy cut the armchair and lamps I stamped on pattern paper, and glued them on the blank images.
For the background, I cut a 5,5" x 4,25" inches Dots & Stripes Pastels panel, as well as a piece of woodgrain cardstock and a slim stripe to make the floor. I also stamped my "Merry Christmas" sentiment from Holiday Greetings on white cardstock using red ink, I cut it using the coordinating die, and then I assembled everything: I attached the woodgrain elements at the bottom of the panel using double sided tape, next the images and my greeting above the fireplace using foam squares.
Next I white heat embossed the second part of my greeting "May the season fill your home with joy" from Cozy Christmas on a slim black banner, and attached it at the bottom of the panel using foam squares again, and finally I added highlights and details to the images using a white gel pen, as well as a dot of glossy accents on each little light in the tree and holly berries.
And that's it! I hope that you like this lovely cozy scene, I really love this bold Merry Christmas sentiment, and that chubby kitty on the chair is adorable! As always you are more than welcome to check the process video for more details and information (click the image above). Thank you so much for stopping by, and see you the next time!
 Purrfect Birthday Stamps Shop at: Sunny Studio |
 Purrfect Birthday Dies Shop at: Sunny Studio |
 Dots & Stripes Pastels 6x6 Paper Shop at: Sunny Studio |
 Santa Claus Lane Stamps Shop at: Sunny Studio |
 Santa Claus Lane Dies Shop at: Sunny Studio |
 Spring Showers Stamps Shop at: Sunny Studio |
 Spring Showers Dies Shop at: Sunny Studio |
 North Pole Stamps Shop at: Sunny Studio |
 North Pole Dies Shop at: Sunny Studio | |
 Cozy Christmas Stamps Shop at: Sunny Studio |
 Cozy Christmas Dies Shop at: Sunny Studio |
 Holiday Greetings Stamps Shop at: Sunny Studio |
 Holiday Greetings Dies Shop at: Sunny Studio | |
 Joyful Holiday Paper Shop at: Sunny Studio |


