Monday, April 12, 2021

Sneak Peek: Color My World, Teacher Appreciation & Gift Card Pocket

Hello and welcome to the first day of our Summer Peek Week!  All this week I am showcasing cards using our newest collection which will be available for purchase on Friday, April 16th. 

Today I am sharing a new layering stamp set perfect for all you art and rainbow lovers called Color My World together with a companion sentiment stamp set called Teacher Appreciation. As you will see, this sentiment set can work for so many occasions beyond celebrating the teacher's in our lives. We also have a new Gift Card Pocket die with will work nicely with both of these stamp sets.

Card No. 1 & 2: For my first project I created a pair of cards using the same layered pencils at different ends to make maximum use of all the stamping involved with this design. I'm not going to lie. These pencils have a ton of layers!  11 to be exact when you factor in the metal rims, eraser, pencil lead and wood portion, but they can be simplified and made in as few as 5 layers when omitting the shadows. 

Sunny Studio Blog: Colored Pencil Sunburst Cards (using Color My World & Teacher Appreciation Stamps)

Card No. 1: To help you (and me) perfectly line up my pencils in this radial design I created a special printable which you can download HERE.  After printing these JPegs onto my white cardstock using my printer's individual sheet feeder on the thickest paper setting, I trimmed them down just a hair inside the outside black lines. I then adhered my pencils over the printed spokes using the straight edge of a ruler to keep things lined up for those pencils that were opposite from each other. I then carefully trimmed off the excess and adhered them to a 4.5" x 4.5" square black cardstock panel.

My sentiment comes from the new Teacher Appreciation Stamps which were stamped using VersaFine Onyx Black Ink and my mini MISTI. In hindsight I might even recommend starting with the sentiment first just so you don't have to risk losing all these precious pencils you stamped or having to come up with a plan B to cover up any mistakes if your ink pad accidentally drops. As a last step I added a little heart from our Basic Mini Shape II Dies which I covered with glossy accents and set aside to dry.
Sunny Studio Blog: Colored Pencil Sunburst Card (using Color My World & Teacher Appreciation Stamps)

Card No. 2: For my second card in the set, I used all those pencil ends that I had trimmed off my first card to create a second one. It just so happens the Teacher Appreciation Stamps have a really great greeting that goes along with the pencil erasers. Hooray!

My daughter who's a Junior in college this year has a professor that has poured a huge amount of time and energy into helping her really soar in her entrepreneur class and I think one of these two cards will be the perfect card for him before she graduates next year.
Sunny Studio Blog: The Influence of a Great Teacher Can Never Be Erased Rainbow Pencil Card (using Color My World & Teacher Appreciation Stamps)

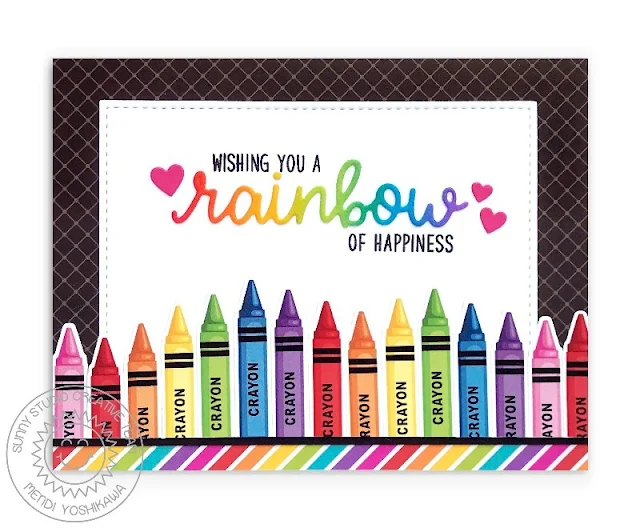
Card No. 3: Up next in a card using the crayon from the Color My World Stamps. This image layers more typical in the way that you only need four coordinating monochromatic ink colors and then a standard black ink to create each crayon. The word "crayon" is a separate image so you can chose to leave it off or include it like I did for this card.

For my greeting, I inked up a small piece of white cardstock using finger daubers and then die-cut it using the Rainbow Word die, pairing it with a coordinating sentiment from our Over The Rainbow Stamps. Once again I pulled out some of those same mini hearts from our 
Basic Mini Shape II Dies which had been inked up using Picked Raspberry distress ink. For my card background, I cut a 5.5" x 4.25" black card panel from our Classic Sunburst Paper pack, adding a rainbow stripe to the bottom of my card from our Rainbow Bright Paper pack. We have a new set of basic Stitched Rectangle dies (being shared tomorrow) that I used to frame my sentiment using white cardstock. 
Sunny Studio: Wising You A Rainbow of Happiness Crayon Card (using Color My World & Over The Rainbow Stamps and Rainbow Bright & Classic Sunburst Paper)

Card No. 4: For this card, I used the new layered paint palette and brush from the Color My World set to create another fun and bright rainbow inspired card. To create the curved painted rainbow for my paintbrush, I cut a curve from a role of masking material and then inked up my rainbow using distress inks and my jumbo daubers before removing the mask. I created a second rainbow in the same ink colors onto a 5.5" x 1.25" strip of cardstock which I mounted on the bottom of my card base and then layered it with my original panel.  I tucked in a basic zig zag edge and added a stitched line to the edge of my panel using our Slimline Basic Border dies. I finished the card by filling the empty space between my rainbow and paintbrush with the greeting from the Color My World Stamps which I stamped using VersaFine Onyx Black Ink.
Sunny Studio: Paint A Rainbow Palette & Brush Card (using Color My World Stamps & Slimline Basic Border Dies)

Card No. 5: Up next is another card featuring the crayons from the Color My World set, but this time I paired them with our new Gift Card Pocket die to recreate the look of a crayon box. To decorate my "crayon box" I turned to our Fishtail Banner dies, cutting a series of V's from green cardstock. and then stamped my pocket with the word "thank you" from our Teacher Appreciation Stamps. This card uses one of the greetings from the set that doesn't have to be limited to just teachers. The stamp set also includes an alternative option to change the wording to "you have brightened my day", rather than "my year" for ultimate flexibility. 

For my card background I used the heart print from our Subtle Grey Tones Paper pack and the rainbow striped paper from our Rainbow Bright Paper pack to add a little interest to this simple design.
Sunny Studio: You Have Brightened My Year Crayon Box Card (using Color My World Stamps, Teacher Appreciation Stamps, Gift Card Pocket Dies, Fishtail Banner Dies, Rainbow Bright & Subtle Grey Tones Paper)

Card No. 6: My next card uses the paint brush and palette again so I thought it would be fun to create a hand-painted background to reinforce the painting theme using some Daniel Smith Watercolors. I wanted my colors to be really intense to match the feel of my stamped pallet of colors so I used less water in my paintbrush when mixing my colors to create more of a gouache
. To start my process I started by brushing on a layer of water onto my watercolor paper and then used broad strokes to repeat the colors of the rainbow with a #8 round brush, cleaning my brush between colors. When it had dried completely, I ironed my panel sandwiched between printer paper on a low heat setting and then die-cut it using our new Stitched Rectangle dies (being shared more tomorrow). I then mounted my stitched rectangle onto an A2 panel cut from kraft paper and die-cut a white circle to frame my stamped images using our Stitched Circle Small Dies.

For my sentiment I used another greeting from our Teacher Appreciation Stamps which I heat embossed with white embossing powder onto black cardstock. I then cut it out using the double ended pennant die that comes with our new Stitched Rectangle dies. The issue was my greeting was a bit longer than the dies allowed for so I hung the end of the die off my cutting platform so it wouldn't cut on one end when passing it through my die-cutting machine. I then flipped it over, locking it in place with the previous cut's stitching lines and then repeated the process by hanging the opposite end off my cutting platform when running it through a second time. 

Sunny Studio: "Thank You For Helping Me Shine" Rainbow Paint Brush & Palette Card (using Color My World Stamps, Teacher Appreciation Stamps, Stitched Rectangle Dies & Stitched Circle Dies)

Card No. 6 details: When I was nearly done with my card I thought it would be cool to make my paints look wet for an even more realistic look so I coated them with some Glossy Accents by Ranger and then set my card somewhere safe to dry where I wouldn't be tempted to accidentally bump it and mess it up (which I have done more times than I care to count).

Sunny Studio: "Thank You For Helping Me Shine" Rainbow Paint Brush & Palette Card (using Color My World Stamps, Teacher Appreciation Stamps, Stitched Rectangle Dies & Stitched Circle Dies)

Card No. 7: For this card I repeatedly stamped a brushstroke image from my stash (this is unfortunately an older retired one by Hero Arts, but you can find similar ones HEREHERE 
and HERE). The beauty of this design is you can forgo stamping the handle of the paintbrush so you are able to speed things up by eliminating those three layers.

For my ink colors I alternated 
Gina K. Bubblegum Pink, Hero Arts Ultra Pink, Gina K. Passionate Pink & PinkFresh Studio Raspberry Bliss. When I was done stamping my brushstrokes they didn't end up being centered on my A2 panel so I trimmed them down using our Frilly Frames Retro Petals Dies and then mounted them onto a pink print paper from our Classic Gingham Paper pack.I then die-cut the word tickled" using our Loopy Letters Dies and the word "pink" using our new Chloe Alphabet dies (to be shared more on Wednesday) and coated them in more Glossy Accents. The word tickled though was getting lost on that particular pink that landed there though so I tucked a pennant cut from our Gingham Pastels Paper pack below it to help it stand out from our Stitched Rectangle dies (being shared tomorrow).
Sunny Studio: Tickled Pink For You Brushstroke with Paint Brushes Card (using Color My World Stamps, Classic Gingham & Gingham Pastel Paper, Stitched Rectangle Dies, Loopy Letters Dies & Chloe Alphabet Dies)

Inside Card: I completed my greeting on the inside of my card so that the full greeting actually reads "tickled pink for you" using our new Gift Card Pocket Dies. Our new Stitched Rectangles dies are also the perfect dimensions to frame a gift card so I layered that below my pocket for a more finished look when the gift card is removed. The gift card pocket dies also include two different versions of the word "for" with both this one shown here and a scripty version as well as the word "you" which matches our Loopy Letters Dies, tying the look of the outside greeting to the inside greeting.

Sunny Studio Stamps: Inside View of Tickled Pink For You Card with Gift Card Pocket

Card No. 8:  For this card I used the notebook paper image from our School Time Stamps, repeatedly stamping them in PinkFresh Studio Sky Blue ink. I then trimmed them down with my paper trimmer and rounded the corners with my scissors before arranging them on the diagonal on my card front and cutting off the parts that hung off the edge. I think I was able to fill my entire card front using only 6 stamped notebook papers because I was able to use the parts that I trimmed off and piece them together to cover the other open spots. 

I then used the lines of the notebook paper to line up my greeting from our Teacher Appreciation stamps and used those same lines to line up my crayons on the diagonal. For this particular card I chose to leave off the word "crayon" so you can see how they look both with and without. My card was feeling like it need a little extra something so I added a scalloped border to the bottom of my card using our Slimline Basic Border dies and some Classic Sunburst Paper scraps. I also cut a scalloped border without the holes from white cardstock using that same die set so I could layer it below my other scallop for a nice solid look on both sides of my card.
Sunny Studio: "You Have Brightened My Year" Layered Rainbow Crayon Card (using Teacher Appreciation Stamps, School Time Stamps, Slimline Basic Border Dies)

Card No. 9: The background for my last card of the day was also created using our School Time Stamps. This time I repeatedly stamped the ruler from the set on kraft paper using Gina K. Kraft Ink, slightly shifting the ruler each time so that the numbers wouldn't be lined up exactly the same way each time.

For this card I actually combined two different greetings together from our Teacher Appreciation Stamps. This is yet another set of sentiments that wouldn't need to be limited to just teachers. You could easily substitute the word friends, doctors, people, etc. in place of the word teacher using alphabet stamps and dies or even borrowing those words from other sets. My greetings were stamped onto circles cut using our Stitched Circle Small dies and Stitched Circle Large dies. For the second portion of my greeting I added interest by heat embossing part of it onto a piece of black cardstock that was die-cut using the pennant from the Stitched Rectangle dies. Maybe I should have just shared those today since 
as you can see I have used them a ton.  ;)  I had some leftover mini hearts from our Basic Mini Shape II Dies sitting on my desk from my very first set of cards and they felt like the perfect finishing touch to this card.
Sunny Studio: "The World Needs More Teachers Like You" Ruler & Pencil Thank You Card (using Teacher Appreciation Stamps, School Time Stamps, Stitched Circle Dies & Stitched Rectangle Dies)

I frequently am asked which ink colors I used for my layered images.  While I think there are so many great options out there, these are the colors I used today for my stamped images from light to dark:

Paintbrush (card no. 4 & 6)
Pinkfresh Studio Warm Buff (3a)
Pinkfresh Studio Doe (3b)
Gina K. Warm Cocoa (3c)
Hero Arts Soft Granite (3d)
Hero Arts Charcoal (3e)
Hero Arts Soft Sand (3f)
Gina K. Sandy Beach (3g)
Gina K. Kraft (3h)

Paintbrush (card no.7)
Hero Arts Soft Granite (3d)
Hero Arts Charcoal 
(3e)
Gina K. Kraft  (3f)
Concord & 9th Wheat  (3g)
Hero Arts Cup O'Joe (3h)

Paint Palette (card no. 4)
Gina K. Kraft (4a)
+ 3-color groupings to match crayons below

Yellow No.2 Pencil
Pinkfresh Studio Apricot (1a)
Concord & 9th Buttercup (1b)
Pinkfresh Studio Marigold (1c)
Hero Arts Soft Granite (1d)
Hero Arts Charcoal (1e)
Gina K. Sandy Beach (1f)
Hero Arts Charcoal (1i)
Pinkfresh Studio Coral Reef (1j)
Pinkfresh Studio Passion Fruit (1k)

Pink Crayon
Pinkfresh Studio Ballet Slipper (2d)
Hero Arts Soft Pink (2c)
Hero Arts Bubblegum (2b)
Hero Arts Ultra Pink (2a)
Versafine Onyx Black Ink (2e)

Red Crayon (& Pencil)
Pinkfresh Studio Coral Reef (2d)
Hero Arts Pale Tomato (2c)
Gina K. Red Hot (2b)
PinkFresh Studio Berrylicious (2a)
Versafine Onyx Black Ink (2e)

Orange Crayon (& Pencil)
Pinkfresh Studio Apricot (2d)
Pinkfresh Studio Clementine (2c)
Concord & 9th Marmalade (2b)
Pinkfresh Studio Persimmon (2a)
Versafine Onyx Black Ink (2e)

Yellow Crayon (& Pencil)
Pinkfresh Studio Lemon Whip (2d)
Pinkfresh Studio Sunshine (2c)
Pinkfresh Studio Sweet Mustard (2b)
Pinkfresh Studio Marigold (2a)
Versafine Onyx Black Ink (2e)

Green Crayon (& Pencil)
Hero Arts Green Hills (2d)
Pinkfresh Studio Key Lime (2c)
Gina K. Lucky Clover (2b)
Pinkfresh Studio Olive (2a)
Versafine Onyx Black Ink (2e)

Teal Crayon
Gina K. Ocean Mist (2d)
Gina K. Turquoise Sea (2c)
Gina K. Blue Lagoon (2b)
Gina K. Tranquil Teal (2a)
Versafine Onyx Black Ink
 (2e)

Blue Crayon (& Pencil)
Hero Arts Dusty Blue (2d)
Pinkfresh Studio Slumber (2c)
Pinkfresh Studio Blue Jay (2b)
Pinkfresh Studio Sapphire (2a)
Versafine Onyx Black Ink (2e)

Purple Crayon (& Pencil)
Pinkfresh Studio Soft Lilac (2d)
Pinkfresh Studio Candy Violet (2c)
Versafine Clair Purple Delight (2b)
Hero Arts Grape Juice
 (2a)
Versafine Onyx Black Ink (2e)

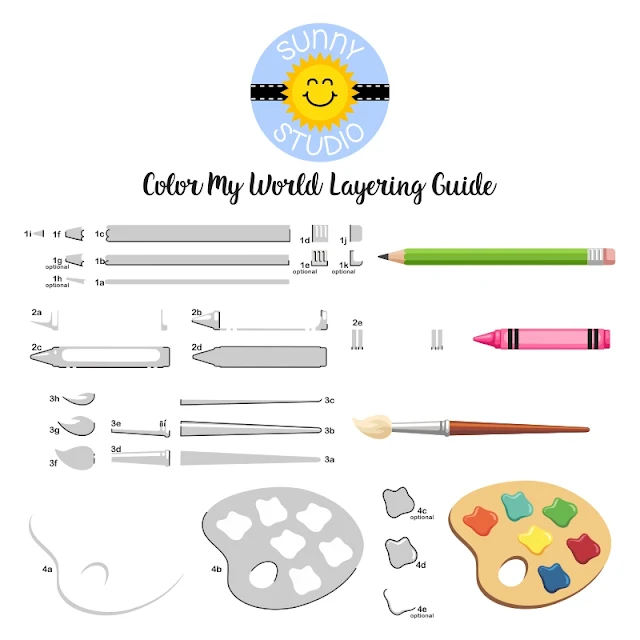
To help you line up our layered stamps like a pro I've created a special layering guide (you can click on the photo below to view it larger). The guide shows the stamps starting with the lightest ink color, working towards the darkest, but sometimes I find it easier to start backwards. They both work depending on what your preference is.  The black outline indicates where that layer touches the previously stamped layer.  :)

Sunny Studio Stamps: Color My World Pencil, Crayon, Paint Brush & Palette Ink Layering Guide

I have also created a special PDF alignment printable for you to print out and help you layer the stamps over for the Pencil and Paintbrush so they will line up perfectly with the dies that you can print HERE. The pencil and paintbrush in particular have three or four separate sections so this really helps keep things lined up so they will still match with the dies when you're done. This guide is designed so that you can trim it down and layer it with your paper strips that are 3.75" x 1" in size. You are then able to flip them and use both size to maximize your paper. I usually start by lining up and stamping some test impressions on thin printer paper while I work on get things set up perfectly and these guides really helped with that.

That wraps up today's sneak peeks. I'm so happy you spent a part of your day with me today. I read all your comments and they mean so much!  I'd love to give a $50 gift code to one lucky winner using the rafflecopter below.  Make sure to keep checking back all this week for more peeks & prizes. The contests run through Saturday, April 17th at Midnight PST with winners announced here on Sunday, April 18th. :)

a Rafflecopter giveaway

Here's a closer look at the our new Color My World Stamps & Dies, Teacher Appreciation Stampseacher Appreciation Stamps and Gift Card Pocket Dies used today (available for purchase on April 16th):

Sunny Studio Blog: Introducing Color My World 4x6 Clear Photopolymer Crayon, Pencil, Paintbrush & Paint Palette Stamps  Sunny Studio Blog: Introducing Color My World Companion Metal Cutting Dies

Sunny Studio Blog: Introducing Teacher Appreciation 4x6 Clear Photopolymer Sentiments Greetings Stamps Sunny Studio Blog: Introducing Gift Card Pocket Metal Cutting Dies with script "for you" word dies

Other Sunny Studio Supplies Used:
School Time Dies
School Time Dies
Shop at:
Sunny Studio
School Time Stamps
School Time Stamps
Shop at:
Sunny Studio
Classic Gingham 6x6 Paper
Shop at:
Sunny Studio
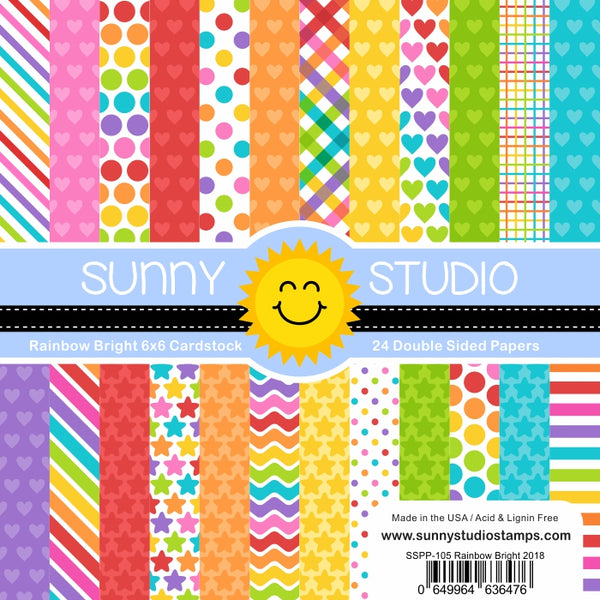
Rainbow Bright 6x6 Paper
Shop at:
Sunny Studio

Gingham Pastels 6x6 Paper
Shop at:
Sunny Studio
Over The Rainbow Stamps
Shop at:
Sunny Studio
Rainbow Word Die
Rainbow Word Die
Shop at:
Sunny Studio
Mini Basic Shape Dies II
Shop at:
Sunny Studio
Frilly Frames Retro Petals Dies
Shop at:
Sunny Studio
Subtle Grey Tones Paper
Shop at:
Sunny Studio
Slimline Basic Borders
Shop at:
Sunny Studio
Classic Sunburst Paper
Shop at:
Sunny Studio
Versafine Onyx Black Ink
Shop at:
Sunny Studio
Loopy Letters Dies
Loopy Letters Dies
Shop at:
Sunny Studio
Stitched Circle Small Dies
Shop at:
Sunny Studio
Stitched Circle Large Dies
Shop at:
Sunny Studio
Fishtail Banner Dies
Shop at:
Sunny Studio
Stitched Rectangle Dies
Shop at:
Sunny Studio
Hero Arts White Detail
Shop at:
Sunny Studio
VersaMark Watermark Ink
Shop at:
Sunny Studio

Saturday, April 10, 2021

Guest Designer Spotlight: Cards with Sara Zoppi

Hi friends, Sara Zoppi here! I am totally thrilled because today I am guesting for Sunny Studio Stamps. As a fairy stamp lover, I couldn't skip this Garden Fairy stamp, which I used to make two cards.

Sunny Studio Stamps: Garden Fairy Scalloped Circle Mat Dies Everyday Cards by Sara Zoppi

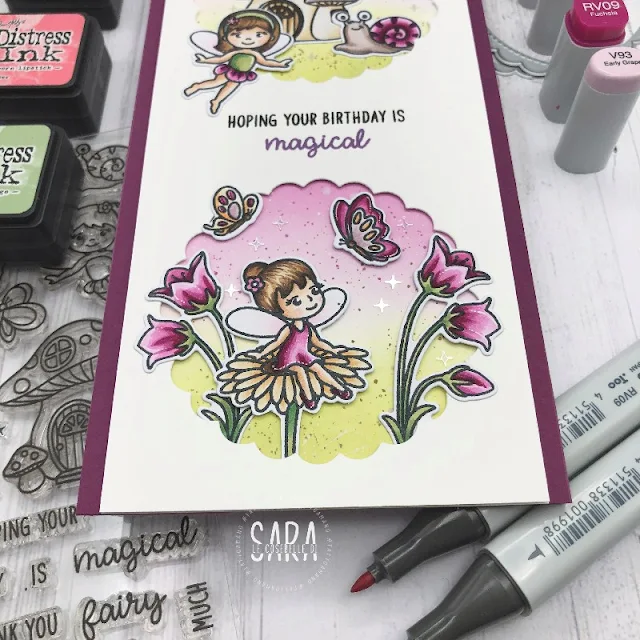
My first card is a sort of slimline, cause the measures are not the typical 3.5" x 8.5". I wanted to create two different scenes and I used one of the second die of the Scalloped Circle Mat 1 to create two holes (the white panel is 3.5"x7.75") I stamped all my images on a piece of Neenah Solar White 80, I used Memento Black Ink. I colored everything with Copics and I used coordinating dies to cut them.

Sunny Studio Stamps: Garden Fairy Scalloped Circle Mat Dies Everyday Cards by Sara Zoppi

On a different panel (with the same dimensions) I ink blended distress oxides in Seedless preserves, Warm Lipstick and Bundled Sage. I also splattered the same colors to create a little texture.

I assembled the two panels with foam tape and I arranged all my images with liquid glue or foam to create depth. Between the two scalloped circles I stamped my sentiment. I really hope you will like it!

Sunny Studio Stamps: Garden Fairy Everyday Cards by Sara Zoppi

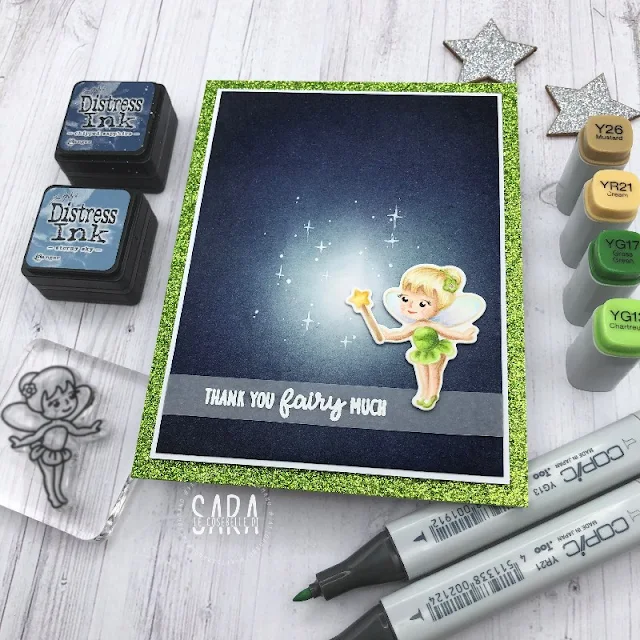
For my second card I used the same stamp set. When I received it, I instantly though that one of the fairies looked like Thinker Bell. I am a big fan of Disney movies, so I couldn't resist. I firstly decided how to arrange her, because I needed to know where the magic wand was. I then ink blended the background with regular distress inks in Black Soot, Chipped Sapphire and Stormy Sky, trying to keep a light hand where I wanted the fairy to be. I then stamped my image with Gina K Amalgam ink in Warm Glow: I absolutely love this for no-line coloring.

Sunny Studio Stamps: Garden Fairy Everyday Cards by Sara Zoppi

I colored everything with Copics but I used my Polycromos pencils to shade my details (since the image is so small and the Copic nib is quite big). I then white heat embossed my sentiment on a piece of vellum, and I arranged everything on the card. I also added some white gelly roll sparkles. For a finishing touch I matted my panel with white and lime glitter cardstock.

Sunny Studio Stamps: Feeling Froggy Everyday Card by Sara Zoppi

For my third card I was inspired by an illustration found on Pinterest. I usually search on Pinterest looking for color combos, illustrations or card sketches, I found it so useful and inspiring. I firstly stamped the main frog, from the Feeling Froggy set, at the center of my piece of paper, trying not to stamp the leaf below. Anyway, as I used no-line ink, that line will disappear when coloring the image. I then sketched the background and colored everything with Copics.

Sunny Studio Stamps: Feeling Froggy Everyday Card by Sara Zoppi

I had the idea of framing my scene with the Stitched Arch die, and that's what I did, adding a second piece of paper with some foam. At the end, I white embossed the sentiment on a piece of red cardstock: I used the word hoppy from the same stamps, while the word kisses belong to Hogs & Kisses.

Sunny Studio Stamps: Lovable Llama Birthday Card by Sara Zoppi

For my last card I was inspired by a Pinterest illustration as well. I wanted to make a cute and happy background for the Loveable Llama. But this time, I worked on two different piece of cardstocks, one for the background and one for the images. When I have to create a card like this, I spend lot of time searching a color palette that I like: I usually like 3 or 4 shades of color, because too many can be so confusing. And that's what I did here: blue-green, yellow and fuchsia. For the background lighter colors, that let the main image pop.

Sunny Studio Stamps: Lovable Llama Birthday Card by Sara Zoppi

I added some details with the white gelly roll pen, and some others with Polycromos (I usually get them when I do no-line coloring and I want to give more details). Two piece of white cardstock and...that's all!

It was a great pleasure to Guest Design for this brand, their images are so cute and sweet. And I really hope you will find all these cards inspiring. Thanks for stopping by and many hugs from Italy!

Sunny Studio Supplies Used:


Hogs & Kisses Stamps
Shop at:
Sunny Studio
Stitched Arch Dies
Stitched Arch Dies
Shop at:
Sunny Studio
Feeling Froggy Stamps
Shop at:
Sunny Studio
Garden Fairy Stamps
Garden Fairy Stamps
Shop at:
Sunny Studio
Garden Fairy Dies
Garden Fairy Dies
Shop at:
Sunny Studio
Lovable Llama Stamps
Shop at:
Sunny Studio
Lovable Llama Dies
Lovable Llama Dies
Shop at:
Sunny Studio
Scalloped Circle Mat 1 Dies
Shop at:
Sunny Studio

Friday, April 9, 2021

Stitched Circle Die Focused Cards by Kay and Candice

Hi there! Kay here and I'm sharing a card today using the new Stitched Circle Small dies. Along with the Stitched Circle Small dies, I used one of my very favorite Sunny Studio Stamp sets, Fabulous Flamingos stamp set and the Fabulous Flamingos dies. As you can tell by my card today, I am ready for some warmer temperatures!

Sunny Studio Stamps: Stitched Circle Dies Fabulous Flamingos Tropical Themed Card by Kay Miller

To start off, I blended some Broken China and Cracked Pistachio distress inks onto Bristol board cardstock, then speckled with water and blotted it dry. I then used the Stitched Circle Small dies to cut a circle out. I mounted this onto my white card panel with foam tape.

Sunny Studio Stamps: Stitched Circle Dies Fabulous Flamingos Tropical Themed Card by Kay Miller

I then stamped all of the cute little images from the Fabulous Flamingos stamp set colored them with Copic markers and then cut them out with the Fabulous Flamingos dies. I adhered these all to the Stitched circle with foam tape and then stamped the sentiment below with black ink.

I hope you have enjoyed my card today! Thanks so much for stopping by!

------------------------------------------------

Hello! Candice with you this Friday sharing a fun way to use the new Stitched Circle dies!

Sunny Studio Stamps: Stitched Circle Dies Fabulous Flamingos Tropical Scenes Slimline Dies Tropical Themed Card by Candice Fisher

I used these Sunny Studio products to create my slimline design:

·  Fabulous Flamingos stamps & coordinating dies
·  Tropical Scenes stamps & coordinating dies
·  Slimline Scalloped Frame dies
·  Stitched Circle Large dies
·  Stitched Circle Small dies
·  Dots & Stripes Pastels 6 x 6 pattern paper
·  Pink Spinel Jewels

I began my slimline with an 8 1/2 x 3 1/2 card base. For the background, I die cut a bunch of small stitched circles from the blue striped pattern paper, glued to a panel of Bristol Smooth and then cut it with the slimline stitched die. I then die cut the scalloped circle from pink cardstock and then die cut the large stitched circle and inked with salty ocean and tumbled glass and trimmed the edges.

Sunny Studio Stamps: Stitched Circle Dies Fabulous Flamingos Tropical Scenes Slimline Dies Tropical Themed Card by Candice Fisher

Next, I stamped the flamingos, fronds, fruits, flowers and the palm tree, colored them with copic markers and used the coordinating dies to cut them out. I added them in clusters on the circles along with some pink jewels. I finished with a sentiment stamped on a banner and adhered with foam tape!

Thank you so much for visiting!

Sunny Studio Supplies Used:

Dots & Stripes Pastels 6x6 Paper
Shop at:
Sunny Studio
Fabulous Flamingos Stamps
Shop at:
Sunny Studio
Fabulous Flamingos Dies
Shop at:
Sunny Studio
Tropical Scenes Stamps
Shop at:
Sunny Studio
Tropical Scenes Dies
Shop at:
Sunny Studio
Slimline Scalloped Frame
Shop at:
Sunny Studio
Stitched Circle Small Dies
Shop at:
Sunny Studio
Stitched Circle Large Dies
Shop at:
Sunny Studio