Copic markers: R11, R02, R32, R43, R14, Y35, YR24, G14, G07, G28, C0, C1
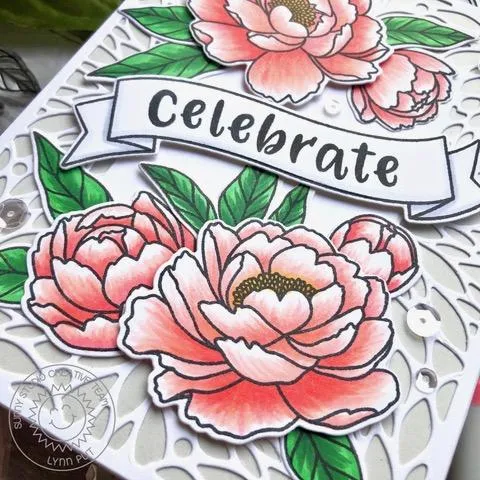
Next I used the Phoebe
Alphabet stamp set to stamp my Celebrate sentiment inside the
banner. I adhered all of my stamped pieces to my card front and used foam tape
to adhere the two largest peony flowers and the banner. To add a
touch of sparkle, I used some clear Wink of Stella glitter pen on all of the
peonies and glued on some iridescent sequins around my flowers.
------------------------------------------------------
Hi everyone! It's Ashley with my very first post as a member of the Sunny Studio Design Team! I'm so excited to be here!
------------------------------------------------------
Hi everyone! It's Ashley with my very first post as a member of the Sunny Studio Design Team! I'm so excited to be here!
My card today
features the new Pink Peonies set! Peonies are my favorite flower, especially the light
pink ones - they were my wedding flowers! Because they are so special to me and
because of the stamp set's name, I was inspired to create a literal pink
peonies card!
I started by stamping several flowers and leaves from the Pink Peonies stamp set onto smooth white watercolor paper with VersaMark ink and heat embossed with white embossing powder. I watercolored the images with Zig Clean Color Real Brush markers scribbled onto a watercolor palette and used as paints. I went with brighter pinks for the card, rather than my favorite pale pink, but I love how they turned out! Once they were dry, I cut them out with the Pink Peonies dies.
I started by stamping several flowers and leaves from the Pink Peonies stamp set onto smooth white watercolor paper with VersaMark ink and heat embossed with white embossing powder. I watercolored the images with Zig Clean Color Real Brush markers scribbled onto a watercolor palette and used as paints. I went with brighter pinks for the card, rather than my favorite pale pink, but I love how they turned out! Once they were dry, I cut them out with the Pink Peonies dies.
While my
watercolored images were drying, I blended Distress Oxides in Spun Sugar,
Seedless Preserves, and Black Soot on white cardstock, then splattered with
watered down white acrylic paint. I used the frame of the new Frilly Frames Eyelet Lace die to add interest to the background.
For extra shine, I splattered my die cuts and background with watered down gold acrylic paint before arranging my images in layers on the background. I popped a few flowers and leaves up with foam squares for dimension. Since I had a pink theme going, I made a "tickled pink" sentiment from the Fabulous Flamingos stamp set. I stamped it in VersaMark and embossed with gold to match my splatters. I finished with a few pale pink jewels scattered around the card.
Thanks so much for stopping by for my first post! I'll be here every Monday so I hope you come again :) Have a wonderful day!
Sunny Studio Supplies Used:
 Fabulous Flamingos Stamps Shop at: Sunny Studio |
 Banner Basics Stamps Shop at: Sunny Studio |
 Banner Basics Dies Shop at: Sunny Studio |
 Phoebe Alphabet Stamps Shop at: Sunny Studio |
 Pink Peonies Stamps Shop at: Sunny Studio |
 Pink Peonies Dies Shop at: Sunny Studio |
 Blooming Frame Die Shop at: Sunny Studio |
 Frilly Frames-Eyelet Lace Shop at: Sunny Studio |


