Friday, December 27, 2019

Hogs & Kisses Cards with Candice and Rachel

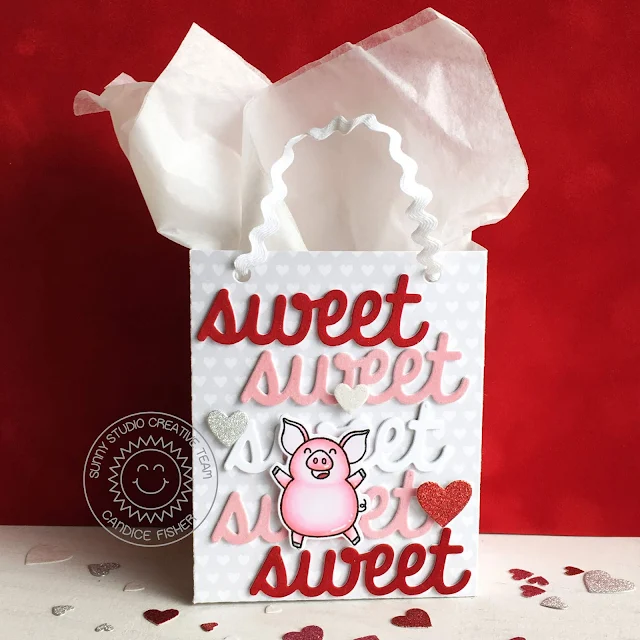
Welcome, I hope you all had a fabulous Holiday season!  Candice with you today and I am jumping right into my favorite crafting holiday, Valentine's Day! I think it is all the red and pinks I get to play with and those colors are perfect for the Hogs & Kissed set I used on my treat bag!

Sunny Studio Stamps: Sweet Treats Bag Hogs & Kisses Fluffy Cloud Border Dies Love Themed Gift Bags by Candice Fisher

I used these fun Sunny Studio products for my treat bag:
To create the bag base, I followed the instructions that you can find here. They are very easy to follow and you can create 3 styles with one die set! The heart pattern paper came from the versatile Subtle Grey Tones pack.

Sunny Studio Stamps: Sweet Treats Bag Hogs & Kisses Fluffy Cloud Border Dies Love Themed Gift Bags by Candice Fisher

Next, I die cut multiples of the sweet word, topping them with white cardstock and pink & red velvet paper. I then stamped the piggy twice, colored them with Copic markers, and used the coordinating dies to cut out.

I then stamped the Quote bubble and sentiment and cut out using the coordinating dies.  For the glitter hearts, I used the heart dies found in the Basic Mini Shape dies & Basic Mini Shape dies II. I tend to hold onto every little scrap of glitter paper just for this use with the little dies! I used foam tape to adhere them on both sides of the bag. To finish, I simply knotted some white rick rack through the holes.

Thank you for stopping by!

----------------------------------------------------


Hello friends! It's Rachel here with a slimline Valentine card that I made featuring the Hogs & Kisses Stamp Set. I love how you can use this cute set for both winter scenes as well as a variety of other seasons. I combined this set with the Bold Balloons Stamp Set for a fun-filled scene.

Sunny Studio Stamps: Hogs & Kisses Fluffy Cloud Border Dies Bold Balloons Love Themed Card by Rachel Alvarado

To start my card, I first trimmed a piece of Neenah Solar White Card Stock to 3.5" x 8.5" and blended it with Picked Raspberry and Spun Sugar Distress Oxide Inks. I splattered this blending with water using a #4 paint brush and then added some diluted pink and white watercolor paints for added interest.

I trimmed a few pieces of white card stock to 3.5" x various heights and cut three pieces using the Fluffy Clouds Border Dies. I adhered these to the bottom portion of my card and then stamped my sentiment onto the lower right side of the front cloud before adding it to my card with some 3D Foam Adhesive Tape. 

Sunny Studio Stamps: Hogs & Kisses Fluffy Cloud Border Dies Bold Balloons Love Themed Card by Rachel Alvarado

For my little pig, I stamped him/her with Memento Tuxedo Black Ink onto another piece of Neenah Solar White 110lb Card Stock and colored them with Copic Sketch Markers. I used the coordinating dies to cut it out. I used some Altenew Inks to stamp my balloons. (Inks Used: Altenew Tea Party Mini Cube Set, Red Sunset Mini Cube Set, and the Cherry Blossom Mini Cube Set) Lastly, I added some sparkly silver baker's twine for my balloon strings.

Thanks so much for stopping by! Have a wonderful weekend!

Sunny Studio Supplies Used:

Sweet Word Die
Sweet Word Die
Shop at:
Sunny Studio
Bold Balloons Stamps
Shop at:
Sunny Studio
Bold Balloons Dies
Bold Balloons Dies
Shop at:
Sunny Studio
Mini Basic Shape Dies
Shop at:
Sunny Studio
Mini Basic Shape Dies II
Shop at:
Sunny Studio
Plane Awesome Stamps
Shop at:
Sunny Studio
Fluffy Clouds Border Dies
Shop at:
Sunny Studio
Subtle Grey Tones Paper
Shop at:
Sunny Studio
Hogs & Kisses Stamps
Shop at:
Sunny Studio
Hogs & Kisses Dies
Hogs & Kisses Dies
Shop at:
Sunny Studio
Sweet Treats Gift Bag
Shop at:
Sunny Studio

Thursday, December 26, 2019

Sweet Treat Bag Projects with Vanessa and Anja

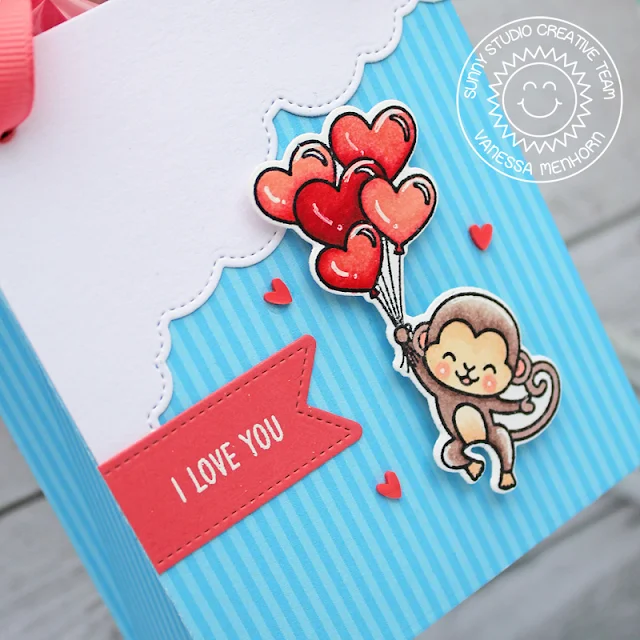
Hello to you! Vanessa here today with a project for the next holiday - Valentine's Day! I used the fabulous Sweet Treat Bag Dies for this cute gift bag:

Sunny Studio Stamps: Sweet Treat Bag Dies Fluffy Cloud Borders Love Monkey Fancy Frame Dies Everyday Gift Bag by Vanessa Menhorn

First, I die-cut the bag from blue patterned paper from the Dots & Stripes Pastels Paper and assembled it. Now I die-cut the Fluffy Clouds Border Dies from white cardstock, trimmed it and adhered it. I punched holes to the top of the bag and adhered ribbon handles.

Then I stamped the adorable monkey from Love Monkey onto white cardstock, colored it with Copics, die-cut the image with the matching die and adhered it to the bag with foam tape.

Sunny Studio Stamps: Sweet Treat Bag Dies Fluffy Cloud Borders Love Monkey Fancy Frame Dies Everyday Gift Bag by Vanessa Menhorn

I stamped and heat-embossed the sentiment onto red/pink cardstock, die-cut it with the pennant from the Fancy Frames Rectangle Dies, trimmed it and adhered it. Finally, I added hearts from the Red & Pink Heart Confetti.

I loved creating this after all the Christmas projects. That monkey is irresistible :) Thanks for visiting today!

-----------------------------------------------------

Hi everyone, Anja here and today I have one more winter release project to share with you using the Sweet Treat Bag Dies. This set is so much fun! I love the size and the different looks of gift bags you can create.

Sunny Studio Stamps: Sweet Treat Bag Dies Merry Mice Fancy Frame Dies Everyday Gift Bag by Anja Bytyqi

I went with a closed version using the semi-circle top flap and picked patterned papers from the Holiday Cheer 6x6 Paper (polka dots, stripes) and Very Merry 6x6 Paper pack (grid). The bag will hold some tea, so the cute mouse in the mug from the Merry Mice set was the perfect match. I stamped the mouse and little cupcake from the Party Pups set in Memento Tuxedo Black Ink and colored the images with Copic Markers.

Next, I die cut a stitched circle from the pink grid paper and matted it with a green cardstock circle which is slightly bigger. I popped up the mouse image with foam tape. The sentiment is included in the Foxy Christmas set. I stamped it in VersaMark Ink and heat embossed it with white embossing powder. Finally, I added a red die-cut heart to the mug and three White Pearls below the sentiment.

Thank you so much for stopping by! Have an amazing day!

Sunny Studio Supplies Used:

Fancy Frames- Rectangles
Shop at:
Sunny Studio
Party Pups Stamps
Party Pups Stamps
Shop at:
Sunny Studio
Party Pups Dies
Party Pups Dies
Shop at:
Sunny Studio
Holiday Cheer 6x6 Paper
Shop at:
Sunny Studio
Foxy Christmas Stamps
Shop at:
Sunny Studio
Dots & Stripes Pastels 6x6 Paper
Shop at:
Sunny Studio
Love Monkey Stamps
Love Monkey Stamps
Shop at:
Sunny Studio
Love Monkey Dies
Love Monkey Dies
Shop at:
Sunny Studio
Fluffy Clouds Border Dies
Shop at:
Sunny Studio
Very Merry 6x6 Paper
Shop at:
Sunny Studio
Merry Mice Stamps
Merry Mice Stamps
Shop at:
Sunny Studio
Merry Mice Dies
Merry Mice Dies
Shop at:
Sunny Studio
Sweet Treats Gift Bag
Shop at:
Sunny Studio

Wednesday, December 25, 2019

Snowflake Frame Die Focused Cards with Franci and Ana

Hello crafty friends and Merry, merry Christmas!! Hope you're having a super happy Holiday time with all your loved one, it's Franci here and I'm so happy to pop in too today to wish you all the best and send Merry Wishes with this sweet Santa Claus Sunny Studio card.

Sunny Studio Stamps: Snowflake Frame Dies Hogs & Kisses Santa Claus Lane Christmas Cards by Franci Vignoli

First of all I created my card base out of white cardstock and I trimmed a coordinated white panel down to size too. I die cut this using the large Layered Snowflake Frame and I also die cut my "Merry" out of some silver sparkle cardstock using the Merry Christmas die included in the Christmas Garland Frame set. 

I inked the front of my card with Salty Ocean and Blueprint Sketch Distress Inks and I glued my window panel to the card. I also glued the "Merry" and stamped "Christmas" on the bottom. Then I stamped, colored with Copics and die cut some images from the Santa Claus Lane set and glued them down with some foam adhesive.

Sunny Studio Stamps: Snowflake Frame Dies Hogs & Kisses Santa Claus Lane Christmas Cards by Franci Vignoli

I added lots of details to all my little scene with a white gel pen, also added a little heart I stamped and die cut from the Hogs & Kisses set. Finally I added some little pearl embellishments here and there and I love how they looks so much!!

Hope you like my card and thank you so much for stopping by today! Now let's celebrate, shall we?! Merry, merry Christmas!

------------------------------------------------

Hello everyone and Merry Christmas! It is Ana here today with a water colored Christmas card featuring Layered Snowflake Frame dies and one of my favorite mini stamps Christmas Chapel.

Sunny Studio Stamps: Snowflake Frame Dies Christmas Garland Frame Dies Christmas Chapel Christmas Card by Ana Anderson

I absolutely adore the Snowflake frames and really wanted to combine it with Christmas Chapel and watercolor both panels for softer, winter wonderland look. I started with die cutting the front panel with larger Snowflake Frame die (I used Canson XL watercolor paper for both panels).  I added very light blue shades of color to the die cut panel and set it aside to dry.

I stamped the Christmas Chapel in Antique Linen Distress Ink (the lightest water-soluble ink I have) so I could do no line water coloring. I used Prima watercolors for both the front die cut snowflake frame panel, the chapel and the background/snow banks.

Sunny Studio Stamps: Snowflake Frame Dies Christmas Garland Frame Dies Christmas Chapel Christmas Card by Ana Anderson

To the chapel panel I added white (acrylic paint mixed with water) splatter. Once both my panels were dry, I stamped the sentiment - from Christmas Chapel set - to the front (snowflake frame) panel. I added foam tape to the snowflake frame pop it up and adhered both panel to A2 card base.

Thank you so much for spending time with us today! I really hope you like today’s winter wonderland project! Wishing you a blessed holiday season!

Sunny Studio Supplies Used:

Christmas Chapel Stamps
Shop at:
Sunny Studio
Christmas Chapel Dies
Shop at:
Sunny Studio
Santa Claus Lane Stamps
Shop at:
Sunny Studio
Santa Claus Lane Dies
Shop at:
Sunny Studio
Hogs & Kisses Stamps
Shop at:
Sunny Studio
Hogs & Kisses Dies
Hogs & Kisses Dies
Shop at:
Sunny Studio
Layered Snowflake Frame
Shop at:
Sunny Studio
Christmas Garland Frame
Shop at:
Sunny Studio

Tuesday, December 24, 2019

Embossing Folder Focused Cards with Juliana and Angelica

Hello Sunny Studio Friends! It's Juliana and today I'm here to share a quick and easy card you can create using the Buffalo Plaid Embossing Folder and Santa's Stocking Dies.

Sunny Studio Stamps: Layered Poinsettia Dies Santa's Stocking Christmas Card by Juliana Michaels

I began with the stocking from the Santa's Stocking Dies and cut it from red cardstock. I then embossed it using the Buffalo Plaid Embossing Folder. Next, I took a black dye ink pad and rubbed it gently over the raised part of the embossed design to make the stocking red and black. You might want to practice this technique on a scrap of embossed paper first, but the main thing to keep is mind is that you don't really push down so much as rub it across the paper.

To decorate the stocking, I cut the trim and heel/toe pieces from Therm O Web Deco Foil Flock Transfer Sheets in White Latte for a bit of texture and interest. For the finishing touch I added a poinsettia created using the Layered Poinsettia Die. I happened to have an extra one laying around so it came in handy for making this card come together quickly. You might look around your stash of die cuts and embellishments for something you can add to your stocking!

Sunny Studio Stamps: Layered Poinsettia Dies Santa's Stocking Christmas Card by Juliana Michaels

You might be asking how I made the card base in the shape of the stocking. To do this, take a piece of cardstock cut to 4.25 x 11 inches and fold it in half. Place the stocking die so that the top edge of the die is over the edge of the fold. That way when you cut the paper it will keep the fold for the card intact. Then just run the piece through your die cut machine and voilá you have a stocking shaped card!

Thanks so much for stopping by today! I hope you enjoyed this Christmas card inspiration using the Buffalo Plaid Embossing Folder and Santa's Stocking Dies.

--------------------------------------------

Hi friends! Angelica here, and I have a new card to share with you today. I used the Buffalo Plaid Embossing Folder to bring color and texture to this cheerful Thank You card.

Sunny Studio Stamps: Frilly Frame Dies Sunflower Fields Thank You Card by Angelica Conrad

I taped white card stock to the inside of the embossing folder, then rubbed Wendy Vecchi Garden Patina Blendable Dye Ink on the other side of the folder. I ran it through my die-cut machine, then repeated the process two more times. Once finished, I trimmed the panel to a square, and attached it to a card front I had die-cut with Frilly Frames Retro Petals stitched rectangle. I used Sunflower Fields stamp set to stamp the sunflower and sentiment. I attached everything together, and attached the card front to a card base with foam adhesive. 

Sunny Studio Stamps: Frilly Frame Dies Sunflower Fields Thank You Card by Angelica Conrad

Inks used on sunflower and leaves: Altenew Buttercream, Warm Sunshine, Caramel Toffee, Paper Bag; Altenew Frayed Leaf, Forest Glades, Evergreen. 

Thanks so much for joining me today. I hope I have helped with ideas using embossing folders.

Sunny Studio Supplies Used:

Santa's Stocking Dies
Shop at:
Sunny Studio
Sunflower Fields Stamps
Shop at:
Sunny Studio
Sunflower Fields Dies
Shop at:
Sunny Studio
Frilly Frames Retro Petals Dies
Shop at:
Sunny Studio
Buffalo Plaid Embossing
Shop at:
Sunny Studio
Layered Poinsettia Dies
Shop at:
Sunny Studio

Monday, December 23, 2019

Scenic Route Cards with Eloise and Leanne

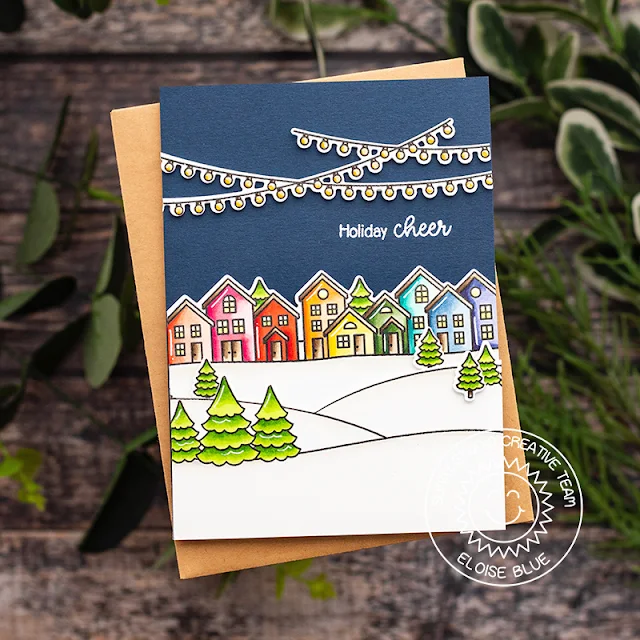
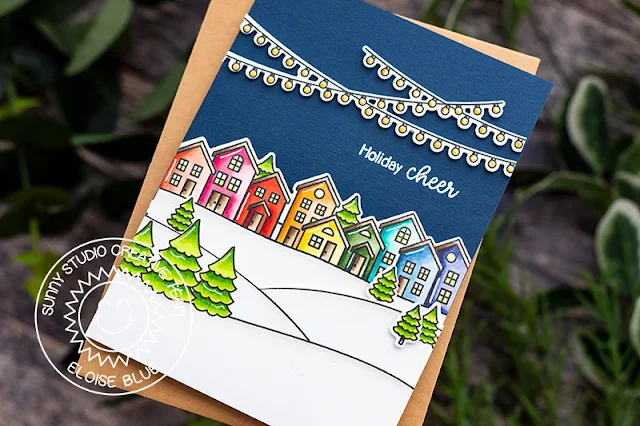
Hi friends, Eloise here and today I’m using the Scenic Route Stamp Set to create my last Christmas Card for the year.

Sunny Studio Stamps: Scenic Route Winter Themed Holiday Cards by Eloise Blue

I started off with stamping out the images from Scenic Route onto some white cardstock and colouring them in with Copic Markers. Once they were all coloured, I cut them out.

(Copic Markers Used: R30, R21, R22, R24 / RV10, RV13, RV25, RV19 / R14, R17, R27, R29 / YR00, YR02, YR12, YR18 / Y11, Y13, Y15, Y19 / YG61, YG63, YG67, G28 / BG10, BG11, BG13, BG49 / B91, B93, B95, B97 / BV01, BV02, BV04, BV08 / YG01, YG03, YG23, YG17 / E42, E43, E44, E47 / W00, W0, W1 / 0)

Sunny Studio Stamps: Scenic Route Winter Themed Holiday Cards by Eloise Blue

I then added foam tape onto the backs of all the pieces and adhered them onto a navy card base. Lastly, I white heat embossed the ‘Holiday Cheer’ sentiment onto the background and added white gel pen details onto the images.

Thanks so much for stopping by today and I’ll see you next week.

-------------------------------------------------

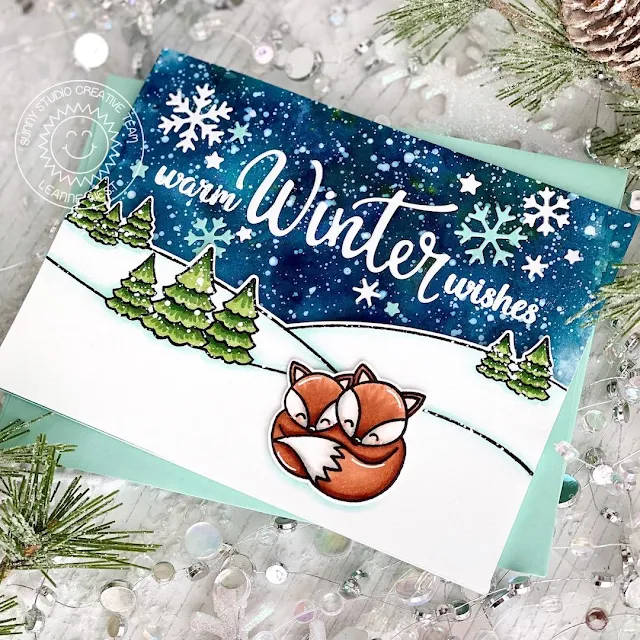
Happy Holidays everyone, Leanne here! Even though I'm officially done with Christmas projects, I still wanted to make some winter themed cards to have on hand. I've created a simple but sweet little scene on today's card. It couldn't have been easier with the help of the Scenic Route stamp set.  

Sunny Studio Stamps: Scenic Route Circle Snowflake Frame Dies Layered Snowflake Frame Dies Foxy Christmas Winter Themed Holiday Card by Leanne West

I love that with just one stamp, I can have the perfect landscape for my scene. I Copic colored the trees and added some light shading to the snowy hills. I wanted to include some cute critters to my wintery scene. I choose the adorable little foxes from Foxy Christmas

For the top half of this scene, I wanted to create a beautiful night sky. I used a combination of two Nuvo Shimmer Powders (Atlantis Burst & Meteorite Shower) to achieve this. I started with a panel of Bristol Smooth card stock and sprayed it with a little water. I then sprinkled the powders overtop. I used a paint brush to move the color around while adding more water where needed to cover the entire panel. After the panel was completely dry, I splattered it with thinned white paint.  

Sunny Studio Stamps: Scenic Route Circle Snowflake Frame Dies Layered Snowflake Frame Dies Foxy Christmas Winter Themed Holiday Card by Leanne West

I layered the snowy landscape over the sky panel with foam tape and then adhered the completed scene to an A2 size card base. I combined stamps and a die cut for the greeting. The stamped warm wishes is from Heartfelt Wishes. The winter die cut word is from the Layered Snowflake Frame set. To finish off the card I added a few die cut snowflakes scattered around the greeting.  

Sunny Studio Supplies Used:

Heartfelt Wishes Stamps
Shop at:
Sunny Studio
Foxy Christmas Stamps
Shop at:
Sunny Studio
Foxy Christmas Dies
Foxy Christmas Dies
Shop at:
Sunny Studio
Scenic Route Stamps
Scenic Route Stamps
Shop at:
Sunny Studio
Scenic Route Dies
Scenic Route Dies
Shop at:
Sunny Studio
Layered Snowflake Frame
Shop at:
Sunny Studio
Snowflake Circle Frame
Shop at:
Sunny Studio