Friday, October 4, 2019

Feeling Frosty Cards with Rachel and Candice

Hello! It's Rachel here and I have a fun double layer shaker card to share with you today featuring the new Feeling Frosty Stamp Set! I love shaker cards and making them double layered adds twice the fun because it adds room for some dimension.

Sunny Studio Stamps: Feeling Frosty Christmas Garland Frame Die Woodland Borders Winter Themed Card by Rachel Alvarado

The Feeling Frosty Set is filled with the cutest snowmen! I started my card by stamping my images onto a sheet of Neenah Solar White 110lb Card Stock and coloring them with Copies. I used the coordinating Feeling Frosty Dies to cut them out. For my background, I trimmed a piece of Neenah Solar White 110lb Card Stock and blended it with some Mermaid Lagoon Distress Oxide Ink. I then splattered this piece with some water to give the blending some texture.

Sunny Studio Stamps: Feeling Frosty Christmas Garland Frame Die Woodland Borders Winter Themed Card by Rachel Alvarado

Once dry, I then splattered it generously with some diluted Opaque White Paint to resemble falling snow. Once my background was ready, I added a few pine trees and a stitched snow drift using the Woodlands Border Die Set and some white card stock. Since this was my bottom layer, I adhered these pieces with liquid adhesive directly to my ink blended background.

I then liberally added some chunky white glitter to this first layer and used .25" wide 3D Foam Tape and a piece of clear acetate to seal it off. Once this layer was secure, I started to work on my second layer. I added another stitched snow drift to this layer once again using the Woodlands Borders Die. I glued this piece directly to the acetate below it. I also did the same with my snowmen and gift images.

Sunny Studio Stamps: Feeling Frosty Christmas Garland Frame Die Woodland Borders Winter Themed Card by Rachel Alvarado

I then repeated the same process with adding some chunky white glitter, foam tape, and acetate to this second layer. I used less glitter on the second layer so that it wouldn't cover my snowmen too much when laying flat.

To finish off my card, I added a thin white white frame to which I had attached a gorgeous frame of garland in white using the new Christmas Garland Frame Die. I love the final effect!

Thanks so much for taking the time to stop by today! If you want a good video tutorial for this type of technique, check out THIS video by Jennifer McGuire. Have a lovely weekend!

----------------------------------------------------

It's Friday and I wish you all a crafty weekend ahead! Candice here and can I tell you how excited I am to be sharing my first official post with you on the Sunny Studio's Design Team?!  Just look at how cute this new Holiday release is!

Sunny Studio Stamps: Feeling Frosty Layered Snowflake Frame Die Scenic Route Woodland Borders Winter Themed Card by Candice Fisher

I truly love how Sunny Studio stamps sets can easily be combined!  For this card, I used:

I began my card by creating an 8 1/2 x 3 1/2 card base which fits perfectly into the size 9A envelopes.

Sunny Studio Stamps: Feeling Frosty Layered Snowflake Frame Die Scenic Route Woodland Borders Winter Themed Card by Candice Fisher

I first stamped the snowmenhouses & kiddos, colored them with Copic markers, and used the coordinating dies listed above for each set. I then heat embossed the sentiment in silver and trimmed to a banner.

For the background, I inked the sky using peacock feathers, tumbled glass & shabby shutters, gluing the houses right at the green glow. Next, I created my snowhills from the AMAZING new Subtle Grey Tones 6x6 paper.  I know I will be going back to this pack often, so many possibilities with this set!

Sunny Studio Stamps: Feeling Frosty Layered Snowflake Frame Die Scenic Route Woodland Borders Winter Themed Card by Candice Fisher

To put the card together, I layered the snowhills and pop dotted the images along them, adding the sentiment along the bottom. For the final touch, I added a bit of sparkle with some glitter snowflakes.

If you haven't seen the full new holiday release, take some time to check it out here.  You will absolutely fall in love! Thank you for visiting!

Sunny Studio Supplies Used:

Fall Kiddos Stamps
Fall Kiddos Stamps
Shop at:
Sunny Studio
Fall Kiddos Dies
Fall Kiddos Dies
Shop at:
Sunny Studio
Woodland Borders Dies
Shop at:
Sunny Studio
Subtle Grey Tones Paper
Shop at:
Sunny Studio
Feeling Frosty Stamps
Shop at:
Sunny Studio
Feeling Frosty Dies
Feeling Frosty Dies
Shop at:
Sunny Studio
Scenic Route Stamps
Scenic Route Stamps
Shop at:
Sunny Studio
Scenic Route Dies
Scenic Route Dies
Shop at:
Sunny Studio
Layered Snowflake Frame
Shop at:
Sunny Studio
Christmas Garland Frame
Shop at:
Sunny Studio

Thursday, October 3, 2019

Season's Greetings Cards with Anja and Vanessa

Hello everyone, Anja here and I'm so excited to share my first project made with new products from the amazing Holiday Release. Today I'm highlighting the Season's Greetings Stamps which I combined with the Christmas Garland Frame Die

Sunny Studio Stamps: Season's Greetings Christmas Garland Frame Dies Holiday Card by Anja Bytyqi

First, I created a watercolor background using Nuvo Shimmer Powders. I let it dry completely and stamped the oversized 'Greetings' sentiment in VersaMark Ink and heat embossed it with WOW! Metallic Platinum Sparkle Embossing Glitter. The other sentiment was white heat embossed on a strip of matching silver cardstock.

Sunny Studio Stamps: Season's Greetings Christmas Garland Frame Dies Holiday Card by Anja Bytyqi

I also stamped the tree sprigs and berries with dye inks. In addition, I heat embossed the berries with clear embossing powder to make them shiny. I used the coordinating dies to cut out the images.

I die cut the pretty intricate tree bough frame with the help of a metal shim and adhered it on top of the watercolor background. To finish off my card, I added a couple of Nuvo Dragon Scales Dream Drops.

Thank you so much for stopping by! Have a wonderful day!

---------------------------------------------------

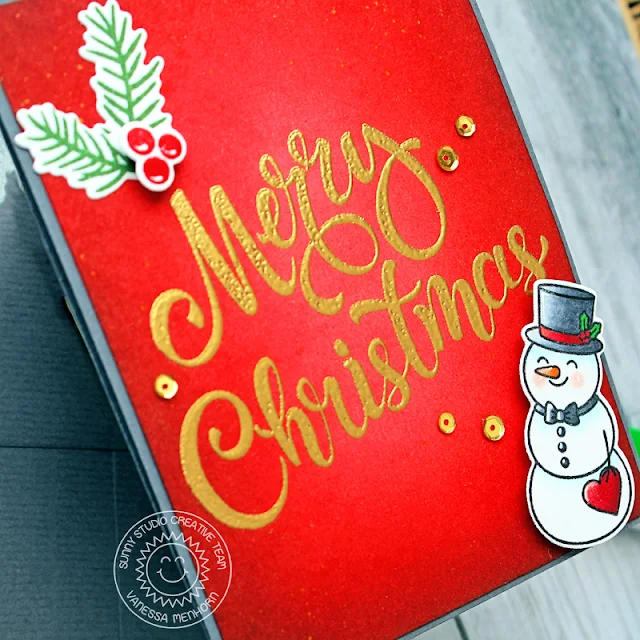
Hello to you! Vanessa here today with a bright Christmas card using the new Season's Greetings set. I love the huge, bold sentiments:

Sunny Studio Stamps: Season's Greetings Feeling Frosty Holiday Card by Vanessa Menhorn

First, I inked a panel of white cardstock with red Distress Inks. After this was dried, I stamped the sentiment with Versamark ink and heat-embossed it with gold embossing powder. Then I applied tiny gold droplets and adhered the panel to the card base. 

Sunny Studio Stamps: Season's Greetings Feeling Frosty Holiday Card by Vanessa Menhorn

Now I stamped the leaves, berries and the snowman from Feeling Frosty, colored the image with Copics, die-cut all the elements with the matching dies and adhered everything to the card. Finally, I added gold sequins.

I love this release! I hope you, too! See you next week, thanks for stopping by!

Sunny Studio Supplies Used:

Season's Greetings Stamps
Shop at:
Sunny Studio
Season's Greetings Dies
Shop at:
Sunny Studio
Feeling Frosty Stamps
Shop at:
Sunny Studio
Feeling Frosty Dies
Feeling Frosty Dies
Shop at:
Sunny Studio
Christmas Garland Frame
Shop at:
Sunny Studio

Wednesday, October 2, 2019

Santa Claus Lane Cards with Ana and Franci

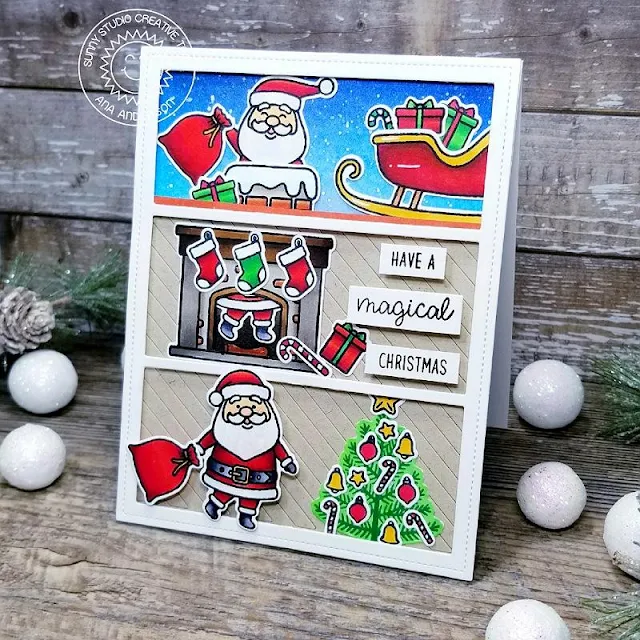
Hello everyone!! It’s Ana here today with a card featuring super adorable Santa Claus Lane stamps and dies from the newest 2019 holiday release.

Sunny Studio Stamps: Santa Claus Lane Frilly Frames Dies Comic Strip Everyday Dies Holiday Card by Ana Anderson

I started with stamping, coloring and cutting the images from the stamp set. I decided to create 3 little scenes with Santa coming through the chimney and bringing presents. I used Comic Strip Everyday Dies which I altered to create 3 identical windows for my scenes. Comic Strip Everyday Dies cut 5 windows – I used scissors to cut the partitions and created a custom 3 widow die cut.

Sunny Studio Stamps: Santa Claus Lane Frilly Frames Dies Comic Strip Everyday Dies Holiday Card by Ana Anderson

I started working on my background next. For the sky I used Chipped Sapphire and Black Soot distress inks then added white splatter for the falling snow.

Sunny Studio Stamps: Santa Claus Lane Frilly Frames Dies Comic Strip Everyday Dies Holiday Card by Ana Anderson

For the bottom light brown wall backgrounds I die cut kraft cardstock using Frilly Frames Stripes Dies. To create the look of wood planks I left all die cuts in place and adhered them all as one piece.

Sunny Studio Stamps: Santa Claus Lane Frilly Frames Dies Comic Strip Everyday Dies Holiday Card by Ana Anderson

Once the background panels were completed, I added comic strip frame popping it up with craft foam. I adhered the images then added the sentiment (from Santa Claus Lane Stamps) and my little Christmas scene was finished.

Thank you so much for stopping by today! Until next week I wish you happy crafting!

-----------------------------------------------

Hi there and happy Wednesday! Franci here with you and I'm so excited I can finally start showing you all the projects I made/ I'm making (I love this release so much I can't stop creating!!) with the new Sunny Studio products. Today's card is a Christmas traditional card with Santa, lots of presents and a little darling snowman.

Sunny Studio Stamps: Santa Claus Lane Feeling Frosty Hogs & Kisses Scenic Route Holiday Card by Franci Vignoli

Awww.. how sweet and festive is this? I love love, looove making Christmas/ winter projects as many of you may know and all these new goodies make me so happy!

First of all I created my card base out of white cardstock and I covered the front with this gorgeous new patterned paper from the new Very Merry 6x6 Paper pack. Then I stamped my snowy landscape from the Scenic Route stamp set, I colored it with my Copics, die cut it with its coordinated dies, trimmed to size and glued it down to my card.

Sunny Studio Stamps: Santa Claus Lane Feeling Frosty Hogs & Kisses Scenic Route Holiday Card by Franci Vignoli

Then I stamped, colored and die cut more images from all these new sets: Santa Claus Lane coordinated diesFeeling Frosty + coordinated dies and Hog and Kisses + coordinated dies. I assembled my little scene and I glued everything down with a combo of liquid glue and foam tape.

Sunny Studio Stamps: Santa Claus Lane Feeling Frosty Hogs & Kisses Scenic Route Holiday Card by Franci Vignoli

I love having the sentiment in a speech bubble here, seems like my images are having fun chit chatting about Holidays! And look at that background moon, it's not the photo guys, I'm telling you, it seems like it's shining for real!! Finally I added lots of details with a white gel pen to all my images plus rosy cheeks as I usually do :) 

Hope you like my Christmas card today and thanks a lot for stopping by! 

Sunny Studio Supplies Used:

Comic Strip Everyday Dies
Shop at:
Sunny Studio
Frilly Frames Stripes Die
Shop at:
Sunny Studio
Very Merry 6x6 Paper
Shop at:
Sunny Studio
Santa Claus Lane Stamps
Shop at:
Sunny Studio
Santa Claus Lane Dies
Shop at:
Sunny Studio
Feeling Frosty Stamps
Shop at:
Sunny Studio
Feeling Frosty Dies
Feeling Frosty Dies
Shop at:
Sunny Studio
Scenic Route Stamps
Scenic Route Stamps
Shop at:
Sunny Studio
Scenic Route Dies
Scenic Route Dies
Shop at:
Sunny Studio
Hogs & Kisses Stamps
Shop at:
Sunny Studio
Hogs & Kisses Dies
Hogs & Kisses Dies
Shop at:
Sunny Studio

Tuesday, October 1, 2019

Layered Poinsettia Cards with Angelica and Juliana

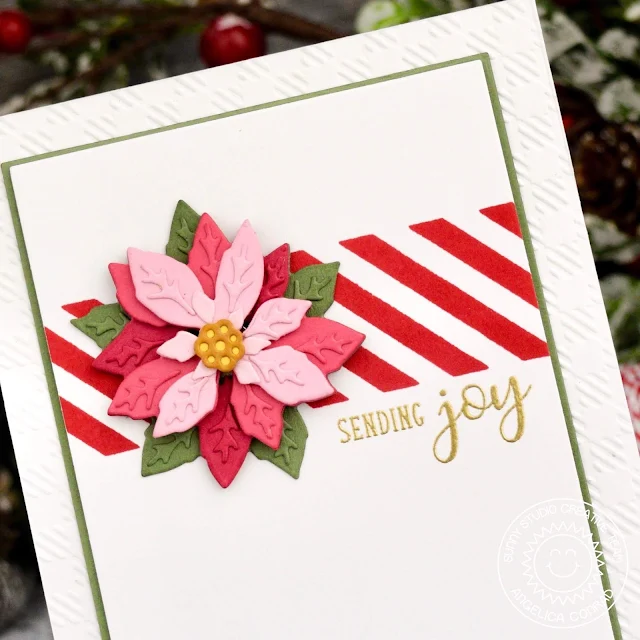
Hi Friends! Angelica here, and I am so excited to share my first Christmas Release project! Today we are focusing on the beautiful Layered Poinsettia Die Set.

Sunny Studio Stamps: Layered Poinsettia Dies Petite Poinsettias Background Basics Holiday Card by Angelica Conrad

I started by pulling out random scraps of pink card stock. I used a cactus green card stock for the back piece. Before assembling the flower together, I used Scor Tape to add a small minus (-) side magnet to the middle of the green bottom layer. I die-cut the pieces, then pieced the poinsettia together with thin foam squares and glue.

Sunny Studio Stamps: Layered Poinsettia Dies Petite Poinsettias Background Basics Holiday Card by Angelica Conrad

I used the stripe stamp from the Background Basics stamp set to add red stripes, then stamped and gold heat-embossed a sentiment from the Petite Poinsettias stamp set. I trimmed the panel down, and added the positive magnet to the back of the panel with Scor Tape. I used thin foam squares to attach the panel to a cactus green panel. I used the new Buffalo Plaid Embossing Folder to emboss white card stock, and attached it to a card base. I added the stamped panel with Scor Tape to the card base to finish the card.

Sunny Studio Stamps: Layered Poinsettia Dies Petite Poinsettias Background Basics Holiday Card by Angelica Conrad

Now the recipient has a pretty Poinsettia that can be kept out when it's time to put the Christmas cards away! I hope I have given you ideas on ways to use this die. That's all that I have for today. Thanks for stopping by!

------------------------------------------------------

Hello Sunny Studio Friends! It's Juliana here and today I'm excited to share my first Christmas card of the season! I'm featuring the Sunny Studio Layered Poinsettia Die paired with the Christmas Garland Frame Die and the Woodgrain Embossing Folder for a slightly rustic design.

Sunny Studio Stamps: Layered Poinsettia Dies Christmas Garland Frame Dies Holiday Card by Juliana Michaels

I began by die cutting a mix of red, green and yellow cardstock using the Layered Poinsettia Die. After all the die cutting, I lightly inked the edges using Vintage Photo Distress Ink and an ink blending tool. Using a fine tipped liquid adhesive applicator, I adhered all of the layers together. I found it helpful to refer to the instructions that come with the die to help line up all the layers. I repeated this twice to have a flower for each corner of my card.

Sunny Studio Stamps: Layered Poinsettia Dies Christmas Garland Frame Dies Holiday Card by Juliana Michaels

Next, I took a piece of green cardstock and die cut it using the tree garland frame from the Christmas Garland Frame Die. This die is super intricate and I highly recommend using a metal shim to get a clean cut with your manual die cutting machine.

Sunny Studio Stamps: Layered Poinsettia Dies Christmas Garland Frame Dies Holiday Card by Juliana Michaels

I knew I wanted to achieve a slightly rustic feel, so I cut a piece of white cardstock to 4.25 x 5.5 inches and embossed it with the Woodgrain Embossing Folder. I then adhered the tree garland frame on top of this. For the sentiment, I die cut a piece of yellow cardstock using the Merry Christmas phrase from the Christmas Garland Frame Die. I adhered this to the center of the framed piece. I then adhered the poinsettia die cuts using double sided foam adhesive. For further embellishment, I added some berries using the red pearls from the Rainbow Pearls.

Sunny Studio Stamps: Layered Poinsettia Dies Christmas Garland Frame Dies Holiday Card by Juliana Michaels

Thanks so much for stopping by today! I hope you enjoyed the slightly rustic style Christmas Card featuring the Layered Poinsettia Die, Christmas Garland Frame Die and Woodgrain Embossing Folder.

Sunny Studio Supplies Used:


Petite Poinsettias Stamps
Shop at:
Sunny Studio
Background Basics Stamps
Shop at:
Sunny Studio
Buffalo Plaid Embossing
Shop at:
Sunny Studio
Woodgrain Embossing
Woodgrain Embossing
Shop at:
Sunny Studio
Layered Poinsettia Dies
Shop at:
Sunny Studio
Christmas Garland Frame
Shop at:
Sunny Studio